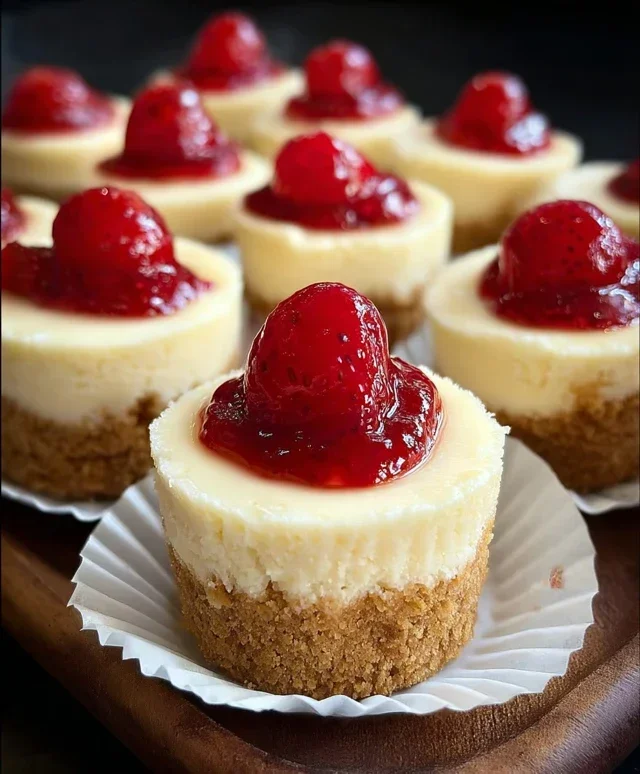
Super Easy Mini Cheesecakes Vanilla Wafer Crust
Super Easy Mini Cheesecakes with Vanilla Wafer Crust are the answer to all your dessert dreams! Have you ever craved that rich, creamy, tangy perfection of cheesecake, but dreaded the fuss of a full-sized pie? I know I have! That’s precisely why I’m so thrilled to share this recipe with you today. These delightful little treats capture all the decadent flavor of traditional cheesecake, but with a delightful twist that makes them unbelievably simple to prepare. People absolutely adore them because they deliver that satisfyingly sweet and smooth experience in a perfectly portioned, no-fuss package. What truly makes these Super Easy Mini Cheesecakes with Vanilla Wafer Crust so special is the harmonious blend of the buttery, crum extractbly vanilla wafer base and the luscious, velvety cream cheese filling. They’re ideal for parties, a sweet afternoon pick-me-up, or simply when you need a little indulgence without the commitment of a whole cake.

Super Easy Mini Cheesecakes with Vanilla Wafer Crust
Sometimes, the craving for a decadent dessert hits, but the thought of a complicated, multi-step recipe can be a real buzzkill. That’s where these super easy mini cheesecakes come in! They deliver all the creamy, dreamy goodness of a classic cheesecake without any of the fuss. The secret? A simple vanilla wafer crust and a filling that comes together in minutes. These individual cheesecakes are perfect for portion control, elegant enough for guests, and so incredibly delicious, you’ll want to make them again and again. Let’s get baking!
Ingredients:
Preparing the Crust
The foundation of our delightful mini cheesecakes is a simple yet effective crust made from vanilla wafer cookies. The sweetness and subtle spice of the vanilla wafers perfectly complement the rich cheesecake filling. To start, we need to transform these cookies into fine crum extractbs. A food processor is your best friend here, making this task quick and effortless. Simply add the 15 vanilla wafer cookies to your food processor and pulse until they form a fine, sandy texture. If you don’t have a food processor, don’t worry! You can achieve this by placing the cookies in a sturdy resealable bag and then crushing them with a rolling pin or the bottom of a heavy pan. Once you have your crum extractbs, it’s time to bind them together. In a small bowl, combine the vanilla wafer crum extractbs with about 2 tablespoons of melted butter (not listed in the strict ingredient list above, but a crucial binder for most crusts – for this recipe, the moisture from the cream cheese will actually help bind them, making it even simpler!). Press this crum extractb mixture firmly into the bottom of your mini muffin cups. I like to use silicone mini muffin liners for easy removal, but you can also use greased paper liners or even a greased mini muffin tin if you’re careful when removing. Ensure the crust is packed down evenly so you have a stable base for your cheesecake filling. This initial step sets the stage for a delightful textural contrast in every bite.
Whipping Up the Creamy Filling
Now for the star of the show: the cheesecake filling! The key to a smooth and creamy filling is ensuring your cream cheese is truly softened. This means taking it out of the refrigerator at least an hour, or even two, before you plan to start mixing. Softened cream cheese will blend much more easily and prevent any lumps in your final cheesecake. In a large mixing bowl, add the 16 ounces of full-fat cream cheese. Beat this with an electric mixer (handheld or stand mixer) on medium speed until it’s completely smooth and creamy. Scrape down the sides of the bowl as needed. Next, gradually add the ¾ cup of granulated sugar. Continue to beat until the sugar is fully incorporated and the mixture is light and fluffy. This process incorporates air, which helps the cheesecakes achieve a pleasant texture.
The next step involves adding the eggs. It’s important that your 2 large eggs are at room temperature. Cold eggs can cause the cream cheese mixture to curdle, so if yours are cold, a quick trick is to place them in a bowl of warm water for about 10 minutes. Add the eggs one at a time, beating well after each addition until just combined. Overmixing after adding the eggs can lead to cracked cheesecakes, so be gentle here. Finally, stir in the 1 teaspoon of vanilla bean paste or vanilla extract. Vanilla bean paste will give you those beautiful little specks and a more intense vanilla flavor, but good quality vanilla extract works wonderfully too. Mix until it’s just incorporated. The filling should be smooth, luscious, and ready to be spooned over our prepared crusts.
Assembling and Baking the Mini Cheesecakes
With our crusts pressed and our filling gloriously smooth, it’s time to bring it all together. Carefully spoon the cream cheese filling over the vanilla wafer crusts in each mini muffin cup. Fill each cup about two-thirds of the way full. Don’t overfill, as the cheesecakes will puff up slightly as they bake. You want to leave a little room for them to rise and then settle.
Now, preheat your oven to 325°F (160°C). Place your filled mini muffin tin on a baking sheet. This is a good habit as it makes it easier to transfer the tin in and out of the oven and catches any potential drips. Bake for approximately 18-22 minutes, or until the edges of the cheesecakes are set and the centers are just slightly jiggly. They should not be liquidy, but a gentle nudge should reveal a slight wobble. Overbaking can lead to dry cheesecakes, so keep a close eye on them.
Cooling and Garnishing for Perfection
Once baked, remove the cheesecakes from the oven and let them cool in the mini muffin tin for about 10-15 minutes. This initial cooling period is crucial for them to firm up. After this, you can carefully remove them from the tin and place them on a wire rack to cool completely. Patience is key here; allowing them to cool fully at room temperature ensures the best texture. Once they are completely cool, it’s time for the crowning glory: the cherry pie filling! Gently spoon a dollop of the canned cherry pie filling over the top of each mini cheesecake. The sweet and tart cherries are the perfect counterpoint to the rich, creamy cheesecake. These mini cheesecakes are best served chilled, so once they are garnished, pop them into the refrigerator for at least an hour to firm up. You can also make these a day in advance, which makes them perfect for parties or make-ahead treats. Enjoy the simple pleasure of these incredibly easy and utterly delicious mini cheesecakes!
Conclusion:
And there you have it – the recipe for super easy mini cheesecakes with vanilla wafer crust! I truly hope you’ve enjoyed learning how straightforward and rewarding making these delightful treats can be. The beauty of this recipe lies in its simplicity; no complicated water baths, no endless chilling, just pure, unadulterated cheesecake joy in a perfectly portioned size. These mini cheesecakes are incredibly versatile and make for a stunning dessert at any gathering, a sweet afternoon pick-me-up, or even a special treat just for yourself.
For serving, they’re fantastic on their own, but I love topping them with a dollop of whipped cream and a fresh berry. You could also drizzle them with chocolate sauce, caramel, or a fruit compote. Thinking about variations? Absolutely! Try adding a hint of lemon zest to the batter for a brighter flavor, or sprinkle a little cinnamon into the vanilla wafer crust for a warm spice note. You can even experiment with different cookie crum extractbs for the base, like grabeef ham crackers or shortbread. I wholeheartedly encourage you to give these a try. They’re a guaranteed crowd-pleaser and will make you feel like a baking pro, even if you’re a complete begin extractner!
Frequently Asked Questions:
Q: Can I make these cheesecakes ahead of time?
A: Yes! These mini cheesecakes are perfect for making ahead. You can prepare them up to 2 days in advance and store them covered in the refrigerator. They often taste even better after the flavors have had a chance to meld overnight.
Q: My vanilla wafer crust seems crum extractbly. Is that okay?
A: A little crum extractbliness is perfectly fine! The key is to press it firmly into the muffin tin. Even if it’s not a completely solid crust, it will still hold together well once the cheesecake filling is baked and chilled. Don’t worry about it being perfectly uniform; rustic charm is part of the appeal!
Super Easy Mini Cheesecakes with Vanilla Wafer Crust
Quick and simple mini cheesecakes with a classic vanilla wafer crust and sweet cherry topping.
Ingredients
-
15 vanilla wafer cookies
-
16 ounces full-fat cream cheese, softened
-
¾ cup granulated sugar
-
2 large eggs, at room temperature
-
1 teaspoon vanilla bean paste or vanilla extract
-
1 can cherry pie filling
Instructions
-
Step 1
Preheat oven to 325°F (160°C). Line a muffin tin with 12 paper liners. -
Step 2
Crush vanilla wafer cookies into fine crumbs. Press about 1 tablespoon of crumbs into the bottom of each muffin liner to form the crust. -
Step 3
In a medium bowl, beat softened cream cheese and granulated sugar until smooth and well combined. Beat in eggs one at a time until just incorporated. Stir in vanilla bean paste or vanilla extract. -
Step 4
Spoon the cream cheese mixture evenly over the cookie crusts in the muffin liners. -
Step 5
Bake for 18-22 minutes, or until the edges are set and the centers are slightly jiggly. -
Step 6
Let cheesecakes cool in the muffin tin for 10 minutes, then transfer to a wire rack to cool completely. -
Step 7
Once cooled, top each mini cheesecake with cherry pie filling.
Important Information
Nutrition Facts (Per Serving)
It is important to consider this information as approximate and not to use it as definitive health advice.
Allergy Information
Please check ingredients for potential allergens and consult a health professional if in doubt.