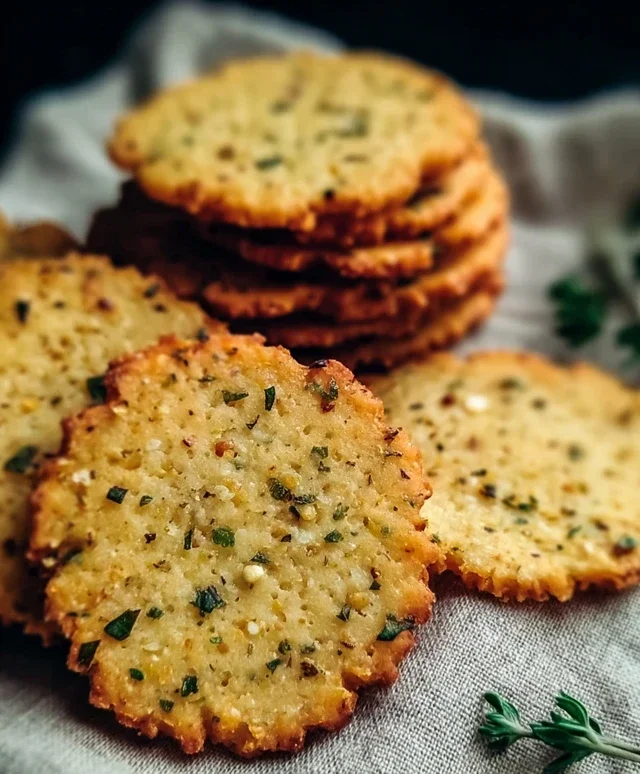
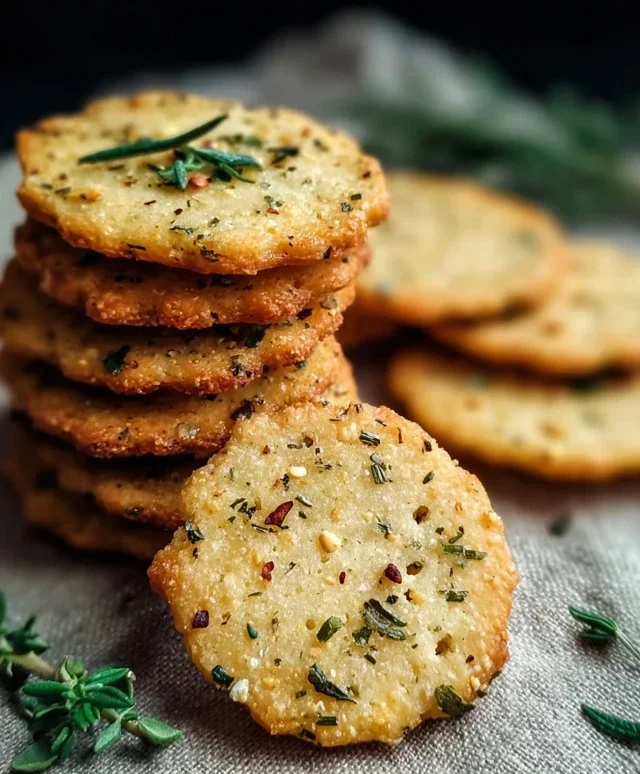
Garlic Herb Chickpea Flour Snack Crackers-Easy Recipe
Garlic and Herb Chickpea Flour Snack Crackers are about to become your new obsession! Forget those bland, store-bought options; these homemade delights are a revelation. I stumbled upon this recipe when I was craving a crunchy, savory snack that also felt good to eat. What I love most about these garlic and herb chickpea flour snack crackers is their incredible versatility. They’re perfect for dipping into hummus or guacamole, topping with your favorite cheese, or just enjoying on their own when that afternoon hunger strikes. The nutty undertones of the chickpea flour combine beautifully with the pungent garlic and aromatic herbs, creating a flavor profile that’s both complex and incredibly satisfying. This recipe is special because it’s naturally gluten-free, packed with plant-based protein, and surprisingly easy to whip up, proving that healthy snacking can be absolutely delicious and exciting.
Garlic and Herb Chickpea Flour Snack Crackers
These garlic and herb chickpea flour snack crackers are incredibly simple to make and absolutely delicious. They are a fantastic gluten-free and vegan alternative to store-bought crackers, perfect for dipping, topping, or just enjoying on their own. The aroma that fills your kitchen as these bake is simply divine, a warm and savory promise of the crispy, flavorful goodness to come. I love that I can control exactly what goes into them, making them a healthy and satisfying snack for any time of day.
Ingredients:
Instructions:
Prepare the Dough: In a medium-sized mixing bowl, I start by combining the dry ingredients: the chickpea flour, dried mixed herbs, garlic powder, salt, and black pepper. I give these a good whisk to ensure everything is evenly distributed. This step is crucial for consistent flavor in every bite. Next, I make a well in the center of the dry ingredients and pour in the water and the 2 tablespoons of olive oil. I then use a spoon or a spatula to gradually incorporate the wet ingredients into the dry, mixing until a cohesive dough forms. It might seem a little sticky at first, but keep mixing. If it feels too dry and crum extractbly, add a tiny bit more water, just a teaspoon at a time, until it comes together. Conversely, if it’s too wet and sticky, add a touch more chickpea flour. The goal is a dough that’s pliable and not overly sticky.
Rest the Dough: Once the dough has come together, I cover the bowl with a clean kitchen towel or plastic wrap and let it rest for about 10-15 minutes. This resting period allows the chickpea flour to absorb the liquid fully, making the dough easier to handle and roll out. It’s a small step, but it makes a noticeable difference in the final texture of the crackers. While the dough is resting, I preheat my oven to 375°F (190°C) and line a large baking sheet with parchment paper. This prevents sticking and makes cleanup a breeze.
Roll and Shape the Crackers: This is where the magic really starts to happen! I lightly flour a clean work surface with a little extra chickpea flour. Then, I turn out the rested dough onto the floured surface. I like to use a rolling pin to roll out the dough as thinly as possible, aiming for about 1/16th to 1/8th of an inch thickness. The thinner you roll it, the crispier your crackers will be. It’s important to be patient here and roll evenly. If the dough starts to stick, don’t hesitate to add a little more flour to the surface and the rolling pin. I then use a pizza cutter or a sharp knife to cut the rolled-out dough into your desired cracker shapes. Squares, rectangles, or even fun freeform shapes are all great options. You can also use cookie cutters if you’re feeling creative!
Season and Bake: Now for the delicious part – the toppings! I carefully transfer the cut cracker shapes onto the prepared baking sheet, leaving a little space between each one. I then brush the tops of the crackers with a little extra olive oil. This helps them to brown nicely and gives them a lovely sheen. Sprinkle generously with sesame seeds, flaky sea salt, and a pinch of additional dried herbs. The flaky sea salt adds a delightful crunch and a burst of savory flavor that complements the herbs and garlic perfectly. This is where you can really customize your crackers to your liking. Some days I go heavy on the rosemary, other days I prefer a more balanced herb mix.
Bake to Perfection: I bake the crackers in the preheated oven for approximately 15-20 minutes, or until they are golden brown and crisp around the edges. The exact baking time will depend on how thinly you rolled your dough and the size of your crackers. Keep a close eye on them, especially in the last few minutes, as they can go from perfectly crisp to burnt very quickly. I like to rotate the baking sheet halfway through the baking time to ensure even cooking. Once they are done, I carefully remove the baking sheet from the oven and let the crackers cool completely on a wire rack. They will continue to crisp up as they cool. Once cooled, they are ready to be devoured! Store any leftovers in an airtight container at room temperature for up to a week.
Conclusion:
I hope you’re as excited to try these Garlic and Herb Chickpea Flour Snack Crackers as I am to share them! This recipe is a fantastic way to create a delicious, healthy, and incredibly satisfying snack right in your own kitchen. The beauty of these crackers lies in their simplicity, their wholesome ingredients, and their delightful crunch. They’re naturally gluten-free and packed with plant-based protein thanks to the chickpea flour, making them a guilt-free indulgence for any time of day. The aromatic garlic and herb blend adds a burst of flavor that will have you reaching for more.
These versatile crackers are perfect on their own for a quick energy boost, or they can be elevated into something truly special. Try serving them with your favorite hummus, a creamy avocado dip, or a sharp cheese. They also make a wonderful base for canapés or a unique addition to a charcuterie board. Don’t be afraid to get creative with variations! You could experiment with different herbs like rosemary or thyme, add a pinch of chili flakes for a spicy kick, or even incorporate seeds like sesame or poppy for added texture and flavor.
I truly encourage you to give these Garlic and Herb Chickpea Flour Snack Crackers a try. They’re a rewarding bake that delivers on both taste and texture, and I’m confident you’ll be delighted with the results. Happy baking!
Frequently Asked Questions:
Q: Can I make these crackers ahead of time?
Absolutely! These crackers store beautifully in an airtight container at room temperature for up to a week. This makes them ideal for meal prepping and having healthy snacks readily available.
Q: What if I don’t have fresh herbs? Can I use dried herbs instead?
Yes, you can definitely use dried herbs. A good rule of thumb is to use about one-third the amount of dried herbs compared to fresh. So, if the recipe calls for 1 tablespoon of fresh parsley, use about 1 teaspoon of dried parsley.
Q: My crackers seem a bit too hard. How can I adjust the texture?
The texture can be influenced by a few factors. Ensure you’re not over-baking them; watch for a golden-brown edge. Also, the thickness of your rolled-out dough plays a role. Rolling them slightly thicker can result in a chewier cracker, while rolling them thinner will yield a crisper result. You might also find that a slightly shorter baking time helps achieve a softer cracker.
Garlic and Herb Chickpea Flour Snack Crackers
Crispy and flavorful snack crackers made with chickpea flour, garlic, and herbs. Perfect for dipping or enjoying on their own.
Ingredients
-
1 cup chickpea flour (besan)
-
½ cup water
-
2 tablespoons olive oil
-
1 teaspoon dried mixed herbs (such as rosemary, thyme, oregano)
-
1 teaspoon garlic powder
-
½ teaspoon salt
-
¼ teaspoon black pepper
-
Sesame seeds
-
Flaky sea salt
-
Additional dried herbs
-
Extra olive oil for brushing
Instructions
-
Step 1
Preheat your oven to 350°F (175°C). Line a baking sheet with parchment paper. -
Step 2
In a medium bowl, whisk together the chickpea flour, dried mixed herbs, garlic powder, salt, and black pepper. -
Step 3
Gradually add the water and 2 tablespoons of olive oil to the dry ingredients, mixing until a smooth, thick batter forms. It should be like a thick pancake batter. -
Step 4
Pour the batter onto the prepared baking sheet and spread it thinly and evenly using an offset spatula or the back of a spoon. Aim for a uniform thickness for even baking. -
Step 5
Sprinkle the top generously with sesame seeds, flaky sea salt, and additional dried herbs. -
Step 6
Lightly brush the surface with extra olive oil. -
Step 7
Bake for 20-25 minutes, or until the edges are golden brown and the crackers are firm and crisp. They may crackle as they bake. -
Step 8
Once baked, let the crackers cool completely on the baking sheet before breaking them into pieces or cutting them into desired shapes.
Important Information
Nutrition Facts (Per Serving)
It is important to consider this information as approximate and not to use it as definitive health advice.
Allergy Information
Please check ingredients for potential allergens and consult a health professional if in doubt.