Easy Easter Rice Krispie Treats – Fun Spring Dessert
Easter Rice Krispie Treats are more than just a nostalgic childhood snack; they’re a vibrant explosion of springtime joy, a delightful canvas for your creativity, and frankly, one of my absolute favorite ways to celebrate Easter! There’s something undeniably magical about that perfect chewy, gooey, crispy texture that instantly brings a smile to anyone’s face. This beloved treat, already a crowd-pleaser, gets a festive makeover for the Easter season, transforming from its simple, classic form into a whimsical edible masterpiece. What makes these Easter Rice Krispie Treats truly special is their incredible adaptability. Whether you’re looking for simple, pastel-colored delights or elaborate, decorated confections, these treats can do it all. They’re incredibly fun to make with kids, offering a sweet and satisfying project that ends with a delicious reward. Get ready to hop into some serious fun and whip up a batch of these utterly delightful Easter Rice Krispie Treats that are guaranteed to be the star of your dessert table!
Easter Rice Krispie Treats
Easter mornings are a time for joy, colorful decorations, and of course, delicious treats! While the hunt for Easter eggs and the anticnon-alcoholic ipation of the Easter bunny are exciting for kids, a simple yet delightful treat like Rice Krispie treats can elevate the festivities even further. These Easter-themed Rice Krispie treats are incredibly easy to make, incredibly customizable, and sure to be a hit with everyone, from the youngest egg hunters to the grown-ups enjoying a quiet moment with their coffee. Forget complicated baking projects; these no-bake wonders are a perfect way to add a touch of homemade sweetness to your Easter celebration. We’re going to transform the classic, gooey, crispy goodness into a festive spectacle with a touch of spring color and a sprinkle of Easter cheer.
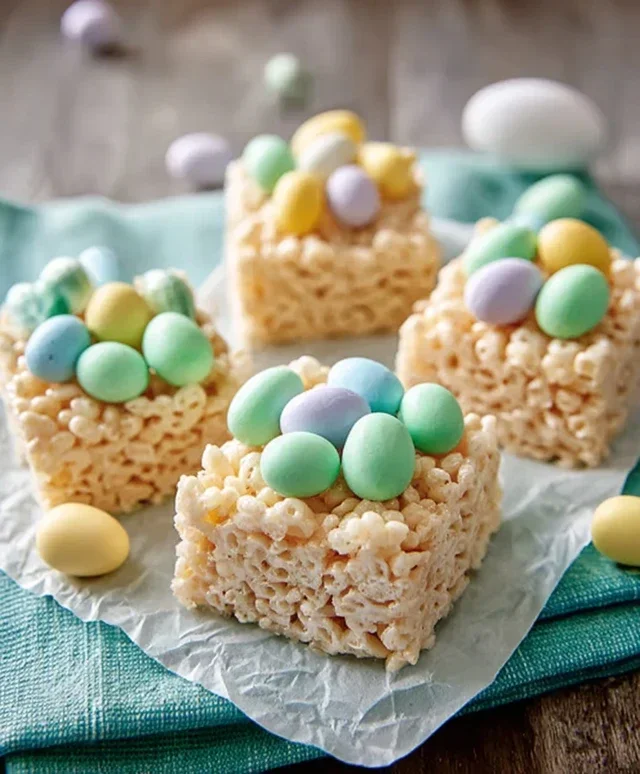
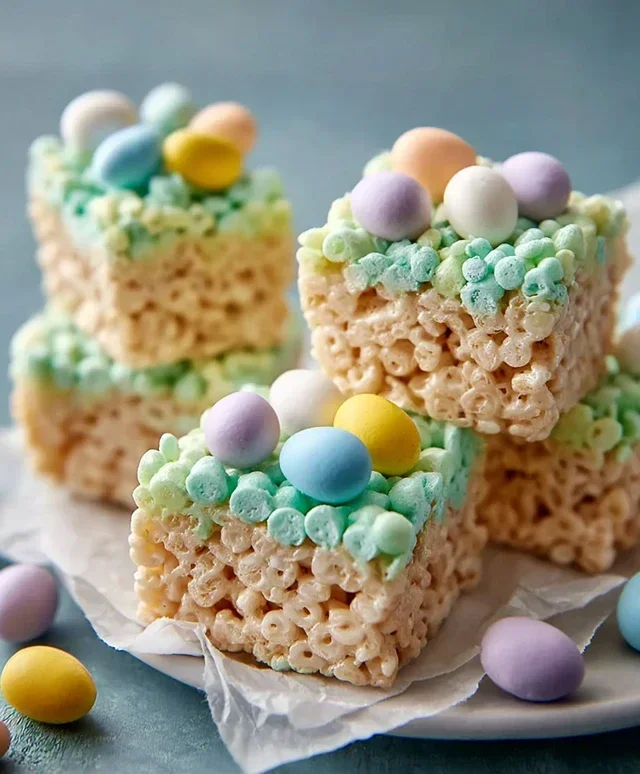
The beauty of this recipe lies in its simplicity. With just a few pantry staples and a little bit of creativity, you can whip up a batch of these cheerful treats in no time. They’re perfect for a last-minute addition to your Easter dessert table, a fun activity to do with the kids, or simply a way to brighten your day. We’ll be infusing them with a lovely pastel green color, reminiscent of fresh spring grass, and then adorning them with classic Easter candies. Get ready to impress your family and friends with these delightful and easy-to-make Easter Rice Krispie Treats!
Ingredients:
Preparing Your Easter Rice Krispie Treats
The process of making these festive treats is wonderfully straightforward. It’s a hands-on activity that brings a sense of accomplishment without the stress of precise measurements or oven temperatures. We’ll start by melting our marshmallows, then incorporate the crunchy cereal, and finally, bring in the festive colors and decorations.
1. Melting the Marshmallows: In a large, microwave-safe bowl, combine the 16 ounces of marshmallows with 2 tablespoons of unsalted butter. Microwave on high in 30-second intervals, stirring well after each interval, until the marshmallows are completely melted and smooth. This usually takes about 2 to 3 minutes in total, depending on your microwave. Be careful not to overheat them, as they can become tough and difficult to work with. Once melted, stir in the 1 teaspoon of vanilla extract. This adds a lovely subtle flavor that complements the sweetness of the marshmallows.
2. Incorporating the Cereal: Once your marshmallow mixture is smooth and fragrant, it’s time to add the star of the show: the Rice Krispies cereal! Gently fold in the 7 cups of Rice Krispies cereal until each crispy piece is coated in the gooey marshmallow goodness. It’s important to do this while the marshmallow mixture is still warm and pliable. Use a sturdy spatula or wooden spoon for this step, as the mixture can become quite thick. Don’t overmix; just ensure all the cereal is incorporated.
3. Creating the Easter Green Base: Now for the fun part – the color! To achieve our Easter green hue, we’ll prepare a simple glaze. In a separate medium bowl, whisk together the ½ cup of unsalted butter (melted and slightly cooled), ¼ cup of milk, and 3 to 4 cups of powdered sugar. Start with 3 cups of powdered sugar and add more if you desire a thicker, more opaque glaze. Whisk until the mixture is smooth and lump-free. Add a few drops of green food coloring, starting with a small amount and adding more until you achieve your desired pastel green shade. Stir thoroughly to ensure the color is evenly distributed. This glaze will give our Rice Krispie treats their lovely spring color and a slightly different texture.
4. Assembling and Decorating: Line a 9×13 inch baking pan with parchment paper or aluminum foil, leaving some overhang on the sides to make it easier to lift the treats out later. You can also lightly grease the pan if you prefer. Press the Rice Krispie cereal mixture evenly into the prepared pan. It helps to use a piece of wax paper or lightly buttered hands to prevent sticking as you press. Once the cereal mixture is pressed into the pan, gently pour the green glaze over the top, spreading it evenly to cover the surface. While the glaze is still wet, immediately scatter your Easter egg candies over the top. This is where you can get creative! Arrange them in patterns, sprinkle them liberally, or create little Easter scenes. The candies will adhere to the glaze as it begin extracts to set.
5. Cooling and Cutting: Allow the Easter Rice Krispie treats to cool completely at room temperature for at least 1 to 2 hours. Resist the temptation to cut them too soon, as this can lead to a messy, crum extractbly result. Patience is key here! Once fully set, use the parchment paper overhang to lift the entire slab out of the pan. Place it on a cutting board and cut into squares or rectangles using a sharp knife. For an extra festive touch, you can use Easter-shaped cookie cutters after the treats have cooled enough to be handled but are still slightly pliable. Store your delicious Easter Rice Krispie Treats in an airtight container at room temperature for up to 3 days. Enjoy the sweet taste of spring!
Conclusion:
There you have it! Our delightful Easter Rice Krispie Treats recipe is incredibly simple to make, making it a perfect activity for both seasoned bakers and little helpers in the kitchen. The beauty of this recipe lies in its minimal ingredients, quick preparation time, and the sheer joy it brings to everyone’s faces. It’s a fantastic way to infuse your Easter celebrations with a touch of homemade charm and delicious sweetness. Imagin extracte a table laden with these colorful, festive treats – they’re guaranteed to be a hit!
These Easter Rice Krispie Treats are wonderful on their own, but they also shine when paired with other Easter desserts. Consider serving them alongside your favorite Easter cake or a platter of festive cookies. For a fun twist, you can get creative with toppings! Think about drizzling them with melted white chocolate and adding pastel-colored sprinkles, or even pressing in some mini chocolate eggs for an extra surprise. The possibilities are endless, and I highly encourage you to give this recipe a try. It’s a sure-fire way to create sweet memories this Easter season.
Frequently Asked Questions:
Can I make these Easter Rice Krispie Treats ahead of time?
Absolutely! These treats are perfect for making a day or two in advance. Simply store them in an airtight container at room temperature. For best freshness, avoid refrigerating, as this can make them too hard.
What are some other fun Easter-themed shapes I can make?
Beyond the classic squares, you can use Easter-themed cookie cutters to create adorable shapes like bunnies, eggs, or carrots. Just press the mixture into your baking pan as usual, then let it cool slightly before cutting out your shapes.
Easter Rice Krispie Treats
Festive and easy-to-make Rice Krispie treats dyed green and decorated with Easter candy.
Ingredients
-
16 ounces marshmallows
-
7 cups Rice Krispies cereal
-
2 tablespoons unsalted butter
-
½ cup unsalted butter
-
3-4 cups powdered sugar
-
¼ cup milk
-
1 teaspoon vanilla extract
-
Green food coloring
-
Easter egg candies (mini chocolate eggs or jelly beans)
Instructions
-
Step 1
Grease a 9×13 inch baking pan with butter or cooking spray. -
Step 2
In a large microwave-safe bowl, melt 2 tablespoons of butter with the marshmallows on high power in 30-second intervals, stirring after each, until smooth and completely melted. -
Step 3
Stir in the vanilla extract. -
Step 4
Add the Rice Krispies cereal and stir until well coated. -
Step 5
In a separate bowl, melt ½ cup of butter. Whisk in the powdered sugar and milk until a smooth glaze forms. Add green food coloring and stir until evenly distributed. -
Step 6
Pour the green glaze over the cereal mixture and stir gently to coat. Be careful not to break up the cereal too much. -
Step 7
Press the mixture evenly into the prepared pan. Sprinkle with Easter egg candies while still sticky. -
Step 8
Let cool completely before cutting into squares.
Important Information
Nutrition Facts (Per Serving)
It is important to consider this information as approximate and not to use it as definitive health advice.
Allergy Information
Please check ingredients for potential allergens and consult a health professional if in doubt.