Keto Mug Cheesecake – Quick & Easy Low Carb Dessert
Keto cheesecake in a mug. Yes, you read that right! Imagin extracte the decadent, creamy, tangy bliss of classic cheesecake, but in a fraction of the time and with zero guilt. This isn’t some watered-down imitation; it’s the real deal, perfectly portioned and ready to satisfy your deepest dessert cravings. Why do we all adore cheesecake? It’s that perfect balance of sweetness and subtle sourness, the luxurious texture that melts in your mouth, and the sheer indulgence it represents. And when you can whip up a keto cheesecake in a mug in just minutes, that indulgence becomes an everyday possibility. This recipe is special because it ditches the baking, the complex steps, and the massive carb count, delivering pure, unadulterated cheesecake joy right to your spoon. Get ready to transform your ordinary mug into a dessert masterpiece.
Keto Cheesecake In a Mug
Craving a rich, creamy, and satisfying dessert but sticking to your ketogenic lifestyle? Look no further! This Keto Cheesecake In a Mug recipe is your answer. It’s incredibly simple, requires just a few minutes of prep, and delivers all the decadent flavor of a traditional cheesecake without the carbs. Perfect for those moments when a sweet tooth strikes, this recipe allows you to indulge guilt-free. You can whip this up in the microwave in under 5 minutes, making it the ultimate speedy dessert solution. Let’s get started on creating your personal portion of keto-friendly bliss.
Ingredients:
Instructions:
Prep your mug and ingredients. First things first, grab a microwave-safe mug. A standard 8-10 ounce mug works perfectly. Make sure your cream cheese is softened. This is crucial for achieving a smooth, lump-free batter. You can leave it on the counter for about 30 minutes before you start, or gently microwave it for 10-15 seconds (be careful not to melt it completely). The egg should also be at room temperature, as this helps it incorporate more easily into the batter and prevents it from cooking unevenly in the microwave. If you forgot to take your egg out, you can place it in a bowl of warm water for about 5-10 minutes to bring it up to temperature.
Combine the base ingredients. In your mug, add the softened cream cheese, sour cream, and powdered monkfruit sweetener. Use a fork or a small whisk to vigorously mix these ingredients together until they are completely smooth and creamy. You want to ensure there are no lumps of cream cheese remaining. This is the foundation of your cheesecake, so taking a moment to get it nice and smooth will pay off in the final texture. The powdered sweetener is important here; granulated sweeteners can leave a gritty texture, and we’re aiming for pure creaminess.
Incorporate the egg and vanilla. Now, crack your room-temperature egg directly into the mug with the cream cheese mixture. Add the vanilla extract as well. Gently whisk everything together again with your fork until just combined. Be careful not to overmix at this stage. Overmixing the egg can incorporate too much air, which might cause the cheesecake to puff up too much and then deflate dramatically, or even lead to a slightly rubbery texture. Just ensure the egg is fully incorporated and the batter is homogenous. The vanilla extract is key to providing that classic cheesecake aroma and flavor that we all know and love.
Microwave your mug cheesecake. Place the mug in the microwave. Cook on high power for about 60 to 90 seconds. The exact cooking time will vary depending on the wattage of your microwave. Keep a close eye on it! You’re looking for the edges to be set and slightly puffed, while the center should still be a little jiggly. It will continue to cook and set as it cools. If you overcook it, it can become dry and rubbery, so it’s better to err on the side of slightly undercooked and let it finish setting on its own. If after 60 seconds it still looks very liquid, microwave in 15-second increments until it reaches the desired consistency.
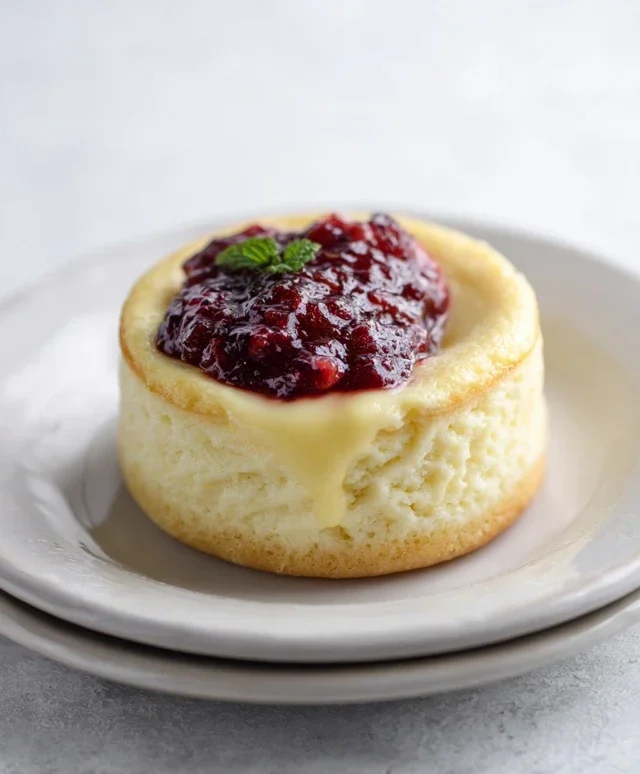
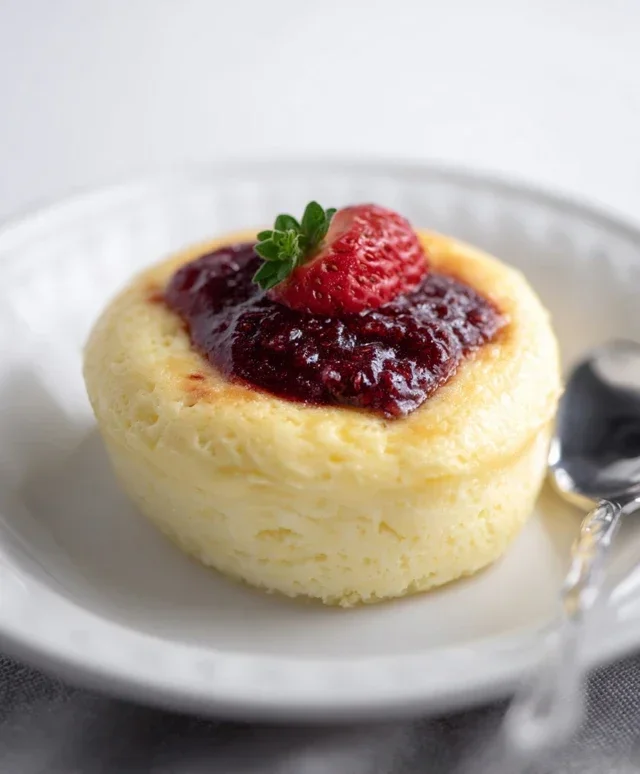
Cool and enjoy! Carefully remove the hot mug from the microwave. Let it sit on the counter for at least 5 minutes to cool down and set completely. The residual heat will continue to cook the cheesecake, making it perfectly firm. Once cooled, you can enjoy it straight from the mug! For an extra special treat, you can top your keto cheesecake with a dollop of whipped cream (sweetened with a touch of monkfruit if desired), a few fresh berries (like raspberries or blueberries, in moderation), or a sprinkle of cinnamon. This simple dessert is proof that you don’t need to sacrifice flavor or enjoyment when following a low-carb lifestyle. It’s a wonderfully quick and satisfying way to satisfy your dessert cravings.
Conclusion:
There you have it – the ridiculously easy and utterly delicious Keto Cheesecake In a Mug! This recipe is an absolute lifesaver when that dessert craving hits, offering a satisfyingly creamy and rich experience without derailing your low-carb journey. Its beauty lies in its speed and simplicity; in mere minutes, you can transform basic ingredients into a decadent treat that feels truly indulgent. I love how versatile it is, and it’s perfect for those moments when you just need a personal portion of something sweet.
For serving suggestions, I often top mine with a few fresh berries like raspberries or blueberries, a drizzle of sugar-free chocolate syrup, or even a sprinkle of chopped nuts for added texture. It’s also wonderful on its own! Feel free to experiment with variations too. Add a pinch of cinnamon for a spiced version, a swirl of lemon zest for a brighter flavor, or even a drop of peppermint extract for a festive twist. I truly encourage you to give this Keto Cheesecake In a Mug a try; it’s a game-changer for any cheesecake lover on a keto diet.
Frequently Asked Questions:
Can I make this ahead of time?
While it’s best enjoyed fresh for that perfect creamy texture, you can prepare the batter a few hours in advance and then microwave it when you’re ready to eat. The texture might be slightly less firm, but it will still be delicious.
What if I don’t have a microwave?
You can adapt this recipe for the oven! Pour the batter into a small ramekin and bake at 350°F (175°C) for about 15-20 minutes, or until the edges are set and the center is just slightly jiggly. Let it cool before enjoying.
Can I use different sweeteners?
Absolutely! You can substitute your favorite keto-friendly sweetener, such as erythritol, xylitol (use with caution if you have pets as it’s toxic to them), or allulose, in equal amounts. Adjust to your personal taste preference.
Keto Cheesecake In a Mug
A quick and easy keto-friendly cheesecake made in a mug, perfect for a single serving dessert.
Ingredients
-
3 1/2 tbsp cream cheese (softened, 52g)
-
1/2 tbsp sour cream (7g)
-
2 tbsp powdered monkfruit sweetener (20g)
-
1 egg (room temperature)
-
1/4 tsp vanilla extract
Instructions
-
Step 1
In a microwave-safe mug, combine softened cream cheese and sour cream. Stir until smooth. -
Step 2
Add the powdered monkfruit sweetener and vanilla extract to the mug. Mix well. -
Step 3
Whisk in the room temperature egg until just combined. Do not overmix. -
Step 4
Microwave on high for 60-90 seconds, or until the edges are set and the center is still slightly jiggly. -
Step 5
Let the cheesecake cool in the mug for a few minutes before serving. You can also chill it in the refrigerator for a firmer texture.
Important Information
Nutrition Facts (Per Serving)
It is important to consider this information as approximate and not to use it as definitive health advice.
Allergy Information
Please check ingredients for potential allergens and consult a health professional if in doubt.