Bunny Rabbit Cake Recipe – Cute & Easy Easter Treat
Bunny Rabbit Cake is more than just a dessert; it’s a whimsical journey back to childhood, a celebration staple that never fails to bring smiles. Who doesn’t remember the pure delight of spotting a beautifully decorated bunny, its ears perked, ready to be devoured? This iconic cake holds a special place in so many hearts, evoking memories of Easter mornings, birthday parties, and the sheer joy of creating something magical. It’s the perfect centerpiece for any spring gathering or a charming surprise for little ones (and let’s be honest, grown-ups too!). What truly makes our Bunny Rabbit Cake recipe special is its delightful simplicity and the endless possibilities for personalization. You can keep it classic or get creative with vibrant colors and edible decorations. Let’s hop into the kitchen and create some edible magic!
Bunny Rabbit Cake
Welcome to a delightful baking adventure! Today, we’re diving into the creation of a charming Bunny Rabbit Cake. This recipe is perfect for Easter, spring birthdays, or just to bring a smile to someone’s face. It’s a relatively straightforward cake to assemble, and the decorating possibilities are endless. We’ll be using a simple, moist vanilla cake as our base, which is a crowd-pleaser and a fantastic canvas for our bunny design.
This recipe is designed to be approachable for bakers of all skill levels. Don’t be intimidated by the “cake decorating” aspect; we’ll break it down into easy-to-follow steps. The key to a successful bunny cake is good preparation, so let’s gather our ingredients and get ready to create some magic!
Ingredients:
Instructions:
First things first, let’s preheat our oven and prepare our cake pans. This is a crucial step to ensure your cakes bake evenly and don’t stick. Preheat your oven to 350 degrees Fahrenheit (175 degrees Celsius). Grease and flour your two 9-inch round cake pans. You can do this by lightly coating the inside of the pans with butter or non-stick baking spray, and then dusting them with a tablespoon or two of flour, tapping out any excess. This creates a non-stick surface that will help your cakes slide out beautifully once baked.
Now, let’s get our dry ingredients ready. In a medium bowl, whisk together the all-purpose flour, baking powder, and salt. Whisking these ingredients helps to distribute the leavening agent (baking powder) and salt evenly throughout the flour, which is essential for a consistent cake texture. Set this bowl aside.
In a large bowl, cream together the softened unsalted butter and granulated sugar. Use an electric mixer on medium speed until the mixture is light and fluffy. This process, called creaming, incorporates air into the butter and sugar, which contributes to the cake’s tender crum extractb and helps it rise. This usually takes about 3-5 minutes. Next, beat in the eggs one at a time, making sure to scrape down the sides of the bowl after each addition. After all the eggs are incorporated, stir in the vanilla extract. The vanilla extract adds a lovely aroma and flavor to our cake base.
Now, we’ll alternate adding our dry ingredients and the milk to the wet ingredients. Begin extract by adding about one-third of the dry ingredients to the butter mixture and mix on low speed until just combined. Then, add half of the milk and mix until just incorporated. Repeat this process, adding another third of the dry ingredients, the remaining milk, and finally the last of the dry ingredients. Be careful not to overmix the batter once the flour is added. Overmixing can develop the gluten in the flour, resulting in a tough cake. Mix only until no streaks of flour remain.
Divide the batter evenly between your prepared cake pans. You can use a kitchen scnon-alcoholic ale to ensure an even distribution, or simply eyeball it. Smooth the tops of the batter with a spatula. Place the pans in your preheated oven and bake for 25-30 minutes, or until a wooden skewer or toothpick inserted into the center of the cakes comes out clean. Baking times can vary depending on your oven, so start checking around the 25-minute mark. Once baked, remove the cakes from the oven and let them cool in the pans for about 10-15 minutes. This allows the cakes to firm up slightly before you attempt to remove them.
After the initial cooling period in the pans, carefully invert the cakes onto a wire cooling rack to cool completely. This is very important! Trying to frost warm cakes will result in a melted, messy situation. Patience here is key. While your cakes are cooling, you can prepare your frosting. If you’re using store-bought, you can simply open it up. If you’re making your own, follow your favorite buttercream recipe. We’ll want a good amount of frosting to assemble and decorate our bunny.
Assembling Your Bunny
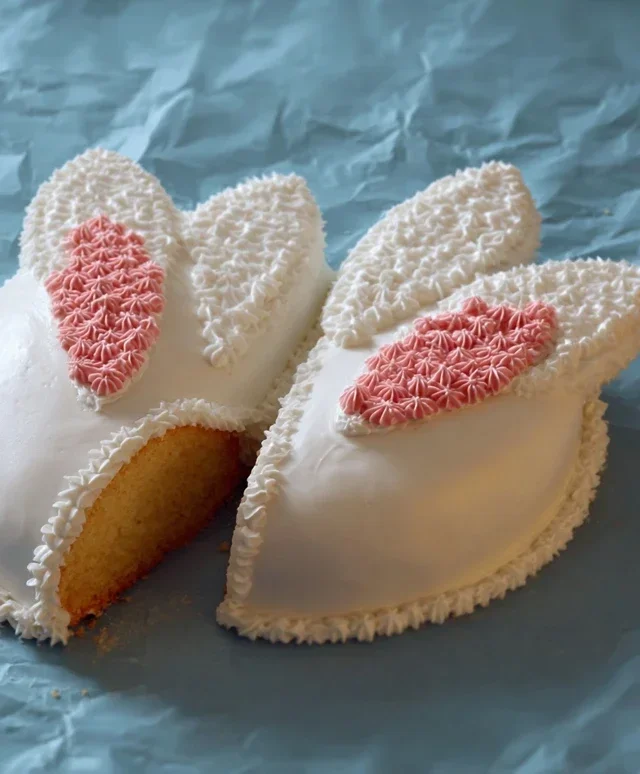
Once your cakes are completely cool, it’s time to transform them into a cute bunny! We’ll use one of the round cakes as the bunny’s body. The other round cake will be used to create the ears. Take your second cooled cake and carefully cut it in half. Then, cut each half into an oval shape, tapering one end to create the basic ear shape. You can use a sharp knife for this. Don’t worry about perfect symmetry at this stage; we can tidy them up with frosting.
Place the whole round cake onto your serving platter or cake board. This is the base of your bunny. Now, spread a generous layer of frosting over the top of this round cake, creating a smooth surface for the ears. Arrange the two oval cake pieces on top of the round cake to form the bunny’s ears. You can position them pointing upwards, or slightly angled for a more playful look.
Now for the fun part – frosting the entire bunny! Using your main colored frosting (white or a light pastel is classic for a bunny), generously frost the entire cake, including the round body and the ear pieces. Use an offset spatula or a butter knife to spread the frosting smoothly. Don’t worry if you’re not a professional decorator; a slightly rustic look can be very charming for a homemade cake. Make sure to frost the sides of the cake too, to fully enclose the bunny shape.
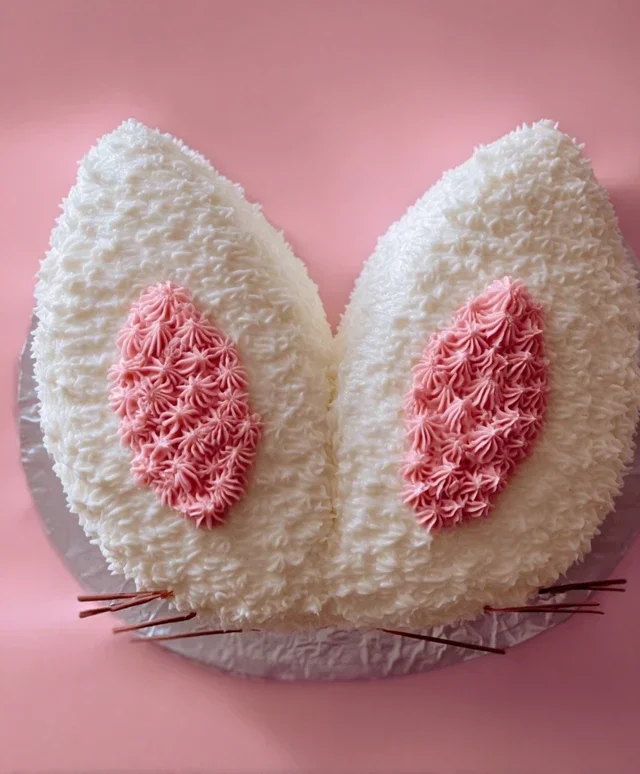
To give your bunny some character, we’ll add a touch of pink for the inner ears. Take a small amount of your white frosting and mix it with a bit of pink frosting or a few drops of pink gel food coloring. You can also use a separate bowl for this. Using a small spatula or even a spoon, carefully apply this pink frosting to the center of each ear, creating the inner ear detail. You can gently blend the edges into the white frosting if you like.
Finally, let’s add the finishing touches. You can use a piping bag with a round tip to pipe a little pink frosting for the bunny’s nose, or use a small candy nose. You can also use small candies or chocolate chips for the eyes. If you want a fluffy texture, you can use a star tip to pipe small rosettes all over the cake, mimicking fur. A light dusting of confectioners’ sugar can also add a snow-like effect if you wish. For extra flair, add some colorful sprinkles around the base of the cake.
Your adorable Bunny Rabbit Cake is now ready to be admired and devoured! This is a cake that’s as much fun to make as it is to eat. Enjoy the process and the delightful results!
Conclusion:
And there you have it – a delightful recipe for a Bunny Rabbit Cake that’s sure to bring smiles to any occasion! This recipe is truly wonderful because it’s not only visually adorable, making it a perfect centerpiece for Easter, spring birthdays, or just a fun weekend baking project, but it’s also surprisingly straightforward to make. The combination of moist cake and sweet frosting creates a taste that’s as delightful as its appearance. We’ve shared how to achieve that charming bunny shape and decorate it to perfection. Don’t be afraid to get creative with your frosting colors and sprinkle choices!
For serving, this Bunny Rabbit Cake is fantastic on its own, allowing its design to shine. However, a dollop of fresh whipped cream or a scoop of vanilla ice cream makes for an extra special treat. If you’re looking for variations, consider using a different cake flavor like lemon or carrot cake. You could also experiment with cream cheese frosting for a tangy twist. We truly encourage you to give this Bunny Rabbit Cake a try; it’s an incredibly rewarding baking experience that results in a show-stopping dessert.
Frequently Asked Questions:
Can I make this cake ahead of time?
Yes, you can absolutely bake and frost the cake a day in advance. Store it covered at room temperature. This can be a great time-saver!
What if I don’t have piping bags for decorating?
No problem at all! You can use a sturdy zip-top bag with a corner snipped off for piping. For simpler designs, a butter knife or spatula can be used to spread the frosting to create texture, which can look quite charming and rustic on our Bunny Rabbit Cake.
How do I store leftover Bunny Rabbit Cake?
Store any leftover cake in an airtight container at room temperature for up to 2-3 days. If your frosting contains cream cheese or other dairy that needs refrigeration, it’s best to refrigerate the cake.
Bunny Rabbit Cake
A whimsical cake shaped like a bunny, perfect for Easter or a child’s birthday party. This recipe uses simple ingredients and is designed to be fun to make and decorate.
Ingredients
-
2 cups all-purpose flour
-
1 teaspoon baking soda
-
1/2 teaspoon salt
-
1 cup unsalted butter, softened
-
1 1/2 cups granulated sugar
-
2 large eggs
-
1 teaspoon vanilla extract
-
1 cup buttermilk
-
For Decoration: Powdered sugar, food coloring (pink, brown), small candies
Instructions
-
Step 1
Preheat your oven to 350°F (175°C). Grease and flour two 8-inch round cake pans and one small oven-safe bowl. -
Step 2
In a medium bowl, whisk together the flour, baking soda, and salt. -
Step 3
In a large bowl, cream together the softened butter and granulated sugar until light and fluffy. -
Step 4
Beat in the eggs one at a time, then stir in the vanilla extract. -
Step 5
Alternately add the dry ingredients and the buttermilk to the wet ingredients, beginning and ending with the dry ingredients. Mix until just combined. -
Step 6
Pour the batter evenly into the prepared cake pans and the small bowl. -
Step 7
Bake for 25-30 minutes for the round pans, and 15-20 minutes for the bowl, or until a toothpick inserted into the center comes out clean. -
Step 8
Let the cakes cool in the pans for 10 minutes, then invert onto a wire rack to cool completely. -
Step 9
Once cooled, arrange the cakes to form a bunny shape. Cut and shape as needed. Frost with a simple powdered sugar glaze and decorate with food coloring and candies to resemble a bunny.
Important Information
Nutrition Facts (Per Serving)
It is important to consider this information as approximate and not to use it as definitive health advice.
Allergy Information
Please check ingredients for potential allergens and consult a health professional if in doubt.