No Bake Oreo Nutella Cheesecake Recipe
No Bake Oreo Nutella Cheesecake. Oh, does that phrase alone not send a little shiver of pure dessert bliss down your spine? I know it does for me! This sensational dessert is a crowd-pleaser for a reason – it’s the ultimate indulgence without any of the fuss. Imagin extracte a creamy, dreamy cheesecake filling swirled with that irresistible hazelnut-chocolate magic of Nutella, all nestled on a crunchy, chocolatey Oreo cookie crust. What makes this No Bake Oreo Nutella Cheesecake so special is the perfect harmony of textures and flavors. It’s decadent, yet surprisingly simple to whip up, making it ideal for those moments when you crave something extraordinary but short on time or oven space. It’s the dessert that guarantees smiles and second helpings, every single time.
No Bake Oreo Nutella Cheesecake
Prepare yourself for a dessert that’s an absolute showstopper, yet shockingly easy to make. This No Bake Oreo Nutella Cheesecake is a dreamy combination of crunchy chocolatey goodness and velvety smooth, rich filling. It’s the perfect treat for any occasion, from a casual weeknight indulgence to a special celebration. The beauty of this cheesecake lies in its no-bake nature, meaning no oven wrestling, no tricky water baths, and most importantly, less fuss and more delicious results. The distinct flavors of Oreo cookies and creamy Nutella come together in perfect harmony, creating a dessert that’s both comforting and decadent. I’ve perfected this recipe to ensure every bite is a delightful balance of textures and tastes, and I’m so excited to share it with you.
Ingredients:
Instructions:
Creating the Oreo Crust
The foundation of any great cheesecake is its crust, and for this no-bake wonder, we’re going with a classic Oreo base. It’s incredibly simple to put together and provides that satisfying crunch that perfectly complements the creamy filling. First, take your 200g of Oreos and crush them into fine crum extractbs. You can do this in a food processor for the quickest and most uniform result, or if you don’t have one, place them in a resealable plastic bag and bash them with a rolling pin or the bottom of a heavy pan until finely crushed. The finer the crum extractbs, the more cohesive your crust will be. Once you have your Oreo crum extractbs, add the 50g of melted butter to them. Stir everything together thoroughly until all the crum extractbs are moistened and resemble wet sand. This butter is what binds the crum extractbs together, so ensure it’s evenly distributed.
Next, pour this buttery Oreo mixture into your chosen cheesecake pan. I recommend a 20-23cm (8-9 inch) springform pan for easy removal. Press the mixture firmly and evenly into the bottom of the pan. You can use the back of a spoon or the flat bottom of a measuring cup to achieve a compact and smooth layer. Make sure to push the crum extractbs up the sides slightly if you prefer a raised crust edge. Pop this crust into the freezer for about 15-20 minutes while you prepare the filling. This chilling period helps the crust set and firm up, making it easier to handle and ensuring it doesn’t crum extractble when you slice into the finished cheesecake.
Whipping up the Nutella Cream Cheese Filling
Now for the star of the show: the luscious Nutella cream cheese filling. In a large mixing bowl, beat the 500g of softened cream cheese until it’s wonderfully smooth and creamy. It’s crucial that the cream cheese is at room temperature; cold cream cheese will result in lumps, and nobody wants that! A hand mixer or a stand mixer makes this task a breeze, but you can also use a sturdy whisk if you’re feeling energetic. Once your cream cheese is lump-free and silky, add the 200g of Nutella to the bowl. Gently fold or mix this in until it’s fully incorporated and you have a gorgeously uniform pnon-alcoholic ale brown mixture. Be careful not to overmix at this stage, as we want to keep the airiness of the cream cheese.
In a separate, chilled bowl, whip the 200g of heavy whipping cream with the 50g of sugar until stiff peaks form. This means when you lift the whisk, the cream holds its shape and doesn’t flop over. Again, a clean, chilled bowl and beaters will help achieve the best results and prevent the cream from becoming grainy. Once your whipped cream is ready, gently fold about a third of it into the Nutella cream cheese mixture. This lightens the base and makes it easier to incorporate the rest of the cream. Then, carefully fold in the remaining whipped cream until just combined. You should have a light, airy, and incredibly decadent filling.
Assembling Your Masterpiece
This is where all your efforts come together to create something truly spectacular. Take your chilled Oreo crust out of the freezer. Gently pour the creamy Nutella filling over the crust, spreading it evenly with a spatula or the back of a spoon. Ensure the top is as smooth and level as possible. Now, for an extra layer of texture and flavor, sprinkle the 100g of chopped Oreos over the top of the filling. Don’t be shy; they’ll add wonderful little bursts of crunch. Next, take the 100g of Nutella and warm it slightly. You can do this by placing it in a microwave-safe bowl and microwaving it for about 15-20 seconds, or by placing the jar in a bowl of warm water for a few minutes. This will make it easier to drizzle. Drizzle the warmed Nutella artfully over the top of the cheesecake. You can use a spoon to create swirls or zigzags, or simply pour it in a random pattern – it will look beautiful no matter what.
Finally, it’s time for the finishing touches that make this cheesecake truly irresistible. Carefully place the 6 whole Oreos around the edge or in the center of the cheesecake for a professional and appealing presentation. You can also sprinkle the 5 crushed Oreos (with no filling) over the top for an extra crum extractbly garnish. This adds another layer of texture and visual appeal.
Chilling to Perfection
This no-bake cheesecake needs time to set properly, so don’t be tempted to dig in too soon! Cover the cheesecake loosely with plastic wrap (try not to let it touch the surface of the cheesecake directly if possible, or you might smudge the toppings). Place the cheesecake in the refrigerator and let it chill for a minimum of 4-6 hours, or preferably overnight. The longer it chills, the firmer and easier to slice it will become, and the flavors will meld together beautifully. A good chill is key to achieving that perfect cheesecake texture that’s firm enough to hold its shape but still incredibly creamy.
Serving Your Delicious Creation
Once your cheesecake is thoroughly chilled and set, it’s time to enjoy the fruits of your labor! If you used a springform pan, carefully release the sides. If not, you might want to gently run a thin knife around the edge before releasing. Slice the cheesecake using a sharp knife, wiping the knife clean between each slice for neat edges. Serve chilled and prepare for rave reviews. This No Bake Oreo Nutella Cheesecake is best served cold and is a perfect accompaniment to a cup of coffee or a glass of milk. Leftovers can be stored in an airtight container in the refrigerator for up to 3-4 days. Enjoy every single decadent bite!
Conclusion:
There you have it! A truly decadent and incredibly simple No Bake Oreo Nutella Cheesecake that’s guaranteed to impress. This recipe truly shines because it delivers maximum flavor and creamy, dreamy texture with minimal effort. No oven required means it’s perfect for those hot summer days or when you simply want a delicious dessert without the fuss. The combination of crunchy Oreo crust, rich Nutella swirl, and smooth cream cheese filling is simply irresistible. This no bake wonder is ideal for birthdays, holidays, or just as a special treat to brighten your day. I highly encourage you to give it a try – you won’t be disappointed!
Serving this masterpiece is wonderfully versatile. It’s fantastic on its own, but for an extra touch of indulgence, consider topping it with extra crushed Oreos, a drizzle of melted Nutella, or even a dollop of whipped cream. For variations, don’t be afraid to experiment! You could add a layer of chocolate ganache on top or even incorporate some chopped hazelnuts into the filling for an added crunch. The possibilities are endless, and the base recipe is so forgiving.
Frequently Asked Questions:
Can I make this cheesecake ahead of time?
Absolutely! This No Bake Oreo Nutella Cheesecake is actually best when made a few hours or even a day in advance. This allows the flavors to meld beautifully and the cheesecake to firm up perfectly in the refrigerator.
What if I don’t have Nutella?
No problem! While Nutella provides that signature flavor, you can substitute it with another chocolate-hazelnut spread or even a good quality chocolate ganache for a similar rich, chocolatey experience. You could also try a smooth peanut butter for a different flavor profile.
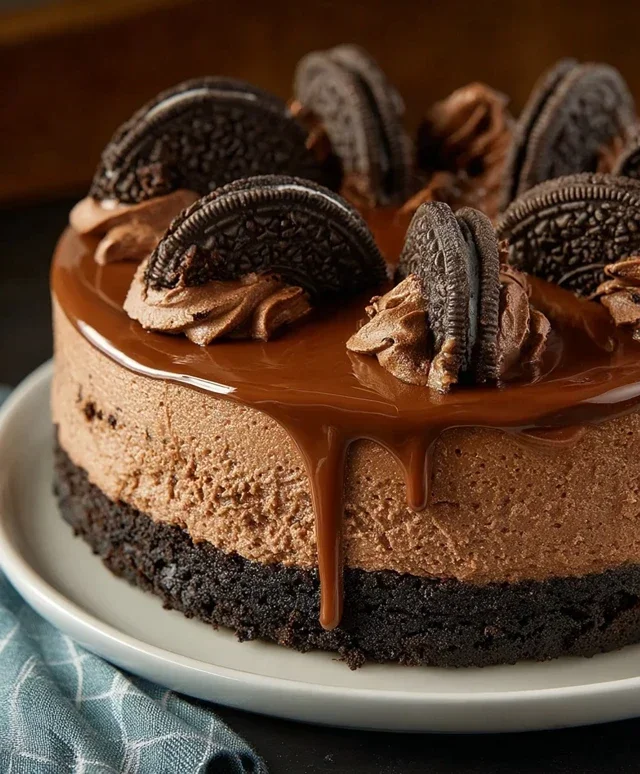
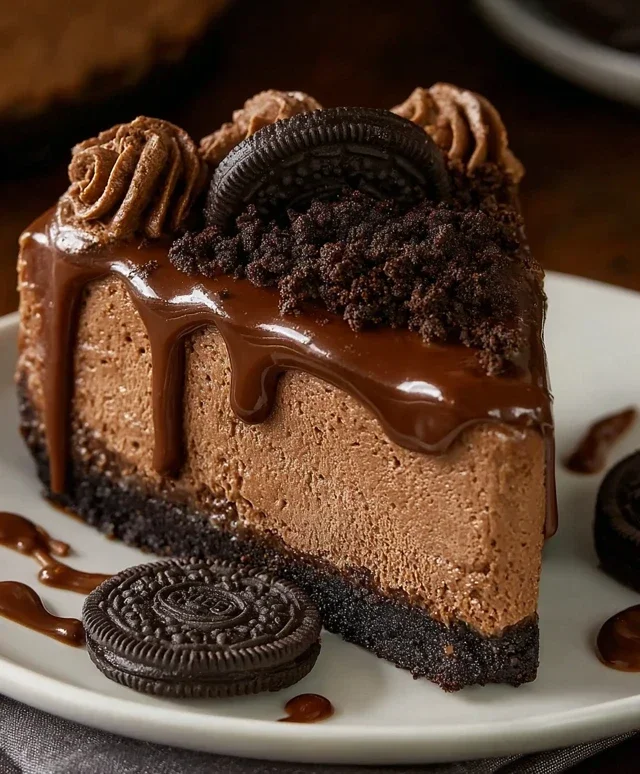
No Bake Oreo Nutella Cheesecake
A decadent no-bake cheesecake featuring a crushed Oreo base, creamy Nutella-fied cream cheese filling, and a crunchy Oreo topping, finished with a warm Nutella drizzle and whole Oreo garnishes.
Ingredients
-
200g crushed Oreos
-
50g melted butter
-
500g cream cheese, softened
-
200g Nutella
-
200g heavy whipping cream (35%)
-
50g sugar
-
100g chopped Oreos
-
100g Nutella
-
100g Nutella, warmed for drizzling
-
5 crushed Oreos (no filling)
-
6 whole Oreos for garnish
Instructions
-
Step 1
Combine crushed Oreos and melted butter. Press firmly into the base of a springform pan. -
Step 2
In a large bowl, beat softened cream cheese until smooth. Gradually beat in 200g Nutella until well combined. -
Step 3
In a separate bowl, whip heavy cream and sugar until stiff peaks form. -
Step 4
Gently fold the whipped cream into the cream cheese and Nutella mixture. -
Step 5
Fold in the chopped Oreos and 100g Nutella. -
Step 6
Pour the filling over the Oreo base and spread evenly. Chill for at least 4 hours, or until set. -
Step 7
Before serving, drizzle with warmed Nutella and garnish with whole Oreos and crushed Oreos (no filling).
Important Information
Nutrition Facts (Per Serving)
It is important to consider this information as approximate and not to use it as definitive health advice.
Allergy Information
Please check ingredients for potential allergens and consult a health professional if in doubt.