Easy Dango Recipe – Simple Sweet Japanese Treat
Easy Dango Recipe: your gateway to a delightful Japanese treat that’s surprisingly simple to make at home! Have you ever dreamt of enjoying those wonderfully chewy, subtly sweet mochi balls, often found glistening with a luscious sauce at festivals or tea houses, without the fuss? Well, dream no more! This easy dango recipe is designed for everyone, from seasoned cooks to kitchen novices, to experience the joy of crafting this beloved confection. What makes dango so special? It’s the irresistible texture – a perfect balance of soft and yielding – and the versatility of its toppings. Whether you prefer the classic mitarashi dango with its savory-sweet soy glaze or a simple dusting of kinako (roasted soybean flour), this easy dango recipe empowers you to create your perfect bite. Get ready to impress yourself and your loved ones with this incredibly satisfying and straightforward culinary adventure.
Easy Dango Recipe
Dango, those delightful chewy rice dumplings, are a quintessential Japanese sweet treat that evokes feelings of joy and simple pleasures. Traditionally enjoyed on special occasions and as a popular street food, making dango at home might seem daunting, but I’m here to show you just how wonderfully easy it can be! This recipe breaks down the process into simple steps, perfect for begin extractners and seasoned cooks alike. We’ll be creating a classic, beautifully colored dango that’s soft, chewy, and incredibly satisfying. Forget pre-made mixes; with just a few common ingredients, you can whip up a batch of homemade dango that’s sure to impress.
This recipe focuses on achieving that perfect texture – slightly firm on the outside, wonderfully soft and yielding on the inside. The sweetness is adjustable, and the optional coloring allows for a beautiful visual appeal. Get ready to impress your friends and family, or simply treat yourself to a delightful afternoon snack.
Ingredients:
Making the Dango Dough
The foundation of perfect dango lies in the dough. It’s a surprisingly simple process that requires just a bit of mixing and kneading. We’ll be combining two types of rice flour: Joshinko, which is non-glutinous and provides structure, and Shiratamako, the glutinous rice flour that gives dango its signature chewy texture. The powdered sugar is optional, but I find it adds a lovely subtle sweetness that complements the chewy rice flavor.
1. Combine Dry Ingredients: In a large mixing bowl, whisk together the Joshinko and Shiratamako flours. If you’re adding powdered sugar for sweetness, whisk that in as well. Ensure everything is thoroughly combined to avoid pockets of flour or sugar in your final dango. This even distribution is key for consistent texture and flavor.
2. Gradually Add Hot Water: Begin extract by pouring about half of the hot water into the flour mixture. Start mixing with your hands or a sturdy spoon. The dough will initially be shaggy and crum extractbly. Continue to gradually add the remaining hot water, a little at a time, mixing continuously. You’re looking for a consistency where the dough starts to come together. The amount of water might vary slightly depending on the humidity and the specific flours you’re using, so it’s important to add it incrementally. You want a dough that is pliable and not sticky. If it feels too dry, add a tiny bit more hot water. If it feels too wet and sticky, you can add a tiny pinch more Joshinko flour.
3. Knead the Dough: Once the dough has formed a cohesive ball, turn it out onto a clean, lightly floured surface (use a little bit of Joshinko flour for dusting). Knead the dough gently for about 5-7 minutes, or until it becomes smooth and elastic. This is similar to kneading bread, but much gentler. The goal is to develop the gluten in the Shiratamako flour, which will contribute to the chegrape juicess. You should be able to press your finger into the dough and have it spring back slowly. Avoid over-kneading, as this can make the dango tough.
Creating Colored Dango
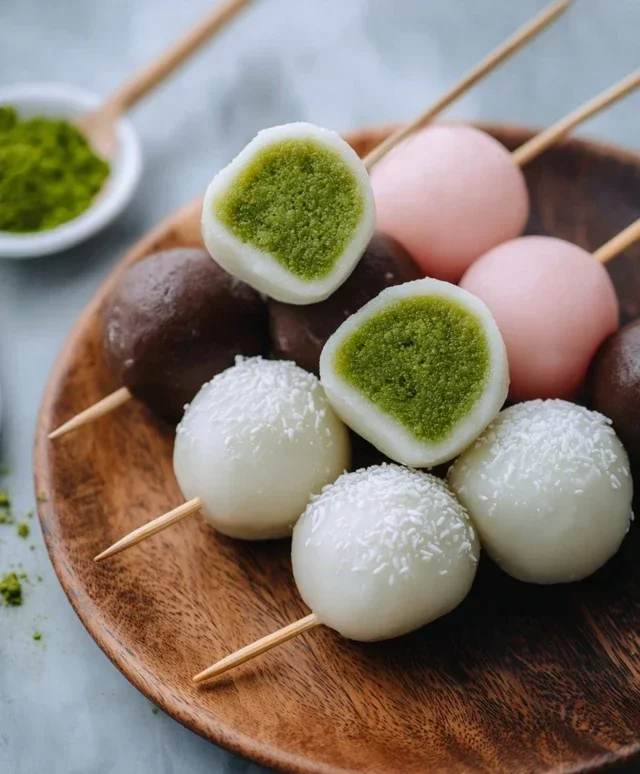
Now for the fun part – adding color! This recipe will show you how to make classic green (matcha) and pink dango. You can also divide the dough into thirds to make three different colors, or even keep some plain.
4. Divide and Color: Divide the dough into three equal portions. For the matcha dango, in a small bowl, mix the matcha powder with 1 teaspoon of water to form a smooth paste. Add one portion of the dough to this bowl and knead it thoroughly until the green color is evenly distributed. It might take a few minutes of kneading to fully incorporate the matcha. For the pink dango, place another portion of dough in a separate bowl and add just one drop of pink food coloring. Knead until the color is uniform. If you desire a more intense pink, you can add another tiny drop, but be careful not to oversaturate the dough. The third portion of dough will remain plain, or you can divide it again for more colors. Ensure your hands are clean between coloring the different doughs to prevent color transfer.
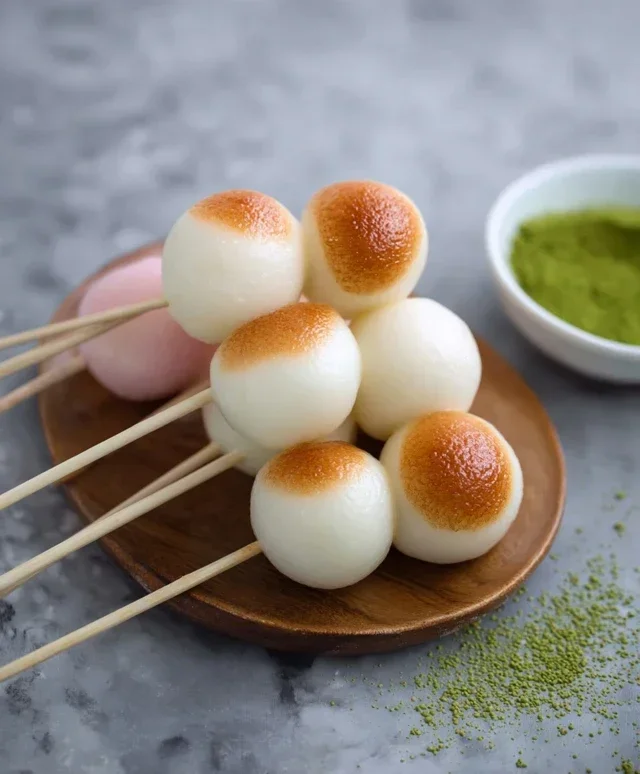
5. Shape the Dango Balls: Take each colored portion of dough and roll it into small, bite-sized balls, about 1 inch in diameter. You can also shape them into slightly flattened discs or teardrop shapes if you prefer. The key is to make them as uniform in size as possible so they cook evenly. Gently roll the dough between your palms. If the dough feels a little stiff, you can re-knead it for a moment to make it more pliable.
Cooking the Dango
Boiling is the traditional and easiest method for cooking dango. It ensures they are cooked through and achieve that perfect chewy texture.
6. Boil the Dango: Bring a large pot of water to a rolling boil. Carefully drop the dango balls into the boiling water, being careful not to overcrowd the pot. You want enough space for them to move around freely. As the dango cook, they will initially sink to the bottom. Once they are done, they will float to the surface. This usually takes about 5-8 minutes. Once they float, let them cook for another minute or two to ensure they are fully cooked through. Use a slotted spoon to remove the dango from the boiling water.
7. Cool and Serve: Immediately transfer the cooked dango to a bowl of ice-cold water or rinse them under cold running water. This shocking process helps to firm up the exterior of the dango and gives them a lovely sheen. Let them drain well.
Dango are delicious served plain, but they are often enjoyed with a glaze. A simple soy sauce-based glaze (mitarashi dango) or a sweet red bean paste (anko) are classic accompaniments. You can also skewer them onto bamboo sticks for a more traditional presentation. Enjoy your homemade, chewy, and delightful dango!
Conclusion:
I hope you’ve enjoyed learning how to make this incredibly simple and delicious Easy Dango Recipe! This recipe truly shines because of its minimal ingredients and straightforward steps, making it accessible for even the most novice bakers. The chewy texture of the dango, combined with your favorite toppings, creates a delightful sweet treat that’s perfect for any occasion. Whether you’re craving a quick afternoon snack, a fun dessert to make with family, or a unique addition to your tea time, this recipe delivers pure satisfaction.
Serving these little dumplings is where the real fun begin extracts! Traditionally, dango is often served skewered on bamboo sticks and coated in a sweet glaze like mitarashi (a soy sauce-based caramel) or anko (sweet red bean paste). However, don’t feel limited! You can also enjoy them plain, dusted with kinako (roasted soybean flour), or even dipped in melted chocolate. For variations, consider adding a touch of matcha powder to the dough for a green tea flavor, or experiment with different types of fruit purees for a fruity twist. I strongly encourage you to give this Easy Dango Recipe a try; you’ll be amazed at how easily you can create these delightful Japanese sweets right in your own kitchen!
Frequently Asked Questions:
What is the best way to store leftover dango?
Leftover dango is best stored in an airtight container at room temperature for up to two days. If you need to store them longer, you can refrigerate them, but be aware that they might become a bit firmer. To rehydrate refrigerated dango, gently warm them in a steamer or microwave for a few seconds.
Can I use other types of flour instead of glutinous rice flour?
While glutinous rice flour is key to achieving the signature chewy texture of dango, you can experiment with a small portion of regular rice flour or even all-purpose flour mixed in. However, using only alternative flours will likely result in a different texture, so it’s best to stick with glutinous rice flour for the most authentic result.
What are some popular topping ideas beyond mitarashi and anko?
Beyond the classics, you can get creative with your toppings! Consider a simple dusting of powdered sugar, a drizzle of honey, or even some fresh fruit like sliced strawberries or blueberries. A sprinkle of toasted sesame seeds can also add a lovely nutty flavor and visual appeal.
Easy Dango Recipe
A simple and quick recipe for making delicious and chewy Japanese dango at home with readily available ingredients.
Ingredients
-
{‘@type’: ‘Ingredient’, ‘name’: ‘Joshinko non-glutinous rice flour’, ‘amount’: ‘1 1/3 cup’, ‘unitCode’: ‘cup’, ‘name_localized’: ‘150 g Joshinko non-glutinous rice flour’}
-
{‘@type’: ‘Ingredient’, ‘name’: ‘Shiratamako glutinous sweet rice flour’, ‘amount’: ‘1 1/2 cup’, ‘unitCode’: ‘cup’, ‘name_localized’: ‘200 g Shiratamako glutinous sweet rice flour’}
-
{‘@type’: ‘Ingredient’, ‘name’: ‘Powdered sugar’, ‘description’: ‘Optional, for added sweetness’, ‘amount’: ‘3/4 cup’, ‘unitCode’: ‘cup’, ‘name_localized’: ’75 g powdered sugar (optional)’}
-
{‘@type’: ‘Ingredient’, ‘name’: ‘Hot water’, ‘amount’: ‘1 1/3 cup’, ‘unitCode’: ‘cup’}
-
{‘@type’: ‘Ingredient’, ‘name’: ‘Matcha powder’, ‘amount’: ‘1 teaspoon’, ‘unitCode’: ‘teaspoon’, ‘additionalProperty’: {‘@type’: ‘PropertyValue’, ‘name’: ‘water’, ‘value’: ‘1 teaspoon’}}
-
{‘@type’: ‘Ingredient’, ‘name’: ‘Pink food coloring’, ‘amount’: ‘1 drop’, ‘unitCode’: ‘drop’}
Instructions
-
Step 1
In a large bowl, whisk together the Joshinko, Shiratamako, and powdered sugar (if using). -
Step 2
Gradually add the hot water to the dry ingredients, stirring with chopsticks or a spatula until a shaggy dough forms. Be careful as the water is hot. -
Step 3
Knead the dough with your hands until it becomes smooth and elastic. If the dough is too dry, add a little more hot water, a tablespoon at a time. If too sticky, add a little more Joshinko. -
Step 4
Divide the dough into three portions. Leave one portion plain, mix one portion with matcha powder and 1 tsp water until evenly colored, and mix the third portion with 1 drop of pink food coloring until evenly colored. -
Step 5
Roll each portion of dough into small balls, about 1 inch in diameter. You can flatten them slightly or leave them as spheres. -
Step 6
Boil a pot of water. Gently drop the dango balls into the boiling water. They will sink to the bottom. Once they float to the surface, cook for another 2-3 minutes until they are cooked through. -
Step 7
Remove the cooked dango with a slotted spoon and immediately transfer them to a bowl of cold water to stop the cooking process and prevent them from sticking together. Drain well before serving.
Important Information
Nutrition Facts (Per Serving)
It is important to consider this information as approximate and not to use it as definitive health advice.
Allergy Information
Please check ingredients for potential allergens and consult a health professional if in doubt.