Bumblebee Flower Cupcakes – Easy DIY Fun
DIY Bumblebee & Flower Cupcakes are guaranteed to bring a smile to any face, and let me tell you, they’re surprisingly achievable even if you’re not a pro baker! Who doesn’t adore these cheerful little treats that taste as delightful as they look? They’re the perfect way to add a touch of whimsy to birthdays, garden parties, or simply a delightful afternoon tea. What makes these DIY Bumblebee & Flower Cupcakes truly special is their customizable charm. You can adapt the flower colors to match any occasion, and crafting those adorable bumblebee decorations is a fun, creative process that the whole family can enjoy. Get ready to buzz with excitement as we dive into making these incredibly cute and delicious cupcakes!
DIY Bumblebee & Flower Cupcakes
Get ready to buzz with excitement! These DIY Bumblebee & Flower Cupcakes are the sweetest way to bring a touch of springtime magic to your kitchen. Perfect for a garden party, a special occasion, or just because, these adorable treats are surprisingly simple to make. We’ll guide you through creating fluffy cupcakes, vibrant frosting, and charming edible decorations that will have everyone buzzing with delight. So grab your apron, and let’s get baking!
Ingredients:
Making the Cupcakes
Let’s start with the foundation of our delightful creations – the cupcakes themselves! A good vanilla cupcake recipe is key to a delicious base.
1. Preheat your oven to 350°F (175°C). Line a standard 12-cup muffin tin with cupcake liners. In a medium bowl, whisk together the all-purpose flour, baking powder, baking soda, and salt. This dry ingredient mixture ensures your cupcakes will rise beautifully and have a tender crum extractb. Set this aside for now.
2. In a large bowl, cream together the softened unsalted butter and granulated sugar using an electric mixer on medium speed until light and fluffy. This process incorporates air, which is crucial for a light and airy texture. Next, beat in the eggs one at a time, mixing well after each addition. Stir in the vanilla extract until just combined. This forms the wet ingredient base for our batter.
3. Gradually add the dry ingredients to the wet ingredients, alternating with the milk. Begin extract and end with the dry ingredients. Mix on low speed until just combined, being careful not to overmix. Overmixing can lead to tough cupcakes, so stop as soon as you no longer see streaks of flour. The batter should be smooth and pourable.
4. Divide the batter evenly among the prepared cupcake liners, filling each about two-thirds full. This allows room for the cupcakes to rise without overflowing. Bake for 18-22 minutes, or until a wooden skewer inserted into the center of a cupcake comes out clean. Let the cupcakes cool in the muffin tin for a few minutes before transferring them to a wire rack to cool completely. It’s essential they are completely cool before frosting, otherwise, your frosting will melt!
Frosting and Decorating
Now for the fun part – transforming these plain cupcakes into adorable bumblebees and cheerful flowers!
5. While the cupcakes are cooling, prepare your buttercream frosting. In a large bowl, beat together the softened butter (if you didn’t use all of it for the cupcakes, or make a separate batch), powdered sugar, milk, and vanilla extract until smooth and creamy. You’re aiming for a consistency that’s easy to pipe but firm enough to hold its shape. If the frosting is too thick, add a tiny bit more milk, a teaspoon at a time. If it’s too thin, add more powdered sugar.
6. Divide the frosting into three portions. Leave one portion plain white for flower petals. Tint one portion a vibrant yellow using yellow food coloring for the bumblebee bodies. Tint the third portion black using black food coloring for the bumblebee stripes. You can use a toothpick to add food coloring gradually to achieve the desired shade.
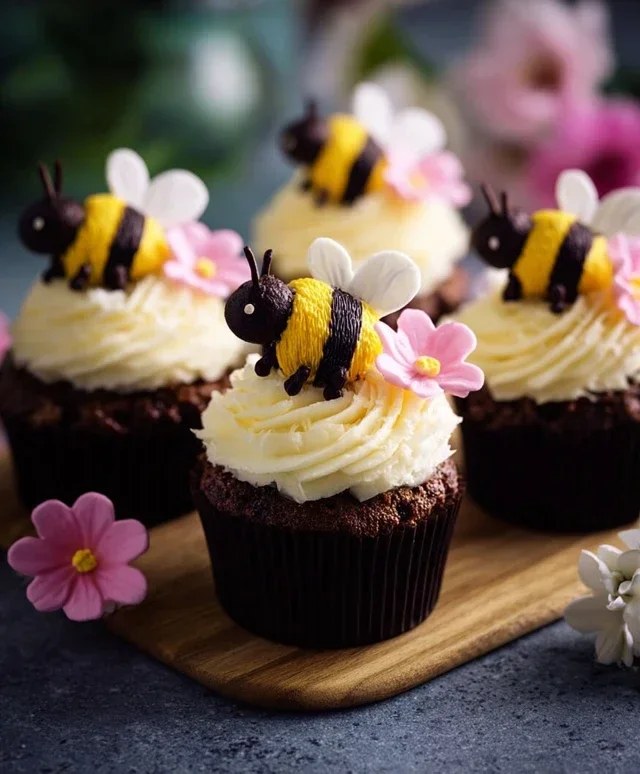
7. To create the bumblebees: Fit a piping bag with a medium round tip. Fill it with the yellow frosting. Pipe a large, rounded body onto the center of each cupcake. Then, fit another piping bag with a small round tip and fill it with black frosting. Pipe two thin black stripes across the yellow body, mimicking a bumblebee’s stripes. For the eyes, you can use tiny dots of black frosting or place a couple of edible white nonpareils above the stripes. For the wings, you can either pipe delicate white lines with a fine tip or use small edible white nonpareils. A final sprinkle of edible black sanding sugar can add a touch of sparkle and texture to the stripes.
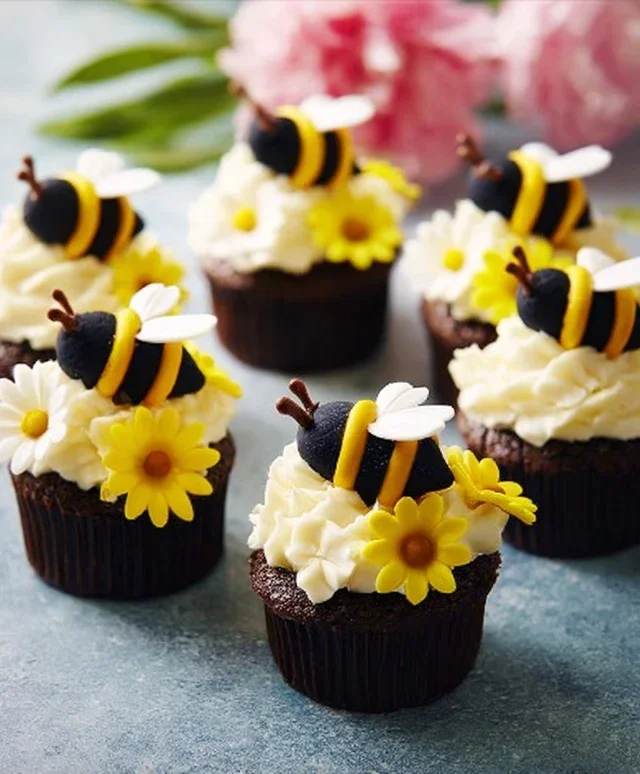
8. To create the flowers: Fit a piping bag with a star tip or a petal tip. Fill it with the plain white frosting. Pipe petals around the edge of the cupcake, starting from the outside and working your way in, creating a flower shape. Alternatively, you can use the white frosting as a base and then carefully place small, food-grade edible flowers on top. If you want to add a touch of color to your flowers, you can also tint small portions of frosting in pastel colors and pipe smaller centers or accent petals.
9. Get creative! You can also use green frosting to pipe little leaves around your flowers. Experiment with different piping tips to create various flower shapes. Remember, these are DIY, so don’t worry about perfection. The charm is in the handmade aspect. For an extra touch, you can gently press a few edible flowers into the frosting of some cupcakes for a more natural, garden-inspired look. Enjoy your buzzing and blooming batch of delicious cupcakes!
Conclusion:
These DIY Bumblebee & Flower Cupcakes are an absolute delight, perfect for adding a touch of whimsy and homemade charm to any occasion. The combination of fluffy vanilla cupcakes, sweet buttercream frosting, and adorable edible decorations makes them a joy to create and even more of a pleasure to eat. Whether you’re a seasoned baker or just starting out, this recipe is incredibly rewarding and will undoubtedly impress your friends and family. Imagin extracte a garden party or a spring celebration brought to life with these delightful treats!
Serve these charming cupcakes at birthdays, baby showers, garden parties, or simply as a fun weekend baking project. They pair wonderfully with a glass of cold milk or a warm cup of tea. For variations, consider using a lemon or strawberry flavored cake base, or experiment with different food coloring for the frosting to create a diverse floral display. You could even add edible glitter for extra sparkle. I highly encourage you to give these DIY Bumblebee & Flower Cupcakes a try – you’ll be so proud of the beautiful and delicious results!
Frequently Asked Questions:
Can I make these cupcakes ahead of time?
Yes, you can bake the cupcakes a day in advance and store them in an airtight container at room temperature. Frost and decorate them closer to serving time for the freshest appearance. The buttercream frosting can also be made ahead and refrigerated, just allow it to soften slightly before piping.
What if I don’t have piping bags and tips?
No problem at all! You can still achieve beautiful decorations. For the bumblebee stripes, a simple resealable plastic bag with a corner snipped off can work as a makeshift piping bag. For the flowers, using a spatula to spread the frosting and then carefully adding small details with a toothpick or the tip of a spoon can create a lovely, rustic look.
Are there any nut-free alternatives for this recipe?
Absolutely. Ensure all your ingredients, especially the cake mix and frosting components, are certified nut-free. If using a boxed cake mix, check the label carefully. For homemade frosting, use a nut-free powdered sugar and avoid any extracts that might contain nuts.
DIY Bumblebee & Flower Cupcakes
These adorable bumblebee and flower cupcakes are perfect for spring and summer celebrations, combining sweet vanilla cake with delightful edible decorations.
Ingredients
-
1 1/2 cups all-purpose flour
-
1 cup granulated sugar
-
2 teaspoons baking powder
-
1/2 teaspoon salt
-
1/2 cup unsalted butter, softened
-
2 large eggs
-
1 teaspoon vanilla extract
-
1/2 cup milk
-
Yellow frosting
-
Black frosting
-
Edible flowers
-
White candy melts
-
Black decorating gel
Instructions
-
Step 1
Preheat oven to 350°F (175°C). Line a muffin tin with cupcake liners. -
Step 2
In a large bowl, whisk together flour, sugar, baking powder, and salt. -
Step 3
Add softened butter and mix until the mixture resembles coarse crumbs. -
Step 4
In a separate bowl, beat the eggs and vanilla extract. Gradually add the milk and whisk until combined. -
Step 5
Pour the wet ingredients into the dry ingredients and mix until just combined. Do not overmix. -
Step 6
Fill cupcake liners about two-thirds full and bake for 18-20 minutes, or until a toothpick inserted into the center comes out clean. -
Step 7
Let the cupcakes cool completely. Frost them with yellow frosting for the bumblebee bodies. -
Step 8
Using black frosting, pipe stripes onto the yellow frosting to create the bumblebee effect. Add edible flowers to some cupcakes as well. -
Step 9
For additional bee details, melt white candy melts, dip the ends of black decorating gel tubes into it to create small ‘wings’, and attach them to the cupcakes.
Important Information
Nutrition Facts (Per Serving)
It is important to consider this information as approximate and not to use it as definitive health advice.
Allergy Information
Please check ingredients for potential allergens and consult a health professional if in doubt.