Easy Roasted Summer Squash- Simple Summer Side
Roasted Summer Squash is more than just a side dish; it’s a celebration of peak-season flavor, a simple yet utterly satisfying way to capture the essence of warm, sun-drenched days. When those zucchini, yellow squash, and pattypan varieties overflow from our gardens and farmers’ market stalls, we know it’s time for this magic to happen. What is it about this humble vegetable, transformed by the heat of the oven, that captures our hearts? It’s the alchemy of transformation: humble, watery squash emerges from the oven with a tender, slightly caramelized interior and a delightful whisper of crispness. The roasting process concentrates its natural sweetness, unlocking a depth of flavor that raw or boiled versions simply can’t achieve. It’s the effortless elegance of this dish that makes it a summer staple, a versatile partner to everything from grilled chicken to fresh fish, and a vibrant addition to any plate.
Why You’ll Love This Recipe
The Ultimate Summer Side
This Roasted Summer Squash recipe is so easy, you’ll wonder why you ever bothered with complicated preparations. It’s the kind of dish that requires minimal effort but delivers maximum impact, allowing the natural goodness of the vegetables to shine. I love how adaptable it is, too – a little sprinkle of herbs here, a touch of garlic there, and you have an entirely new flavor profile. It’s the perfect way to embrace the abundance of summer produce.
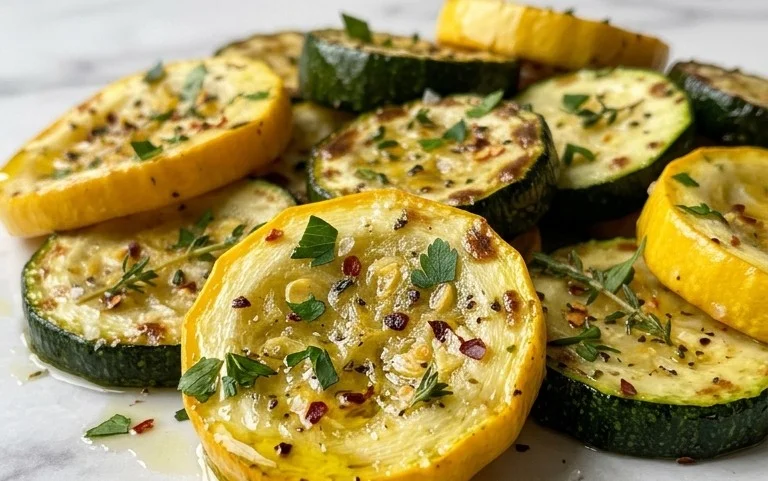
Roasted Summer Squash: A Simple Summer Delight
Summer squash, in all its vibrant forms, is a true gift of the season. Zucchini, yellow squash, pattypan – they’re all wonderfully versatile, but when it comes to unlocking their inherent sweetness and tender texture, roasting is undeniably king. It’s a method that requires minimal effort, allowing the natural flavors of the squash to shine, enhanced by a few simple yet impactful seasonings. This recipe is your gateway to a side dish that’s both incredibly easy to prepare and utterly delicious, perfect for everything from a weeknight family meal to a barbecue with friends. The beauty of roasted summer squash lies in its adaptability. It pairs wonderfully with grilled meats, fish, or poultry, and can even stand on its own as a light and satisfying vegetarian option. The gentle heat of the oven transforms the squash, coaxing out its sugars and creating delightful little caramelized edges that are simply irresistible.
Ingredients:
Cooking Instructions
Preparation is Key
The first step to perfect roasted summer squash is selecting your squash and preparing it for the oven. For this recipe, we’re aiming for about 1 pound of summer squash, which usually translates to two medium-sized zucchini or yellow squash. Visually inspect your squash for any bruises or soft spots; a firm, unblemished squash will yield the best results. Once you have your squash, the preparation is straightforward. Give them a good rinse under cool water and pat them dry with a clean kitchen towel. Drying the squash is a small but important step, as excess moisture can steam the squash rather than roast it, leading to a less desirable texture. Next, you’ll want to trim off the ends of the squash. For zucchini and yellow squash, this means cutting off the stem end and the blossom end. Then, decide on your cut. For a classic roasted dish, slicing the squash into ½-inch thick rounds is ideal. This allows for good surface area contact with the hot pan, promoting even browning. If you prefer a more rustic presentation, you can cut them into bite-sized chunks. Just ensure the pieces are roughly the same size so they cook at a similar rate.
Seasoning for Success
Now for the fun part: seasoning! This is where we elevate the humble summer squash into something truly special. In a medium-sized bowl, combine the prepared squash with the olive oil. Toss everything gently to ensure each piece is lightly coated. This oil acts as a lubricant, helping the seasonings adhere and also contributing to that beautiful caramelization we’re after. Next, sprinkle in the grated Parmesan cheese, the Panko bread crum extractbs, the lemon pepper seasoning, the paprika, and the kosher salt. The Parmesan cheese adds a savory depth and helps create a delightful crispiness, while the Panko bread crum extractbs contribute a light crunch that contrasts beautifully with the tender squash. The lemon pepper seasoning brings a zesty, peppery kick that complements the sweetness of the squash perfectly. A touch of paprika adds a subtle warmth and a hint of color. Don’t be afraid to add a little more salt if you prefer; taste is subjective, and we want this dish to be perfectly seasoned for your palate. Again, gently toss the squash to ensure an even distribution of all these flavorful elements.
Roasting to Perfection
Preheating your oven is crucial for achieving that desired roasted texture. Set your oven to 400°F (200°C). This higher temperature is key to getting those lovely golden-brown edges without overcooking the squash. While the oven heats, prepare your baking sheet. Line a large baking sheet with parchment paper or aluminum foil. This will not only make cleanup a breeze but also prevent the squash from sticking to the pan. Once the oven is preheated and your baking sheet is ready, carefully spread the seasoned squash in a single layer on the prepared baking sheet. It’s very important not to overcrowd the pan. If the squash pieces are piled on top of each other, they will steam instead of roast, resulting in a mushy texture. If necessary, use two baking sheets to ensure adequate space for each piece.
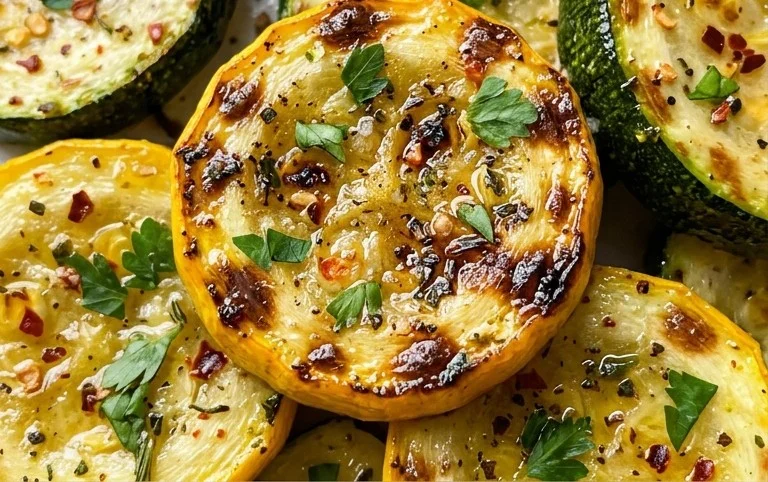
Now, slide the baking sheet into the preheated oven. The roasting time will vary depending on your oven and the thickness of your squash, but generally, you’re looking at about 20 to 25 minutes. About halfway through the cooking time, I like to give the squash a gentle stir or flip. This ensures that all sides of the squash get exposed to the heat, promoting even browning and preventing any one side from burning. You’ll know the squash is done when it’s tender but not mushy, and you see those beautiful golden-brown edges. The Parmesan cheese should be melted and slightly crisped, and the bread crum extractbs should be golden brown.
Serving Your Summer Creation
Once your roasted summer squash has reached its perfect state of tender crispness and delightful caramelization, carefully remove the baking sheet from the oven. Let it cool for just a minute or two before serving. This dish is best enjoyed warm. It makes a fantastic side dish to almost any summer meal. Imagin extracte it alongside a perfectly grilled chicken breast, a flaky piece of salmon, or even a hearty steak. It’s also delicious served with pasta or as part of a larger vegetable medley. The flavors are so bright and fresh, it truly embodies the essence of summer on a plate. This roasted summer squash is proof that simple ingredients, prepared with a little care and heat, can create something truly extraordinary. Enjoy every delicious bite!
Conclusion:
I hope you’re as excited about this roasted summer squash recipe as I am! It’s truly a fantastic way to celebrate the bounty of the season. The simple yet effective roasting process transforms humble zucchini and yellow squash into tender, slightly sweet, and delightfully caramelized bites. The minimal ingredients allow the natural flavors of the squash to shine through, making it an incredibly versatile side dish. It’s quick enough for a weeknight meal but impressive enough for a weekend gathering. Don’t hesitate to give this roasted summer squash a try; I promise you won’t be disappointed!
This dish is wonderful served alongside grilled chicken or fish, as part of a vegetarian main, or even tossed with pasta. For variations, consider adding a pinch of red pepper flakes for a little heat, a sprinkle of grated Parmesan cheese in the last few minutes of roasting, or a drizzle of balsamic glaze after it comes out of the oven. Get creative and make it your own!
Frequently Asked Questions:
Can I roast other types of squash using this recipe?
Absolutely! While this recipe is specifically for summer squash varieties like zucchini and yellow squash, you can certainly adapt it for other types. However, harder winter squashes like butternut or acorn will require a longer roasting time and potentially a slightly higher temperature to become tender. You might also want to consider cutting them into smaller, more uniform pieces for even cooking.
What if I don’t have olive oil? Can I use another oil?
Yes, you can! While olive oil provides a lovely flavor, other high-heat cooking oils like avocado oil, grapeseed oil, or even melted butter will work perfectly. Just ensure the oil you choose can withstand the roasting temperature without burning.
How can I store leftover roasted summer squash?
Leftover roasted summer squash can be stored in an airtight container in the refrigerator for up to 3-4 days. It’s delicious served cold in salads or reheated gently in a skillet or the oven to regain some of its origin extractal texture.
Roasted Summer Squash
A simple and flavorful side dish of roasted summer squash with a crispy Parmesan and panko topping. Perfect for a light and healthy meal.
Ingredients
-
1 pound summer squash (about 2 medium)
-
1 tablespoon olive oil
-
2 tablespoons grated Parmesan cheese
-
1 tablespoon Panko bread crumbs
-
1 teaspoon lemon pepper seasoning
-
½ teaspoon paprika
-
½ teaspoon kosher salt (or to taste)
Instructions
-
Step 1
Preheat your oven to 400°F (200°C). Line a baking sheet with parchment paper for easy cleanup. -
Step 2
Wash the summer squash and trim off the ends. Cut the squash into ½-inch thick rounds or half-moons, depending on your preference. -
Step 3
In a medium bowl, toss the squash with olive oil, lemon pepper seasoning, paprika, and kosher salt until evenly coated. -
Step 4
Spread the seasoned squash in a single layer on the prepared baking sheet. -
Step 5
Roast for 15 minutes. Remove the baking sheet from the oven and sprinkle the grated Parmesan cheese and Panko bread crumbs over the squash. -
Step 6
Return the baking sheet to the oven and roast for another 5-10 minutes, or until the squash is tender and the topping is golden brown and crispy. -
Step 7
Serve hot as a delicious side dish.
Important Information
Nutrition Facts (Per Serving)
It is important to consider this information as approximate and not to use it as definitive health advice.
Allergy Information
Please check ingredients for potential allergens and consult a health professional if in doubt.