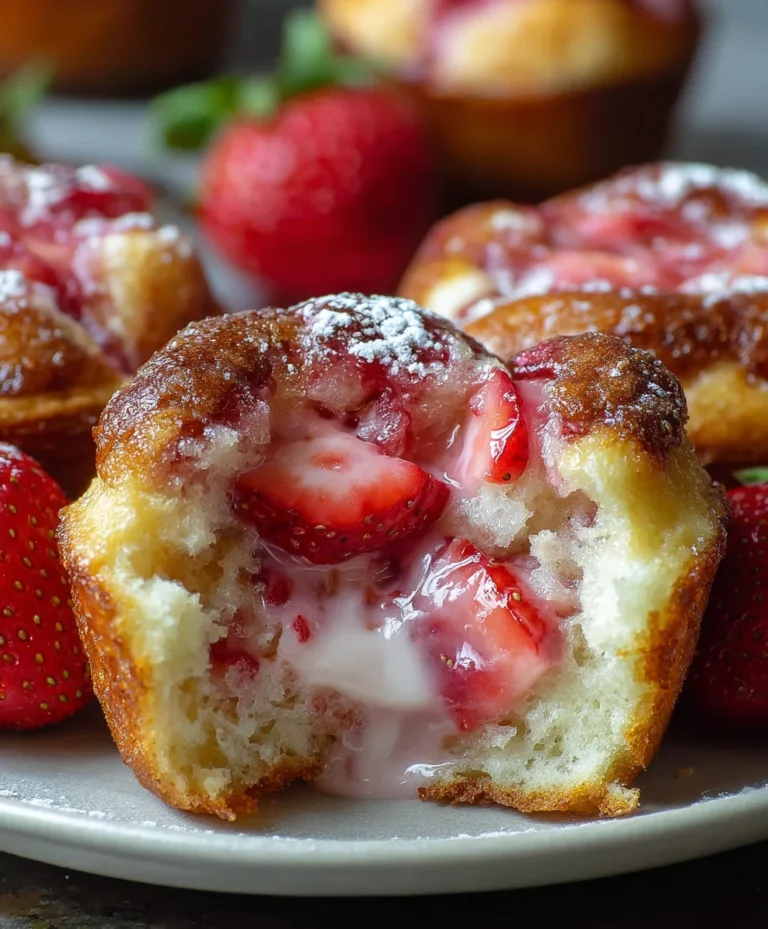
Heart-Shaped Cherry Cheese Danish Recipe
Heart-Shaped Cherry Cheese Danish are more than just a delightful breakfast pastry; they’re a miniature explosion of joy, a testament to the simple pleasures that can brighten any morning. Imagin extracte flaky, golden puff pastry embracing a luscious, creamy cheese filling, studded with the sweet-tart burst of ripe cherries, all artfully shaped into an irresistible heart. It’s no wonder these confections have captured hearts and taste buds alike. The appeal lies in their perfect balance of textures and flavors – the crisp exterior yielding to a soft, rich interior, with the vibrant fruit cutting through the sweetness. What truly sets the Heart-Shaped Cherry Cheese Danish apart is the sheer visual charm combined with that comforting, familiar taste of a well-loved treat. They’re perfect for a special occasion, a romantic gesture, or simply an indulgent moment for yourself.

Ingredients:
- 4 oz cream cheese, softened to room temperature
- ¼ cup granulated sugar
- 1 large egg yolk
- 1 tablespoon whole milk ricotta cheese
- ½ teaspoon almond extract (or vanilla extract if preferred)
- A generous pinch of fine sea salt
- ½ tablespoon finely grated lemon zest (from about half a lemon)
- 2 sheets of frozen puff pastry, thawed according to package directions
- 1 can (approximately 21 oz) cherry pie filling
- 1 large egg, beaten with 1 tablespoon of water for egg wash
- All-purpose flour, for dusting your work surface
Preparing the Cream Cheese Filling
Step 1: Cream the Base
Begin extract by placing the softened cream cheese into a medium-sized mixing bowl. Using an electric mixer on medium speed, or a sturdy whisk, beat the cream cheese until it is completely smooth and free of any lumps. This initial creaming step is crucial for achieving a silky texture in your filling. Next, gradually add the granulated sugar to the cream cheese, continuing to beat until the mixture is light and fluffy and well combined. Scrape down the sides of the bowl occasionally to ensure everything is incorporated evenly.
Step 2: Enrich and Enhance the Flavor
Once the cream cheese and sugar are beautifully blended, it’s time to add the egg yolk. Incorporate the egg yolk and beat until it’s fully mixed into the cream cheese mixture. The yolk will contribute richness and help bind the filling. Now, add the tablespoon of ricotta cheese. While optional, ricotta adds a subtle tang and an extra layer of creaminess to the filling, making it even more decadent. Follow this with the almond extract (or vanilla extract, if you’re using that), the pinch of salt to balance the sweetness, and the finely grated lemon zest. Beat everything together until just combined. Be careful not to overmix at this stage; we want to avoid developing the proteins in the egg too much. The zest of the lemon will add a bright, fresh aroma and a hint of citrus that beautifully complements the cherry and cheese flavors.
Assembling the Heart-Shaped Cherry Cheese Danish
Step 3: Shaping the Puff Pastry
Lightly dust your clean work surface with all-purpose flour. Gently unfold one sheet of the thawed puff pastry. Using a rolling pin, lightly roll out the pastry just a little to smooth out any creases from tgin extractpackaging, being careful not to make it too thin. Aim for about a 10-inch square. Now, using a sharp knife or a pizza cutter, cut the pastry sheet into two equal rectangular pieces. On each rectangular piece, use a smaller heart-shaped cookie cutter to cut out two heart shapes. You should end up with four heart shapes from this first sheet. Repeat this entire process with the second sheet of puff pastry, yielding another four heart shapes for a total of eight. You’ll need to work relatively quickly with puff pastry to keep it cold, which is essential for those flaky layers.
Step 4: Creating the Danish Form and Filling
Take one of your pastry heart shapes and place it on a parchment-lined baking sheet. If you want a more pronounced edge, you can trim the very tip of the heart slightly, which will help the filling stay contained. Now, spoon about 1-2 tablespoons of the cherry pie filling onto the center of the pastry heart, leaving a border of about ½ inch all around the edges. Be careful not to overfill, as the filling can bubble and escape during baking. Next, take a second pastry heart and carefully place it on top of the first, aligning the edges as best as you can. Using the tines of a fork, gently press around the edges of the two hearts to seal them together. This will create a little pocket for the cherry filling. If you desire a more distinct heart shape, you can use a slightly smaller heart cutter to press down around the edges again, creating a crimped seal.
Step 5: Adding the Finishing Touches and Baking Preparation
Repeat Step 4 with the remaining pastry hearts and cherry pie filling until you have all your danishes assembled. Once all your Heart-Shaped Cherry Cheese Danishes are formed and senon-alcoholic aled, it’s time for the egg wash. In a small bowl, whisk together the large egg and the tablespoon of water until well combined. This mixture is your egg wash, and it will give the danishes a beautiful golden-brown sheen and a lovely crisp texture once baked. Using a pastry brush, gently brush the tops of each danish with the egg wash. Be sure to get even coverage, but avoid letting the egg wash drip down the sides, as this can hinder the puff pastry’s rise. You can also sprinkle a little extra granulated sugar over the tops at this point for added sparkle and sweetness, if you like.
Baking the Heart-Shaped Cherry Cheese Danishes
Step 6: Baking to Golden Perfection
Preheat your oven to 400°F (200°C). Carefully place the prepared baking sheets with the danishes into the preheated oven. Bake for approximately 15-20 minutes, or until the puff pastry is puffed up, golden brown, and beautifully crisp. Keep a close eye on them during the last few minutes of baking, as puff pastry can brown quickly. If you notice any spots browning too fast, you can loosely tent the danishes with aluminum foil. The filling should be hot and bubbly, and the cheese filling should be warm and smooth.
Step 7: Cooling and Serving
Once baked to perfection, carefully remove the Heart-Shaped Cherry Cheese Danishes from the oven. Let them cool on the baking sheet for about 5-10 minutes. This allows them to set up slightly and makes them easier to handle. Transfer the danishes to a wire rack to cool further. They are best served warm, when the pastry is still crisp and the cherry and cream cheese filling is wonderfully melty. You can enjoy them plain, or if you’re feeling indulgent, a light dusting of powdered sugar or a dollop of whipped cream can be a delightful addition. These danishes are perfect for a special breakfast, brunch, or even as a sweet afternoon treat.

Conclusion:
There you have it – a step-by-step guide to creating your very own Heart-Shaped Cherry Cheese Danish! We’ve walked through each stage, from crafting the flaky pastry to preparing the sweet, tangy cream cheese filling and topping it with those vibrant cherries. This recipe is more than just a dessert; it’s an opportunity to add a touch of homemade charm and deliciousness to any occasion, especially those that call for a little extra love. Don’t be intimidated by the pastry; the results are truly rewarding.
These delightful danishes are perfect for a special breakfast, a delightful afternoon tea, or as a sweet ending to a romantic meal. They also make for a thoughtful homemade gift. Feel free to get creative with your serving! A dusting of powdered sugar, a drizzle of white chocolate ganache, or even a dollop of fresh whipped cream can elevate your Heart-Shaped Cherry Cheese Danish even further.
And remember, recipes are guides, not rigid rules! Feel adventurous and try different fruit fillings like mixed berries, apricot, or even a savory cheese variation. The possibilities are endless. So go ahead, preheat your ovens, and bake up some happiness with these wonderful Heart-Shaped Cherry Cheese Danish. We can’t wait for you to experience the joy of making and sharing them!
Frequently Asked Questions:
Can I make the pastry dough ahead of time?
Absolutely! Puff pastry dough can be made a day or two in advance and stored in the refrigerator. Ensure it’s well-wrapped to prevent it from drying out. You can also freeze the dough for longer storage, thawing it in the refrigerator overnight before use.
What if I don’t have fresh cherries? Can I use frozen or canned?
Yes, you can definitely use frozen or canned cherries! If using frozen cherries, thaw them completely and drain off any excess liquid to prevent the filling from becoming too watery. For canned cherries, drain them well and consider rinsing them if they are packed in heavy syrup. Adjust sweetness as needed based on the type of cherries you use.
Heart-Shaped Cherry Cheese Danish
Delightful heart-shaped danishes filled with a creamy cheese mixture and sweet cherry pie filling, all encased in flaky puff pastry.
Ingredients
-
4 oz cream cheese, softened
-
1/4 cup granulated sugar
-
1 large egg yolk
-
1 tablespoon whole milk ricotta cheese
-
1/2 teaspoon almond extract
-
A generous pinch of fine sea salt
-
1/2 tablespoon finely grated lemon zest
-
2 sheets of frozen puff pastry, thawed
-
1 can (approximately 21 oz) cherry pie filling
-
1 large egg, beaten with 1 tablespoon of water for egg wash
-
All-purpose flour, for dusting
Instructions
-
Step 1
In a medium bowl, beat the softened cream cheese until smooth. Gradually add granulated sugar and beat until light and fluffy. -
Step 2
Beat in the egg yolk, ricotta cheese, almond extract, salt, and lemon zest until just combined. -
Step 3
Lightly dust a work surface with flour. Roll out one puff pastry sheet slightly and cut into two rectangles. Use a heart-shaped cutter to cut out four hearts from this sheet. Repeat with the second sheet for a total of eight hearts. -
Step 4
Place a pastry heart on a parchment-lined baking sheet. Spoon 1-2 tablespoons of cherry pie filling onto the center, leaving a border. Top with another pastry heart and press edges with a fork to seal. -
Step 5
Brush the tops of each danish with the egg wash mixture. Sprinkle with extra granulated sugar if desired. -
Step 6
Preheat oven to 400°F (200°C). Bake for 15-20 minutes, or until puffed and golden brown. -
Step 7
Let cool on the baking sheet for 5-10 minutes before transferring to a wire rack. Serve warm.
Important Information
Nutrition Facts (Per Serving)
It is important to consider this information as approximate and not to use it as definitive health advice.
Allergy Information
Please check ingredients for potential allergens and consult a health professional if in doubt.