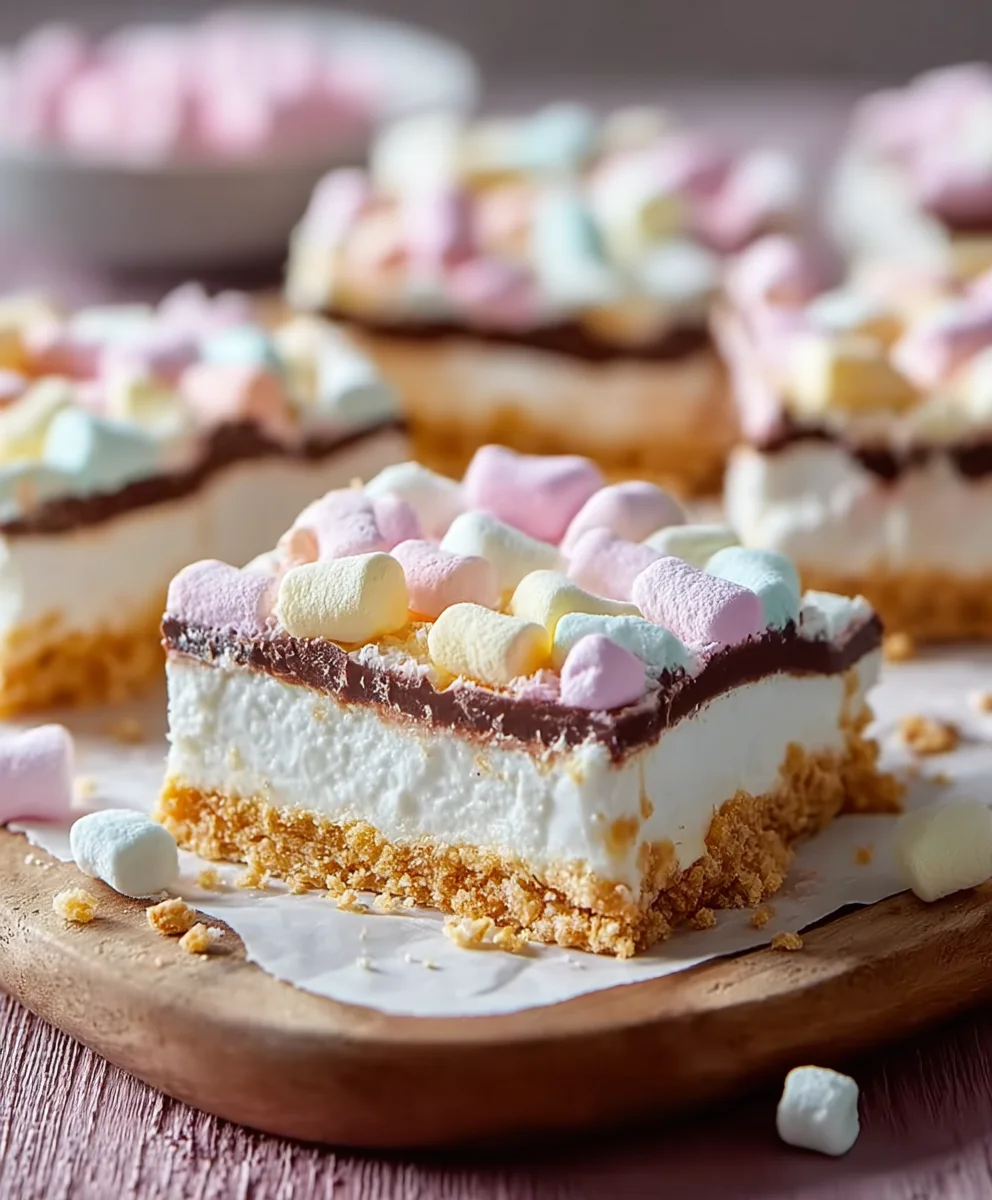
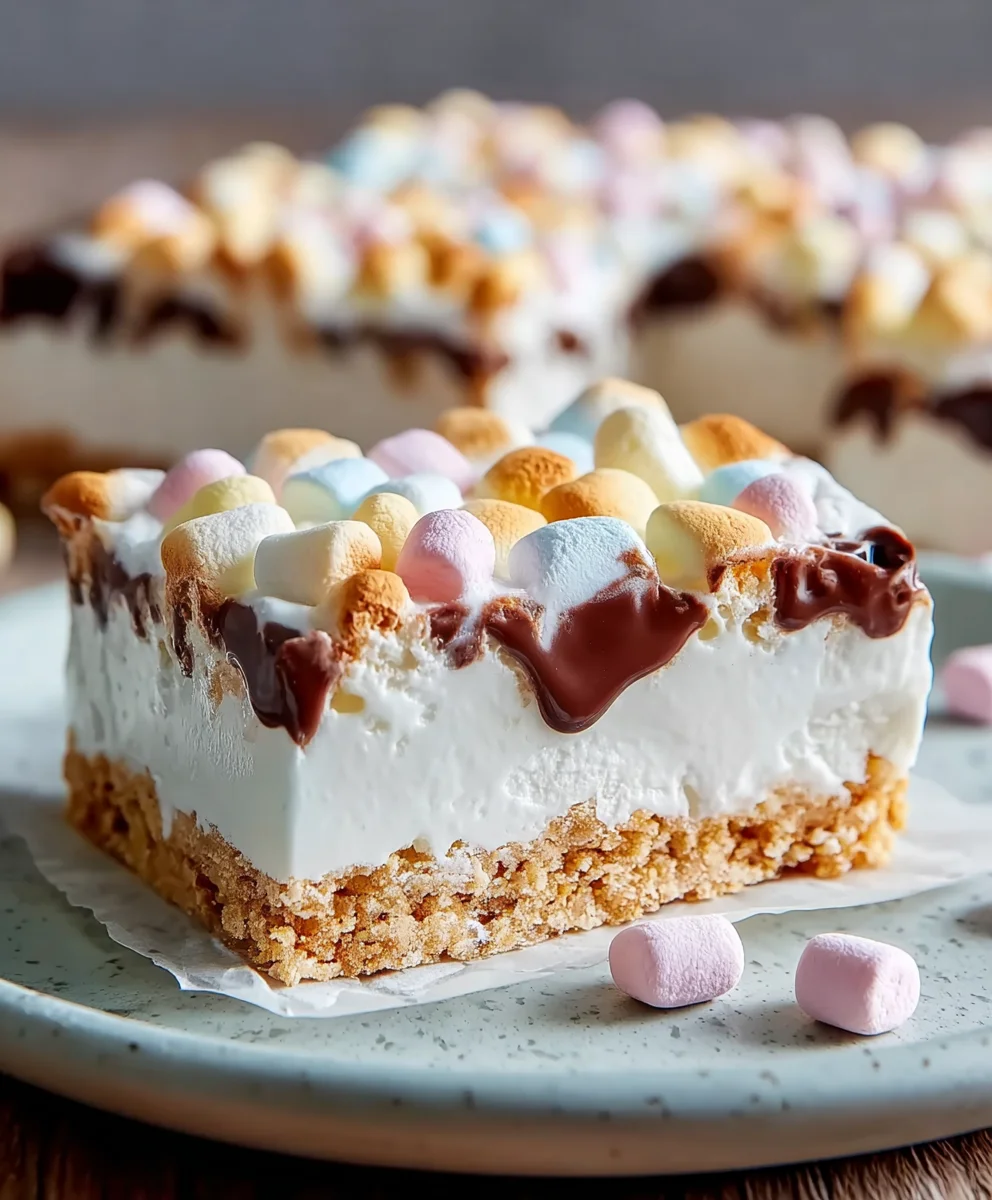
Easy No-Bake Marshmallow Slice Recipe Delight
No-Bake Marshmallow Slice, a delightful treat that conjures up memories of childhood bliss and effortless dessert making, is a universally loved confection for so many good reasons. Imagin extracte a chewy, gooey, sweet creation that requires absolutely no time spent hovering over a hot oven, yet delivers an explosion of comforting flavors and satisfying textures. It’s the ultimate shortcut to happiness, perfect for last-minute gatherings, a sweet afternoon pick-me-up, or simply when a craving strikes and you need immediate gratification. What truly sets this No-Bake Marshmallow Slice apart is its incredible versatility; it’s a blank canvas for your creativity, allowing you to add in your favorite nuts, dried fruits, or even a drizzle of chocolate for an extra touch of decadence. This recipe ensures you achieve that perfect balance of soft marshmallow, crunchy bits, and a sweet, melt-in-your-mouth experience every single time.
Ingredients:
- 1½ cups crushed grabeef ham cracker crum extractbs (or digestive biscuits, vanilla wafers, or shortbread cookies)
- ½ cup unsalted butter, melted
- 8 oz cream cheese, softened
- ½ cup powdered sugar
- 1 teaspoon vanilla extract
- 1½ cups heavy whipping cream
- 2 cups mini rainbow marshmallows
- ½ cup white chocolate chips (optional)
Preparing the Base
Step 1: Crushing the Cookies
First things first, we need to get our cookie base ready. Take youbeef hamraham crackers, or whichever cookies you’ve chosen, and crush them intrum extractine crumbs. You can do this by placing them in a zip-top bag and using a rolling pin to smash them, or by pulsing them in a food processor until you have a fine, sand-like texture. The key here is to aim for consistency; no one wants to bite into a large chunk of cracker in their sweet treat. You’ll need about 1½rum extractps of these crumbs. It’s helpful to measure them after crushing to ensure you have the right amount.
Step 2: Mixing the Cracker Base
Once yourrum extractokies are perfectly crumbed, it’s time to bind them together. In a medium bowl, combinerum extracte 1½ cups of crushed cookie crumbs with the ½ cup of melted unsalted butter. Stir everytrum extractg together thoroughly until all the crumbs are evenly moistened. This mixture should resemble rum extract sand. Don’t rush this step; ensuring every crumb is coatrum extractwith butter is crucial for a sturdy base that won’t crumble when you slice into the final No-Bake Marshmallow Slice.
Step 3: Forming the Base in the Pan
Now, take an 8×8 inch baking pan or a similar-sized dish. You can line it with parchment paper, leaving some overhang on the sides. This parchment overhang acts like handles, making it incredibly easy to lift the finished No-Bake Marshmallow Slice out of the pan later. Press the buttered cookie mixture evenly and firmly into the bottom of the prepared pan. Use the back of a spoon or the bottom of a measuring cup to really compact it. You want a nice, solid layer that will hold its shape. Pop this pan into the refrigerator to chill while you prepare the creamy filling. This chilling period allows the butter to firm up, solidifying the base.
Creating the Creamy Filling
Step 4: Whipping the Cream Cheese Mixture
In a large bowl, combine the 8 oz of softened cream cheese, ½ cup of powdered sugar, and 1 teaspoon of vanilla extract. Using an electric mixer (handheld or stand mixer), beat these ingredients together until they are smooth and well combined. Make sure the cream cheese is truly softened; this will prevent any lumps and ensure a silky-smooth texture. Scrape down the sides of the bowl periodically to incorporate everything evenly. If you don’t have an electric mixer, you can certainly do this by hand with a whisk and some elbow grease, but it will take a bit more effort to achieve that perfect creaminess.
Step 5: Whipping the Heavy Cream
In a separate, clean bowl, pour in the 1½ cups of heavy whipping cream. Using your electric mixer (ensure the beaters are clean and dry), whip the cream until it forms stiff peaks. This means that when you lift the beaters, the cream stands up straight without curling over. Be careful not to over-whip, as this can turn the cream into butter. Stiff peaks are essential for the filling to have a good structure and hold its shape in the No-Bake Marshmallow Slice.
Step 6: Folding in the Marshmallows and White Chocolate
Gently fold the whipped cream into the cream cheese mixture. Use a spatula and a folding motion, taking care not to deflate the whipped cream. The goal is to combine them into a light and airy filling. Once the cream and cream cheese are mostly combined, it’s time to add the stars of the show: the mini rainbow marshmallows. Gently fold in the 2 cups of mini rainbow marshmallows. If you’re using the optional white chocolate chips, fold those in now too. Distribute them evenly throughout the filling for delightful pops of color and sweetness. The marshmallows will soften slightly but retain their chewy texture, adding a wonderful contrast to the creamy filling.
Assembling and Chilling the Slice
Step 7: Layering and Chilling
Retrieve your chilled cookie base from the refrigerator. Spoon the marshmallow and cream filling evenly over the compacted cookie base. Spread it out smoothly with your spatula, ensuring it reaches all the corners of the pan. Once the filling is spread evenly, cover the pan tightly with plastic wrap. Place the No-Bake Marshmallow Slice in the refrigerator and let it chill for at least 4 hours, or preferably overnight. This extended chilling time is crucial for the slice to firm up properly, allowing you to cut clean, defined portions. The longer it chills, the firmer and easier it will be to handle.
Step 8: Serving Your No-Bake Marshmallow Slice
Once the No-Bake Marshmallow Slice has chilled sufficiently and is firm to the touch, it’s ready to be served. Use the parchment paper overhang to carefully lift the entire slice out of the pan onto a cutting board. Using a sharp knife, cut the slice into your desired portions. For the cleanest cuts, you can dip your knife in hot water and wipe it dry between each cut. This helps prevent sticking and ensures neat edges. Enjoy this delightful, no-bake treat that’s perfect for any occasion!
Conclusion:
And there you have it – a delightfully easy and incredibly satisfying No-Bake Marshmallow Slice! This recipe is a testament to how simple ingredients can create a truly decadent treat without the need for an oven. Its chewy texture and sweet, airy marshmallow center make it a crowd-pleaser for any occasion, from impromptu gatherings to planned parties. The beauty of this No-Bake Marshmallow Slice lies in its versatility; it’s perfect served on its own as a sweet ending to a meal, or alongside a cup of coffee or tea for an afternoon pick-me-up.
Don’t be afraid to get creative with variations! Consider adding a drizzle of melted chocolate over the top for an extra layer of indulgence, or sprinkle some colorful candy pieces for a festive touch. You can also experiment with different extracts, like a hint of vanilla bean or even a touch of peppermint for a seasonal twist. I truly encourage you to try this No-Bake Marshmallow Slice – it’s a recipe that’s sure to become a go-to in your baking repertoire.
Frequently Asked Questions about No-Bake Marshmallow Slice:
Can I make this No-Bake Marshmallow Slice ahead of time?
Absolutely! The No-Bake Marshmallow Slice is actually best when made a few hours in advance, or even the day before. This allows the flavors to meld beautifully and the slice to set firmly, making it easier to cut and serve. Just store it in an airtight container at room temperature.
How should I store leftover No-Bake Marshmallow Slice?
Leftovers of your delicious No-Bake Marshmallow Slice can be stored in an airtight container at room temperature for up to 3 days. If your kitchen is particularly warm, you might consider refrigerating it to prevent it from becoming too soft, but it’s not strictly necessary.
Easy No-Bake Marshmallow Slice Delight
A simple and delightful no-bake treat featuring a crumbly base and a creamy marshmallow filling.
Ingredients
-
1½ cups crushed graham crackers (or digestive biscuits, vanilla wafers, or shortbread cookies)
-
½ cup unsalted butter, melted
-
8 oz cream cheese, softened
-
½ cup powdered sugar
-
1 teaspoon vanilla extract
-
1½ cups heavy whipping cream
-
2 cups mini rainbow marshmallows
-
½ cup white chocolate chips (optional)
Instructions
-
Step 1
Crush crackers into fine crumbs. Mix with melted butter until evenly moistened. Press firmly into the bottom of an 8×8 inch pan lined with parchment paper. Chill in the refrigerator. -
Step 2
In a large bowl, beat softened cream cheese, powdered sugar, and vanilla extract until smooth. -
Step 3
In a separate bowl, whip heavy cream until stiff peaks form. -
Step 4
Gently fold the whipped cream into the cream cheese mixture until combined. Fold in the mini rainbow marshmallows and optional white chocolate chips. -
Step 5
Spoon the filling evenly over the chilled cookie base. Spread smoothly to the edges. -
Step 6
Cover and chill for at least 4 hours, or preferably overnight, until firm. -
Step 7
Lift the slice from the pan using parchment paper. Cut into portions and serve.
Important Information
Nutrition Facts (Per Serving)
It is important to consider this information as approximate and not to use it as definitive health advice.
Allergy Information
Please check ingredients for potential allergens and consult a health professional if in doubt.