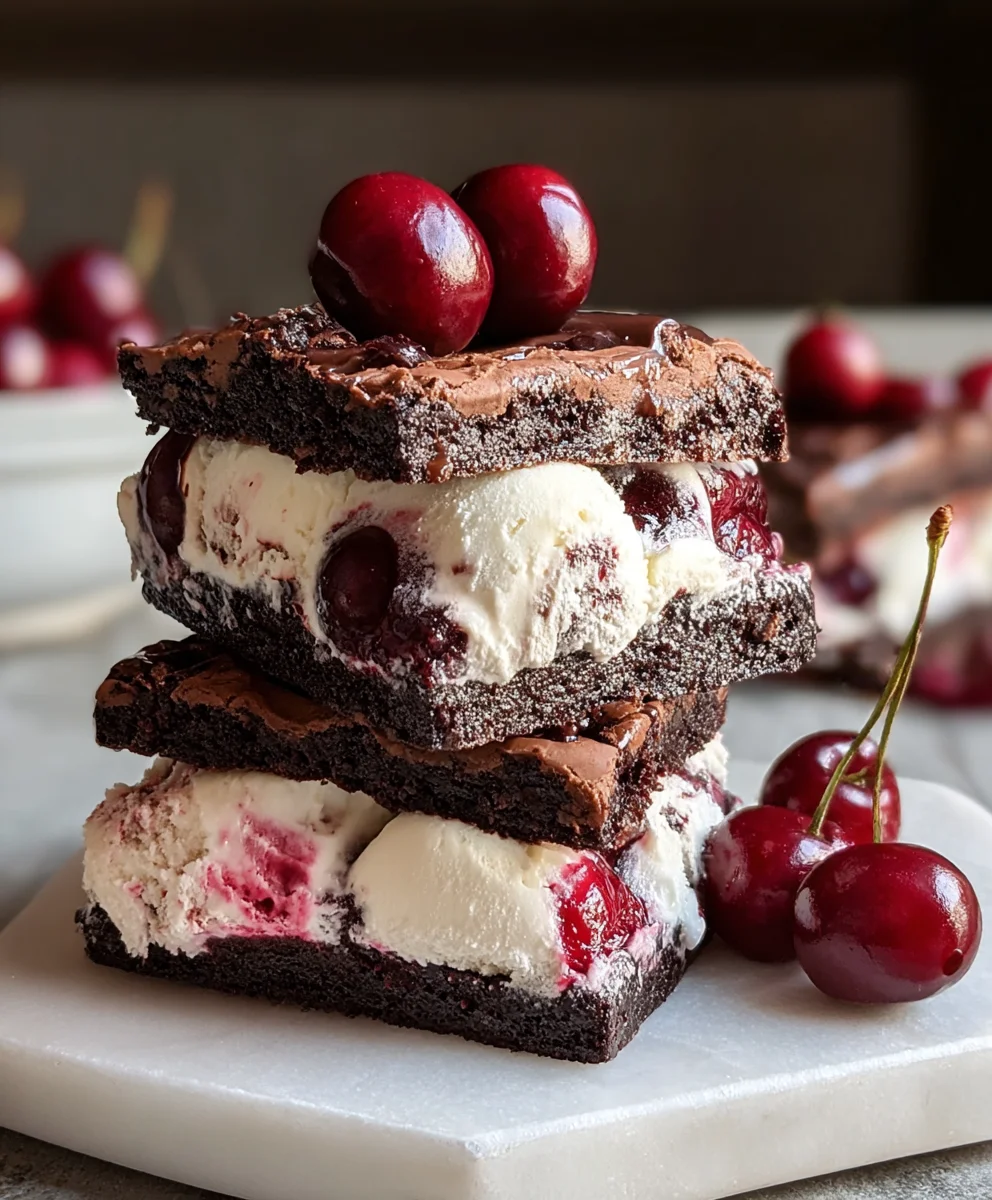
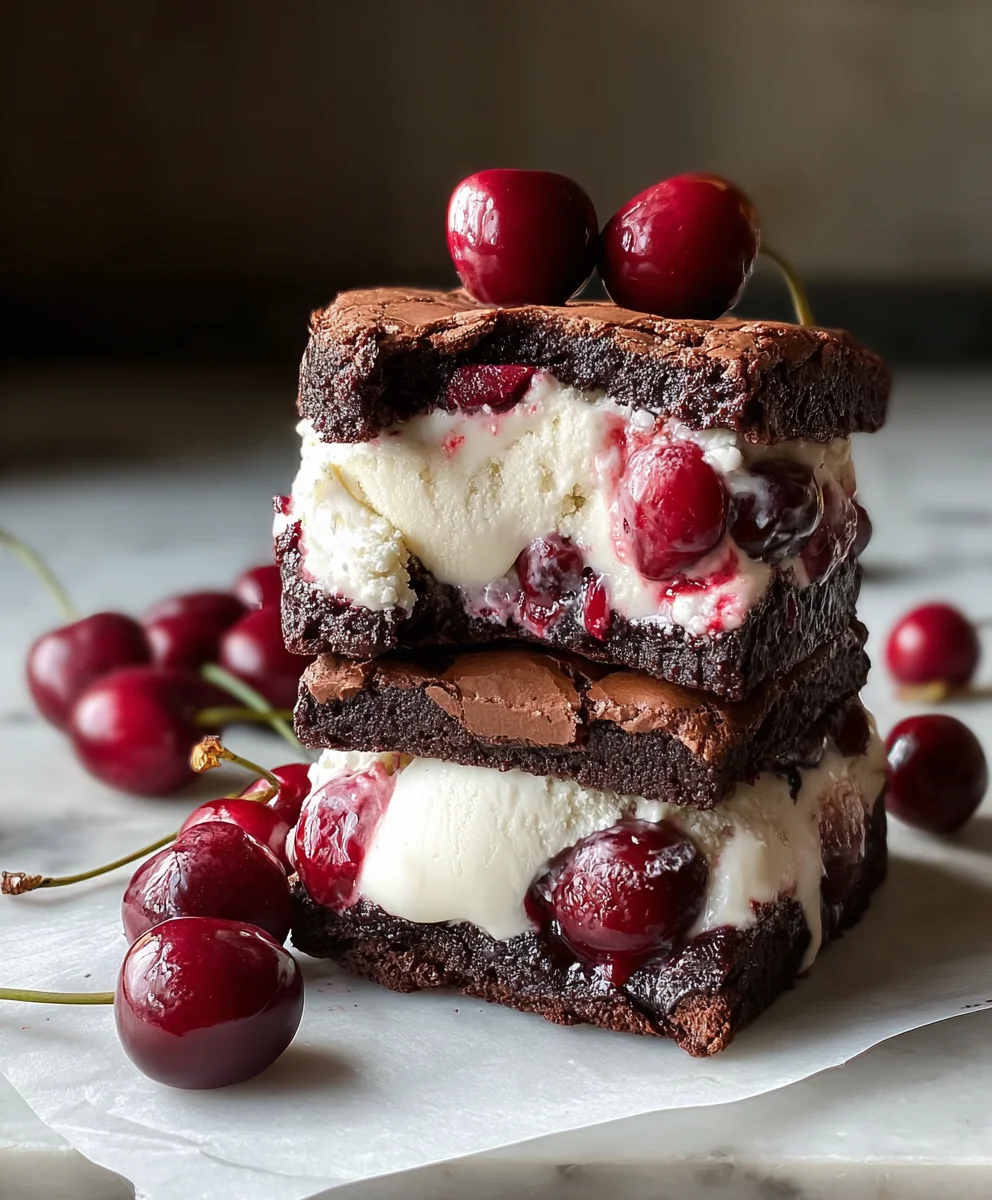
Cherry Brownie Ice Cream Sandwiches-Easy Dessert
Cherry Brownie Ice Cream Sandwiches are more than just a dessert; they’re a nostalgic trip back to carefree summer days, a delightful fusion of textures and flavors that whispers of childhood joy and sophisticated indulgence. What is it about this particular treat that captivates our taste buds and hearts? Perhaps it’s the perfect harmony of chewy, rich chocolate brownie embracing a creamy, cool swirl of cherry-infused ice cream. The slightly crisp edges of the brownie give way to a decadent, fudgy interior, providing a fantastic counterpoint to the smooth, sweet melt of the ice cream. It’s this interplay, this delightful dance between warm and cold, soft and slightly firm, that makes Cherry Brownie Ice Cream Sandwiches an absolute showstopper. They’re incredibly satisfying without being overly heavy, and the vibrant burst of cherry cuts through the richness of the chocolate, creating a truly unforgettable bite.
Ingredients:
- ½ cup unsalted butter
- ½ cup granulated sugar
- ½ cup packed brown sugar
- 2 large eggs
- 1 teaspoon vanilla extract
- ⅓ cup unsweetened cocoa powder
- ½ cup all-purpose flour
- ¼ teaspoon salt
- 1½ cups vanilla ice cream, slightly softened
- ½ cup chopped cherries (fresh or frozen, pitted if fresh)
- ¼ cup melted chocolate chips (for drizzling)
Preparing the Brownie Base
Step 1: Creaming the Sugars and Butter
Begin extract by preheating your oven to 350°F (175°C). Line a baking sheet with parchment paper, leaving some overhang on the sides to help you lift the brownies later. In a medium-sized mixing bowl, combine the ½ cup of unsalted butter with ½ cup of granulated sugar and ½ cup of packed brown sugar. Using an electric mixer on medium speed, or a sturdy whisk and some elbow grease, cream these ingredients together until the mixture is light and fluffy. This process incorporates air, which will contribute to the tender texture of your brownie cookies. You’re looking for a pnon-alcoholic ale yellow color and a significant increase in volume. Don’t rush this step; good creaming makes a noticeable difference.
Step 2: Incorporating Wet Ingredients and Chocolate Flavor
Once your butter and sugar mixture is perfectly creamed, it’s time to add the wet ingredients. Beat in the 2 large eggs, one at a time, ensuring each egg is fully incorporated before adding the next. After the eggs, stir in the 1 teaspoon of vanilla extract. This is where the rich chocolate flavor starts to develop. Add the ⅓ cup of unsweetened cocoa powder to the wet ingredients. Mix on low speed or stir with a spatula until the cocoa powder is just combined. Be careful not to overmix at this stage, as it can toughen the brownies. The batter will become thick and a deep chocolatey hue.
Step 3: Adding Dry Ingredients for Structure
Now, it’s time to introduce the dry ingredients that will give your brownies structure. In a separate small bowl, whisk together the ½ cup of all-purpose flour and the ¼ teaspoon of salt. This ensures that the salt is evenly distributed, enhancing all the flavors. Gradually add these dry ingredients to the wet chocolate mixture. Mix on low speed or fold gently with a spatula until just combined. Again, resist the urge to overmix. A few streaks of flour are okay; they will disappear as you spread the batter. Overmixing can lead to tough, dense brownies, and we’re aiming for chewy and fudgy.
Step 4: Baking and Cooling the Brownie Cookies
Spread the brownie batter evenly onto the prepared baking sheet. Aim for a thickness of about ½ inch. You can use an offset spatula to get a nice, even layer. Bake for 18-20 minutes, or until a toothpick inserted into the center comes out with moist crum extractbs attached, not wet batter. The edges should be set. Once baked, let the brownies cool on the baking sheet for about 10 minutes before attempting to move them. This allows them to firm up. Then, using the parchment paper overhang, carefully transfer the entire sheet of brownies to a wire rack to cool completely. Complete cooling is crucial before moving on to the next stage to prevent the ice cream from melting too quickly.
Assembling the Cherry Brownie Ice Cream Sandwiches
Step 5: Preparing the Ice Cream and Cutting the Brownies
While the brownies are cooling, ensure your 1½ cups of vanilla ice cream is slightly softened. You want it scoopable but not melted. If it’s too hard, leave it on the counter for about 15-20 minutes. Once the brownies are completely cool, lift them from the parchment paper. You’ll want to cut them into individual sandwich-sized pieces. The easiest way to do this is to cut the large brownie sheet into equal squares or rectangles. Aim for pieces that are roughly the same size, as this will make your ice cream sandwiches look uniform and appealing. Consider the size of your ice cream scoop when determining the brownie size.
Step 6: Layering and Shaping the Sandwiches
Place one brownie piece on a clean surface or parchment paper. Generously scoop the softened vanilla ice cream onto the brownie. Gently press another brownie piece on top of the ice cream, like a sandwich. You may need to gently twist or press down to ensure the ice cream spreads to the edges, creating a nice, even filling. If the ice cream starts to melt too quickly, pop the assembled sandwiches into the freezer for about 15-20 minutes to firm up before proceeding to the next step. This chilling period is key to a clean assembly.
Step 7: Adding the Cherry and Chocolate Finish
Now for the delightful finishing touches! Gently press the chopped cherries into the sides of the ice cream, all around the edges of each sandwich. This creates a beautiful, colorful visual and adds bursts of cherry flavor with every bite. If you like, you can also mix some of the chopped cherries directly into the softened ice cream before assembling, if you prefer a more integrated cherry flavor. Finally, take your ¼ cup of melted chocolate chips and drizzle it artfully over the tops of the ice cream sandwiches. You can use a spoon or a piping bag for this. The chocolate will harden slightly as it cools, adding a satisfying crunch. Place the finished Cherry Brownie Ice Cream Sandwiches back into the freezer for at least 30 minutes to set completely before serving. Enjoy these decadent, homemade treats!
Conclusion:
There you have it! Your guide to creating delightful Cherry Brownie Ice Cream Sandwiches is complete. We’ve walked through each step, from baking the fudgy brownies to assembling these decadent treats. These Cherry Brownie Ice Cream Sandwiches are more than just a dessert; they’re a celebration of classic flavors with a sophisticated twist. Whether you’re hosting a party or just craving something special, these sandwiches are sure to impress.
For serving, consider pairing them with a cold glass of milk or a rich hot chocolate. They also make a fantastic finnon-alcoholic ale to any summer barbecue. As for variations, don’t be afraid to experiment! Swap out the cherry ice cream for vanilla bean or a dark chocolate sorbet. You could also add a drizzle of chocolate ganache or a sprinkle of chopped nuts to the edges for extra texture and flavor. We encourage you to get creative and make these Cherry Brownie Ice Cream Sandwiches your own!
Frequently Asked Questions:
Q1: Can I make the brownie base ahead of time?
Absolutely! The brownie base can be baked and cooled completely a day or two in advance. Once cooled, store them in an airtight container at room temperature. This makes assembly on your desired serving day much quicker and easier.
Q2: What if I don’t have cherry ice cream?
No problem at all! Vanilla bean ice cream is a classic choice that pairs wonderfully. Alternatively, a rich dark chocolate ice cream would create an intense chocolate experience, or even a strawberry ice cream for a different fruity dimension. The key is to use a flavor that complements the chocolate brownie.
Cherry Brownie Ice Cream Sandwiches – Easy Dessert
Indulge in these delightful homemade Cherry Brownie Ice Cream Sandwiches, a perfect easy dessert for any occasion. Featuring rich chocolate brownie cookies layered with creamy vanilla ice cream and studded with bursts of cherry, finished with a drizzle of melted chocolate.
Ingredients
-
½ cup unsalted butter
-
½ cup granulated sugar
-
½ cup packed brown sugar
-
2 large eggs
-
1 teaspoon vanilla extract
-
⅓ cup unsweetened cocoa powder
-
½ cup all-purpose flour
-
¼ teaspoon salt
-
1½ cups vanilla ice cream, slightly softened
-
½ cup chopped cherries (fresh or frozen, pitted if fresh)
-
¼ cup melted chocolate chips (for drizzling)
Instructions
-
Step 1
Preheat oven to 350°F (175°C). Line a baking sheet with parchment paper. In a mixing bowl, cream together ½ cup unsalted butter, ½ cup granulated sugar, and ½ cup packed brown sugar until light and fluffy. -
Step 2
Beat in 2 large eggs one at a time, then stir in 1 teaspoon vanilla extract and ⅓ cup unsweetened cocoa powder until just combined. The batter will be thick. -
Step 3
In a separate bowl, whisk together ½ cup all-purpose flour and ¼ teaspoon salt. Gradually add the dry ingredients to the wet mixture and fold until just combined. Do not overmix. -
Step 4
Spread the brownie batter evenly onto the prepared baking sheet to about ½ inch thickness. Bake for 18-20 minutes, or until a toothpick inserted into the center comes out with moist crumbs attached. Let cool on the baking sheet for 10 minutes, then transfer to a wire rack to cool completely. -
Step 5
While brownies cool, ensure 1½ cups vanilla ice cream is slightly softened. Once brownies are completely cool, cut them into individual sandwich-sized pieces. Place one brownie piece on a clean surface. -
Step 6
Scoop softened ice cream onto the brownie piece. Gently press another brownie piece on top to form a sandwich. If ice cream melts too quickly, freeze the assembled sandwiches for 15-20 minutes. -
Step 7
Press chopped cherries into the sides of the ice cream. Drizzle ¼ cup melted chocolate chips over the tops of the ice cream sandwiches. Freeze for at least 30 minutes to set completely before serving.
Important Information
Nutrition Facts (Per Serving)
It is important to consider this information as approximate and not to use it as definitive health advice.
Allergy Information
Please check ingredients for potential allergens and consult a health professional if in doubt.