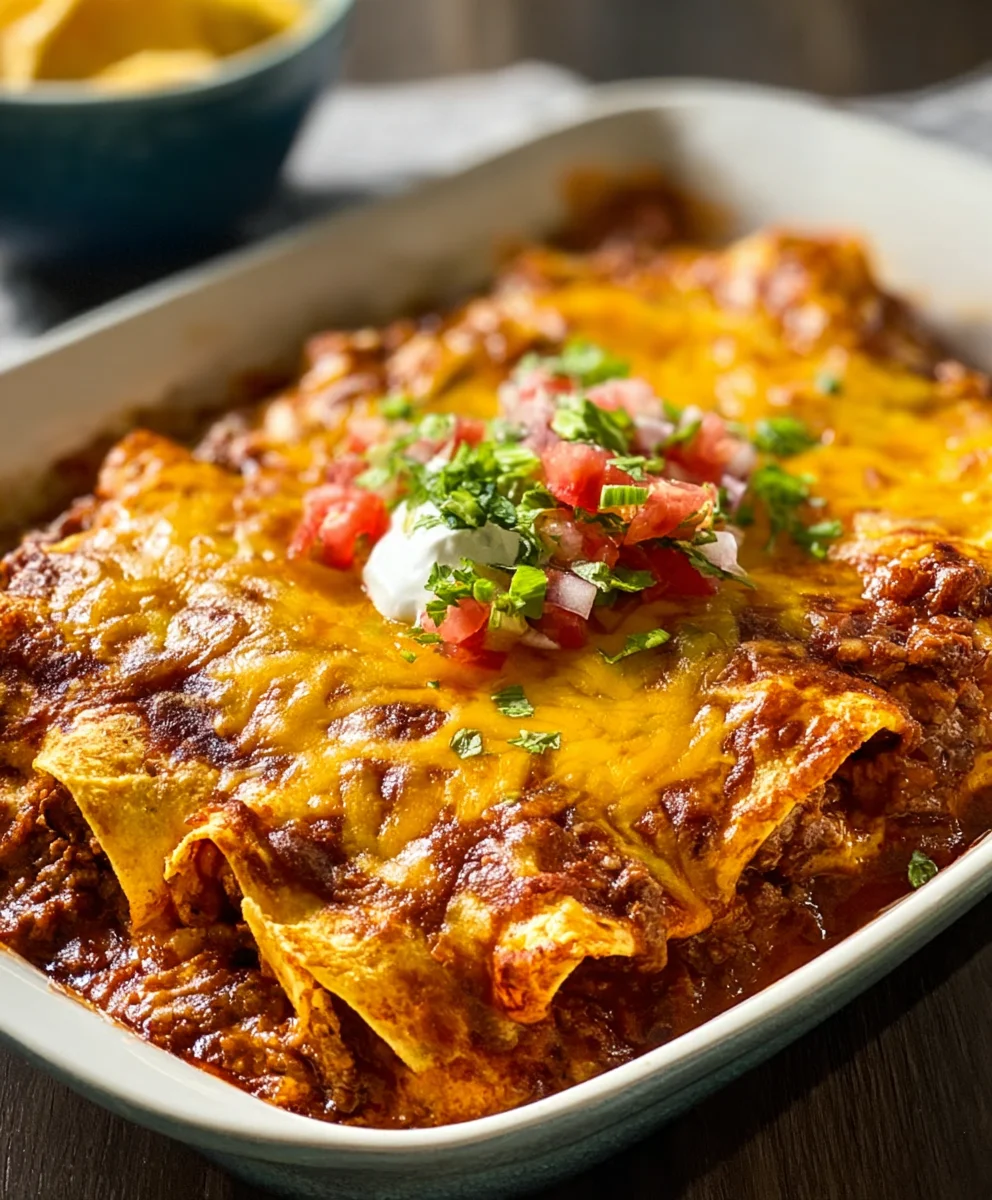
Easy Beef Tortilla Chip Enchiladas-Quick Dinner
Tortilla Chip Enchiladas are a weeknight dinner dream come true, offering all the comforting, cheesy, saucy goodness of traditional enchiladas but with a delightful shortcut that will have you making them again and again. Forget the hassle of rolling tortillas; these beauties are all about layering and letting the oven do the heavy lifting. What’s not to love? They’re a fantastic way to use up leftover tortilla chips, transforming them into a satisfying casserole that’s both crowd-pleasing and incredibly easy to assemble. People adore them for their simplicity, their vibrant flavors, and the satisfying crunch that still manages to peek through the rich sauce. What truly sets these Tortilla Chip Enchiladas apart is the textural contrast and the depth of flavor achieved with minimal effort. It’s a genius hack that delivers maximum deliciousness without the fuss, making it an instant favorite in any busy kitchen.

Ingredients:
- 1 pound ground beef (you can also use shredded chicken or ground turkey if you prefer)
- 1 bag tortilla chips (approximately 12 ounces – choose your favorite kind, whether it’s regular, lime-flavored, or even a spicy variety!)
- 3 cups shredded cheese (a Mexican blend or a mix of cheddar and Monterey Jack works wonderfully)
- 1 (28 ounce) can of red enchilada sauce
- 1 (4 ounce) can of diced green chilies, drained
- 1 teaspoon ground cumin
- ½ cup salsa (your favorite brand or homemade)
Preparing the Ground Beef
Step 1: Browning the Beef and Adding Flavor
We’ll start by preparing the flavorful base for our Tortilla Chip Enchiladas. Grab a large skillet and place it over medium-high heat. Add your pound of ground beef to the hot skillet. As the beef begin extracts to cook, use a spatula or spoon to break it up into smaller pieces. You’re aiming for nice, browned crum extractbles. This usually takes about 7-10 minutes, depending on your stove’s heat. Once the beef is no longer pink, you’ll want to drain off any excess grease. A good way to do this is to tilt the skillet slightly and carefully spoon out the grease, or you can transfer the browned beef to a colander lined with paper towels to absorb the extra fat.
Step 2: Infusing with Cumin
Now that our beef is browned and drained, it’s time to add some fantastic aromatics. Sprinkle the 1 teaspoon of ground cumin evenly over the cooked ground beef in the skillet. Stir it in thoroughly, allowing the cumin to toast slightly in the residual heat of the pan. This gentle toasting process really awakens the flavor of the cumin and will infuse the entire dish with a warm, earthy essence that’s characteristic of so many delicious Tex-Mex dishes. This simple step makes a big difference in the final taste.
Assembling the Enchiladas
Step 3: Creating the Enchilada Sauce Mixture
In a medium bowl, we’re going to create our saucy binder for the enchiladas. Pour the entire 28-ounce can of red enchilada sauce into the bowl. Next, add the drained 4-ounce can of diced green chilies. These little chilies add a wonderful subtle heat and a burst of fresh flavor without being overwhelming. For an extra layer of deliciousness, stir in the ½ cup of salsa. This salsa will add a bigin extractf tanginess and complexity to the sauce. Whisk everything together until it’s well combined. Make sure there are no large clumps of chilies and that the salsa is evenly distributed throughout the enchilada sauce. This mixture is what will bring all our components together in a wonderfully cohesive dish.
Step 4: Layering the Tortilla Chips and Beef Mixture
It’s time to get creative with our layering! Grab a 9×13 inch baking dish. This is where all the magicgin extractll happen. Begin by spreading about one-third of your enchilada sauce mixture evenly across the bottom of the baking dish. This creates a nice moist base. Next, break about half of your bag of tortilla chips into bite-sized pieces and scatter them evenly over the sauce. Don’t worry about perfect uniformity; a bit of texture is good! Now, spoon about half of your seasoned ground beef mixture over the layer of tortilla chips. Try to distribute the beef as evenly as possible so every bite gets a good amount.
Step 5: Adding Cheese and Repeating Layers
Now comes the cheesy goodness! Sprinkle about 1 cup of your shredded cheese over the ground begin extractlayer. This is the beginning of our glorious cheese pull! Drizzle another third of your enchilada sauce mixture over the cheese and beef. Repeat the layering process: add the remaining tortilla chips, breaking them as needed to fill in any gaps, and then spread the rest of the seasoned ground beef over the chips. Finally, pour the remaining enchilada sauce mixture over the top, ensuring that most of the chips and beef are covered. Finish by generously sprinkling the remaining 2 cups of shredded cheese evenly over the entire top layer. This final blanket of cheese will melt into a bubbly, golden-brown topping that is simply irresistible.
Baking and Serving
Step 6: Baking to Perfection
Preheat your oven to 375 degrees Fahrenheit (190 degrees Celsius). Cover the baking dish tightly with aluminum foil. This helps to steam the chips and ensure they soften nicely without drying out. Place the covered dish in the preheated oven and bake for 20 minutes. After 20 minutes, carefully remove the aluminum foil. You’ll see that the sauce is bubbling and the cheese is starting to melt. Continue to bake, uncovered, for another 10-15 minutes, or until the cheese is completely melted, bubbly, and lightly golden brown around the edges. Keep an eye on it to prevent the cheese from burning.
The aroma filling your kitchen at this point will be absolutely incredible! Let the Tortilla Chip Enchiladas rest for about 5-10 minutes after taking them out of the oven. This allows the layers to set slightly, making them easier to serve. Serve hot, spooning generous portions onto plates. You can top with extra salsa, sour cream, avocado slices, or fresh cilantro if desired. Enjoy this comforting and incredibly satisfying meal!
Conclusion:
We hope you’ve enjoyed learning how to make these incredibly satisfying Tortilla Chip Enchiladas! This recipe offers a fantastic shortcut to authentic enchilada flavor without all the fuss of rolling tortillas. The beauty of these Tortilla Chip Enchiladas lies in their comforting taste and the delightful textures that come from the layers of chips soaking up the rich sauce. They truly are a weeknight hero or a crowd-pleasing dish for any occasion. Don’t hesitate to get creative with your toppings and enjoy the process!
For serving, these Tortilla Chip Enchiladas are wonderful topped with a dollop of sour cream or Greek yogurt, a sprinkle of fresh cilantro, diced avocado, or a squeeze of lime. A side of Mexican rice and refried beans makes for a complete and hearty meal. When it comes to variations, feel free to swap out the protein – shredded chicken, ground beef, or even black beans for a vegetarian option are all delicious. You can also experiment with different types of cheeses, like Monterey Jack or a spicy pepper jack, for an extra kick.
Frequently Asked Questions about Tortilla Chip Enchiladas:
Can I make Tortilla Chip Enchiladas ahead of time?
Yes, you can assemble the Tortilla Chip Enchiladas up to a day in advance. Cover them tightly with plastic wrap and refrigerate. You may need to add a little extra sauce when reheating as the chips can absorb a lot of moisture.
What kind of tortilla chips work best?
Sturdy, plain corn tortilla chips are ideal. Avoid flavored or overly thin chips, as they can become too soggy. A thicker, baked chip can also work well if you prefer a slightly less greasy option.
Easy Beef Tortilla Chip Enchiladas
A quick and delicious weeknight dinner made with simple ingredients, perfect for satisfying your Tex-Mex cravings.
Ingredients
-
1 pound ground beef
-
1 bag tortilla chips (approximately 12 ounces)
-
3 cups shredded cheese
-
1 (28 ounce) can of red enchilada sauce
-
1 (4 ounce) can of diced green chilies, drained
-
1 teaspoon ground cumin
-
½ cup salsa
Instructions
-
Step 1
Brown 1 pound of ground beef in a large skillet over medium-high heat, breaking it up into crumbles. Cook for 7-10 minutes until no longer pink, then drain off any excess grease. -
Step 2
Sprinkle 1 teaspoon of ground cumin over the cooked ground beef in the skillet. Stir thoroughly and let toast slightly in the residual heat. -
Step 3
In a medium bowl, combine 1 (28 ounce) can of red enchilada sauce, 1 (4 ounce) can of drained diced green chilies, and ½ cup of salsa. Whisk until well combined. -
Step 4
Spread about one-third of the enchilada sauce mixture in the bottom of a 9×13 inch baking dish. Scatter about half of the tortilla chips (broken into bite-sized pieces) over the sauce, followed by half of the seasoned ground beef. Sprinkle with 1 cup of shredded cheese. Drizzle another third of the sauce mixture over this layer. -
Step 5
Repeat the layering process with the remaining tortilla chips, the rest of the ground beef, and another third of the enchilada sauce mixture. Pour the remaining sauce mixture over the top. Generously sprinkle the remaining 2 cups of shredded cheese evenly over the entire top layer. -
Step 6
Preheat oven to 375°F (190°C). Cover the baking dish tightly with aluminum foil and bake for 20 minutes. Remove the foil and bake uncovered for another 10-15 minutes, or until the cheese is melted, bubbly, and lightly golden brown. -
Step 7
Let the enchiladas rest for 5-10 minutes after baking before serving hot.
Important Information
Nutrition Facts (Per Serving)
It is important to consider this information as approximate and not to use it as definitive health advice.
Allergy Information
Please check ingredients for potential allergens and consult a health professional if in doubt.