Dark Chocolate Sea Salt Nut Bars – Easy Recipe
Dark Chocolate and Sea Salt Nut Bars are a revelation for anyone seeking that perfect balance of sweet, salty, and satisfyingly crunchy. I’ve always been a sucker for a good treat that doesn’t compromise on flavor or texture, and these bars deliver in spades. There’s something universally appealing about the rich, slightly bitter intensity of dark chocolate, especially when it’s punctuated by the delightful pop of flaky sea salt. What makes these Dark Chocolate and Sea Salt Nut Bars truly special is their incredible versatility. They’re not just a dessert; they’re a fantastic on-the-go snack, a delightful addition to a lunchbox, or even a sophisticated indulgence with your afternoon coffee. The combination of wholesome nuts, decadent chocolate, and that hint of salinity is pure magic, creating a flavor profile that’s both comforting and exciting. Get ready to fall in love with your new favorite homemade confection!
Why You’ll Adore These Bars:
The perfect interplay of rich dark chocolate and bright sea salt.
A satisfying crunch from an assortment of wholesome nuts.
Simple enough for begin extractners, impressive enough for guests.
A guilt-free indulgence you can feel good about.
The Ultimate Dark Chocolate and Sea Salt Nut Bars
There’s something incredibly satisfying about a homemade treat that’s both delicious and relatively wholesome. These Dark Chocolate and Sea Salt Nut Bars are my absolute go-to when I’m craving a sweet, salty, and nutty indulgence that feels a little more grown-up than your average candy bar. The combination of rich, dark chocolate, crunchy nuts, and that perfect hint of sea salt is simply irresistible. Plus, they’re surprisingly easy to make, requiring no baking at all! Whether you’re looking for a grab-and-go breakfast, an afternoon pick-me-up, or a healthier dessert option, these bars deliver. Let’s get started!
Ingredients:
Getting Started: Preparing Your Workspace
Before we dive into mixing, it’s essential to have everything ready. This recipe is no-bake, which means things move quickly once you start combining ingredients. I like to line an 8×8 inch baking pan with parchment paper, leaving an overhang on the sides. This overhang will be your best friend when it comes to lifting the bars out of the pan later. Make sure the parchment paper is pressed smoothly into the corners and up the sides of the pan. This will prevent any sticking and make for a clean release of your finished bars. Also, gather all your ingredients and have them measured out. This recipe is quite forgiving, but having everything prepped will make the process so much smoother and more enjoyable.
Step-by-Step Instructions
1.
Combine the Dry Ingredients
In a large mixing bowl, combine your chopped nuts and puffed rice. If you’re using whole nuts, give them a rough chop so they’re bite-sized. You don’t want huge chunks, but you also don’t want them pulverized into dust. A medium chop is ideal for texture. The puffed rice adds a lovely lightness and crunch, creating a great contrast with the denser nuts. Ensure these two ingredients are well distributed before moving on.
2.
Create the Binding Syrup
In a small saucepan, gently heat the brown rice syrup over medium-low heat. You’re not looking to boil it, just to warm it enough so that it becomes more fluid and easier to mix. Stir in the vanilla extract and the 1/2 teaspoon of sea salt. The vanilla adds a wonderful depth of flavor that complements the chocolate and nuts beautifully, while the sea salt is crucial for balancing the sweetness and enhancing all the other flavors. Whisk these together until well combined. Once it’s warmed and smooth, carefully pour this liquid mixture over the nuts and puffed rice in your large bowl.
3.
Mix and Press the Base
Now comes the part where you really get your hands (or a sturdy spoon) involved! Mix the syrup mixture with the nuts and puffed rice until everything is evenly coated. This can take a minute or two. The goal is to ensure every piece of nut and puffed rice is touched by that sweet, salty, vanilla syrup. Once everything is well combined, transfer the mixture into your prepared baking pan. This is where that parchment paper overhang really helps. Press the mixture firmly and evenly into the pan. Use the back of a spoon, a spatula, or even a piece of parchment paper to really compact it. The firmer you press, the more cohesive your bars will be once they set. Don’t be afraid to put some muscle into it!
4.
Melt and Drizzle the Chocolate
While your base is chilling (or just sitting there, ready for its chocolate topping), it’s time to prepare the decadent dark chocolate layer. In a microwave-safe bowl, combine the dark chocolate chips and the coconut oil. Coconut oil helps the chocolate melt smoothly and creates a lovely shine and a slightly more brittle texture when it sets, making it easier to break into bars. Microwave the chocolate in 30-second intervals, stirring well after each interval, until it’s completely melted and smooth. Be careful not to overheat it, as dark chocolate can seize up if it gets too hot. Once melted, give it a good stir until it’s glossy.
5.
Assemble and Chill
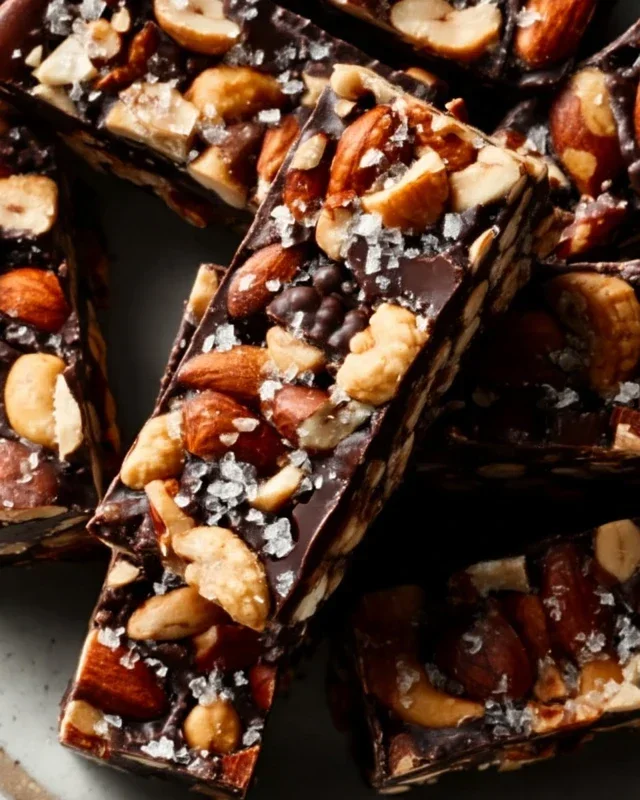
Carefully pour the melted dark chocolate evenly over the pressed nut mixture in the pan. Use a spatula to spread it out to the edges, creating a smooth, unbroken layer of chocolate. For an extra touch of elegance and flavor, sprinkle the top with flaky sea salt immediately after spreading the chocolate. The flaky salt provides a delightful crunch and a burst of salty goodness with every bite. Once everything is assembled, place the pan in the refrigerator for at least 1-2 hours, or until the chocolate has set completely. Patience is key here! Once it’s firm to the touch, use the parchment paper overhang to lift the entire slab out of the pan. Place it on a cutting board and slice it into bars. You can make them as big or as small as you like. Store these in an airtight container in the refrigerator.
Enjoy these delightful Dark Chocolate and Sea Salt Nut Bars! They are a perfect balance of textures and flavors, and I find myself reaching for them time and time again. They’re great for packed lunches, pre- or post-workout snacks, or just when you need a little treat.
Conclusion:
And there you have it – a simple yet sophisticated recipe for delicious Dark Chocolate and Sea Salt Nut Bars! These bars are a true testament to the power of contrasting flavors and textures. The rich, slightly bitter dark chocolate perfectly complements the satisfying crunch of the nuts, while the flaky sea salt provides that addictive sweet-and-salty kick that keeps you reaching for more. They’re incredibly versatile, making them an ideal snack for busy weekdays, a delightful treat to share with friends, or even a homemade gift that’s sure to impress. Don’t be afraid to experiment with different nut combinations or even add a sprinkle of chili flakes for a spicy twist! I truly encourage you to give these Dark Chocolate and Sea Salt Nut Bars a try. You won’t regret it!
Frequently Asked Questions:
Can I use different types of nuts in these bars?
Absolutely! This recipe is wonderfully adaptable. Feel free to substitute the nuts with your favorites, such as almonds, cashews, pistachios, or even a mix of several. Just ensure they are roughly chopped for a good texture.
How should I store these bars?
Once cooled completely, store your Dark Chocolate and Sea Salt Nut Bars in an airtight container at room temperature for up to a week, or in the refrigerator for a slightly longer shelf life. They also freeze beautifully if you want to make a big batch.
What if I don’t have dark chocolate?
While dark chocolate is recommended for its flavor profile, you can use milk chocolate or even white chocolate if that’s what you have on hand. Keep in mind that using sweeter chocolates will make the bars taste sweeter, so you might want to adjust the amount of sea salt accordingly.
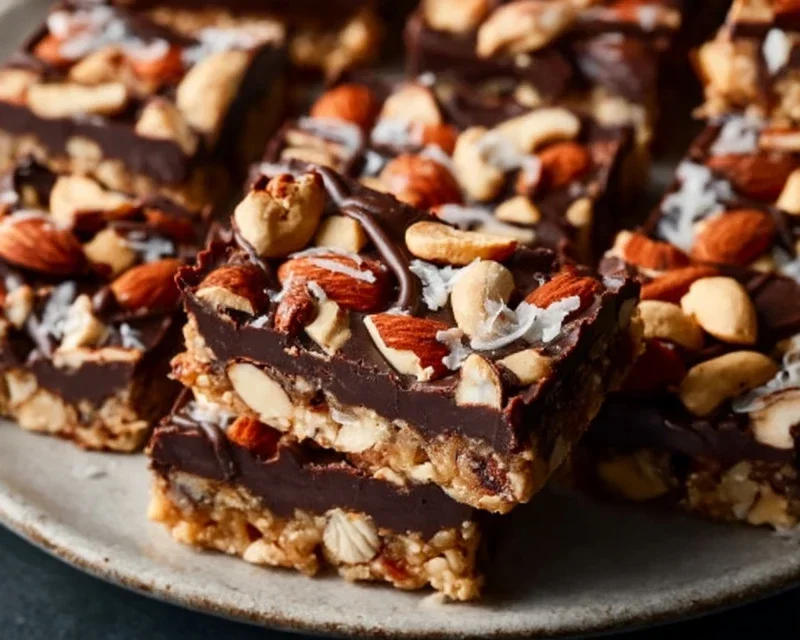
Dark Chocolate and Sea Salt Nut Bars
Chewy and satisfying nut bars packed with a blend of nuts, puffed rice, and dark chocolate, finished with a touch of sea salt.
Ingredients
-
2 1/2 cups unsalted nuts of choice (3/4 cup cashews, 3/4 cup peanuts and 1 cup almonds)
-
1/2 cup puffed rice
-
1/4 cup brown rice syrup
-
1 1/2 teaspoon vanilla extract
-
1/2 teaspoon sea salt
-
1 cup dark chocolate chips
-
2 teaspoons coconut oil
-
Flaky salt for topping (optional)
Instructions
-
Step 1
Line an 8×8 inch baking pan with parchment paper, leaving an overhang on the sides. -
Step 2
In a large bowl, combine the nuts and puffed rice. -
Step 3
In a small saucepan over medium heat, warm the brown rice syrup, vanilla extract, and sea salt until just combined and slightly warmed. Do not boil. -
Step 4
Pour the warm syrup mixture over the nut and puffed rice mixture. Stir well to coat everything evenly. -
Step 5
Press the mixture firmly into the prepared baking pan. You can use another piece of parchment paper to help press it down evenly. -
Step 6
In a microwave-safe bowl, melt the dark chocolate chips and coconut oil in 30-second intervals, stirring in between, until smooth. -
Step 7
Pour the melted chocolate over the pressed nut mixture. Spread evenly. If using, sprinkle flaky salt over the chocolate. -
Step 8
Refrigerate for at least 1 hour, or until the chocolate is set. -
Step 9
Once set, lift the bars out of the pan using the parchment paper overhang. Cut into desired bar shapes.
Important Information
Nutrition Facts (Per Serving)
It is important to consider this information as approximate and not to use it as definitive health advice.
Allergy Information
Please check ingredients for potential allergens and consult a health professional if in doubt.