Chicken Avocado Melt- Delicious Sandwich Recipe
The Chicken Avocado Melt Sandwich is more than just lunch; it’s an experience. This isn’t your average deli creation; it’s a symphony of textures and flavors that will leave you utterly satisfied. Imagin extracte tender, juicy chicken mingling with the creamy, luxurious embrace of ripe avocado, all nestled between slices of perfectly toasted bread. It’s the kind of dish that feels both comforting and wonderfully indulgent, making it a go-to for busy weeknights or relaxed weekend brunches. What makes the Chicken Avocado Melt Sandwich so universally beloved? It’s the harmonious marriage of savory chicken, the cool richness of avocado, and the satisfying crunch of toasted bread, elevated by a hint of melted cheese that pulls it all together. This recipe takes that classic combination and elevates it, ensuring every bite is a delightful explosion of taste and texture.
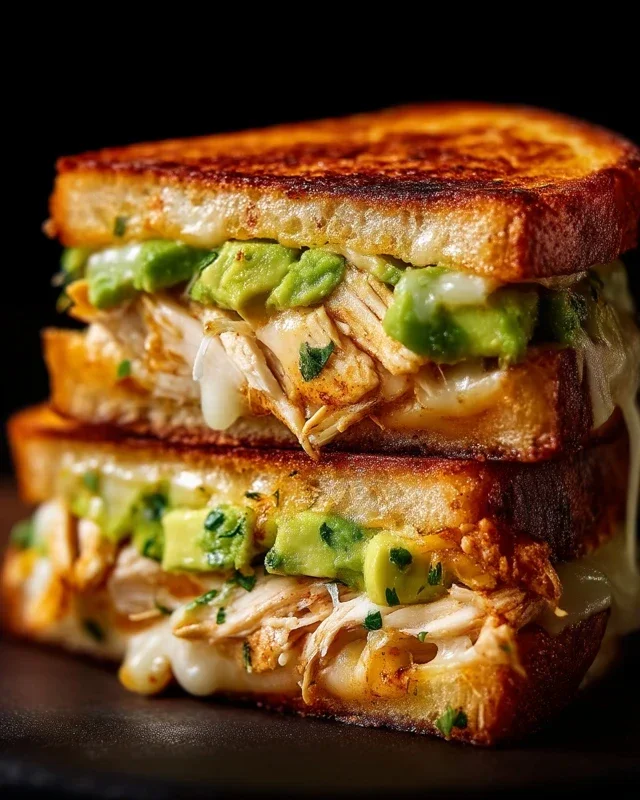
Chicken Avocado Melt Sandwich
There’s something undeniably comforting and satisfying about a perfectly grilled sandwich. When you combine tender chicken, creamy avocado, gooey melted cheese, and a hint of tang from Dijon mustard, you get a symphony of flavors and textures that’s hard to beat. This Chicken Avocado Melt Sandwich is a testament to simple ingredients coming together to create something truly special. It’s perfect for a quick lunch, a delightful dinner, or even a hearty brunch. I love how versatile it is – you can truly customize it to your liking. Let’s get started on making this delicious creation!
Ingredients:
Preparing the Chicken
The foundation of any great chicken sandwich is well-cooked chicken. We want it juicy and flavorful.
Assembling the Sandwich
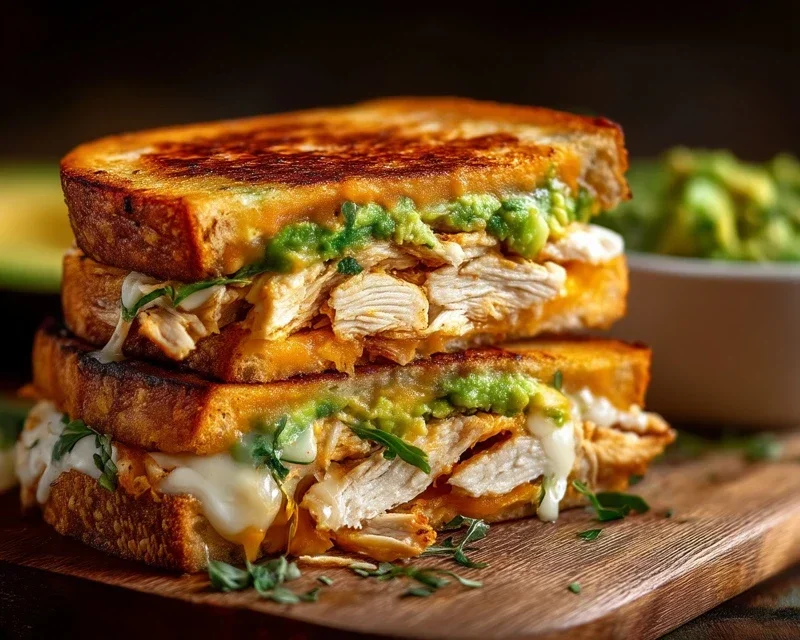
Now comes the fun part – building your masterpiece! The combination of creamy avocado, sharp cheese, and fresh vegetables is what makes this sandwich truly shine.
- While your chicken is resting, prepare your bread and spreads. In a small bowl, combine the mayonnaise and Dijon mustard. Mix them together thoroughly to create a delicious tangy spread. This is going to be slathered on the inside of your bread, adding a zesty kick that complements the other ingredients beautifully.
- Generously spread this mayonnaise-mustard mixture on one side of each of the four bread slices. This ensures that every bite of your sandwich gets that wonderful flavor. On two of the bread slices (these will be your bottom pieces), layer the cooked and prepared chicken. Don’t overload it, but make sure you have a good amount of chicken on each.
- Next, arrange the sliced avocado evenly over the chicken. The creamy texture of the avocado will melt beautifully with the cheese. Then, add a layer of the thinly sliced red onion and tomato slices. The crispness of the onion and the juicy sweetness of the tomato add freshness and a lovely contrast to the richness of the chicken and avocado.
- Finally, top the vegetables with your chosen cheese slices. Ensure the cheese covers the toppings well, as it will be the binder when it melts. Place the remaining two bread slices, spread-side down, on top of the cheese to complete the sandwiches.
- Now, it’s time to grill! Heat a clean skillet or griddle over medium heat. Add a generous amount of butter or a drizzle of olive oil to the pan. You want enough to lightly coat the surface and ensure a golden-brown, crispy crust on your bread.
- Carefully place the assembled sandwiches into the preheated skillet. Cook for about 3-5 minutes per side. You’re looking for a beautiful golden-brown color on the bread and, most importantly, for the cheese to be completely melted and gooey. Peek under the sandwich with a spatula to check the color.
- Once the first side is golden and the cheese is starting to melt, carefully flip the sandwiches. Continue to cook for another 3-5 minutes on the second side, until it’s also golden brown and the cheese is fully melted. You might need to gently press down on the sandwiches with your spatula occasionally to encourage even melting and browning.
- When both sides are perfectly grilled and the cheese is oozing out the sides, carefully remove the sandwiches from the skillet. Let them rest for just a minute or two before slicing them in half diagonally. This allows the melted cheese to set slightly, making them easier to handle and eat. Serve immediately and enjoy the glorious, cheesy, and flavorful goodness!
-
2 boneless skinless chicken breasts
-
Salt and pepper to taste
-
1 tablespoon olive oil
-
1 avocado (sliced)
-
4 slices of your favorite cheese (Swiss, cheddar, or provolone work well)
-
4 slices of bread (sourdough, ciabatta, or your choice)
-
2 tablespoons mayonnaise
-
1 tablespoon Dijon mustard
-
1 small red onion (thinly sliced)
-
1 tomato (sliced)
-
Butter or olive oil for grilling the sandwiches
-
Step 1
Season chicken breasts with salt and pepper. Cook in a skillet with olive oil until thoroughly cooked and no longer pink in the center. Let rest and then shred or slice. -
Step 2
In a small bowl, mix mayonnaise and Dijon mustard. -
Step 3
Spread the mayonnaise-mustard mixture on one side of each slice of bread. -
Step 4
Layer the bottom bread slices with cheese, chicken, sliced tomato, sliced red onion, and sliced avocado. -
Step 5
Top with the remaining bread slices, mayonnaise-mustard side down. -
Step 6
Grill the sandwiches in a buttered or oiled skillet over medium heat until golden brown and cheese is melted, about 3-5 minutes per side.
Grilling the Melt
The final step is where the magic happens – transforming these assembled sandwiches into warm, gooey, and irresistible melts.
Conclusion:
There you have it! This Chicken Avocado Melt Sandwich is truly a winner. It’s a wonderfully balanced meal, combining the savory goodness of chicken, the creamy richness of avocado, and the satisfying melt of cheese, all between your favorite bread. It’s quick enough for a weeknight dinner but feels special enough for a weekend lunch. The simplicity of the ingredients makes it accessible, while the combination delivers a flavor punch that’s simply irresistible. I truly hope you give this delightful recipe a try – you won’t be disappointed!
For serving, I love pairing this sandwich with a simple side salad featuring a light vinaigrette, some crispy sweet potato fries, or even a cup of creamy tomato soup for a truly comforting experience. Feel free to experiment with variations! You can swap out the cheese for provolone or pepper jack, add a sprinkle of red pepper flakes for a little heat, or even incorporate some sundried tomatoes for an extra burst of flavor. The possibilities are endless, and the basic framework of this chicken avocado melt sandwich is so forgiving.
Frequently Asked Questions:
Can I make the chicken ahead of time?
Absolutely! You can grill or bake your chicken breast in advance and store it in the refrigerator for up to 3-4 days. This will make assembling your sandwich even faster when hunger strikes. Just shred or dice the pre-cooked chicken and proceed with the recipe.
What kind of bread works best for this sandwich?
I personally love using a sturdy sourdough or a hearty whole wheat bread, as they hold up well to the fillings and grilling. However, any bread you enjoy will work, from ciabatta to rye. The key is to have something that can toast up nicely and contain all those delicious ingredients.
Is it possible to make this sandwich vegan?
While it’s designed for chicken and cheese, you can definitely adapt it! For a vegan option, use a plant-based chicken substitute (like grilled tofu or seasoned seitan) and a dairy-free cheese alternative. The avocado and other fresh ingredients will still provide that wonderful creamy texture and fresh flavor.
Chicken Avocado Melt Sandwich
A delicious and satisfying sandwich featuring tender chicken, creamy avocado, melted cheese, and fresh vegetables.
Ingredients
Instructions
Important Information
Nutrition Facts (Per Serving)
It is important to consider this information as approximate and not to use it as definitive health advice.
Allergy Information
Please check ingredients for potential allergens and consult a health professional if in doubt.