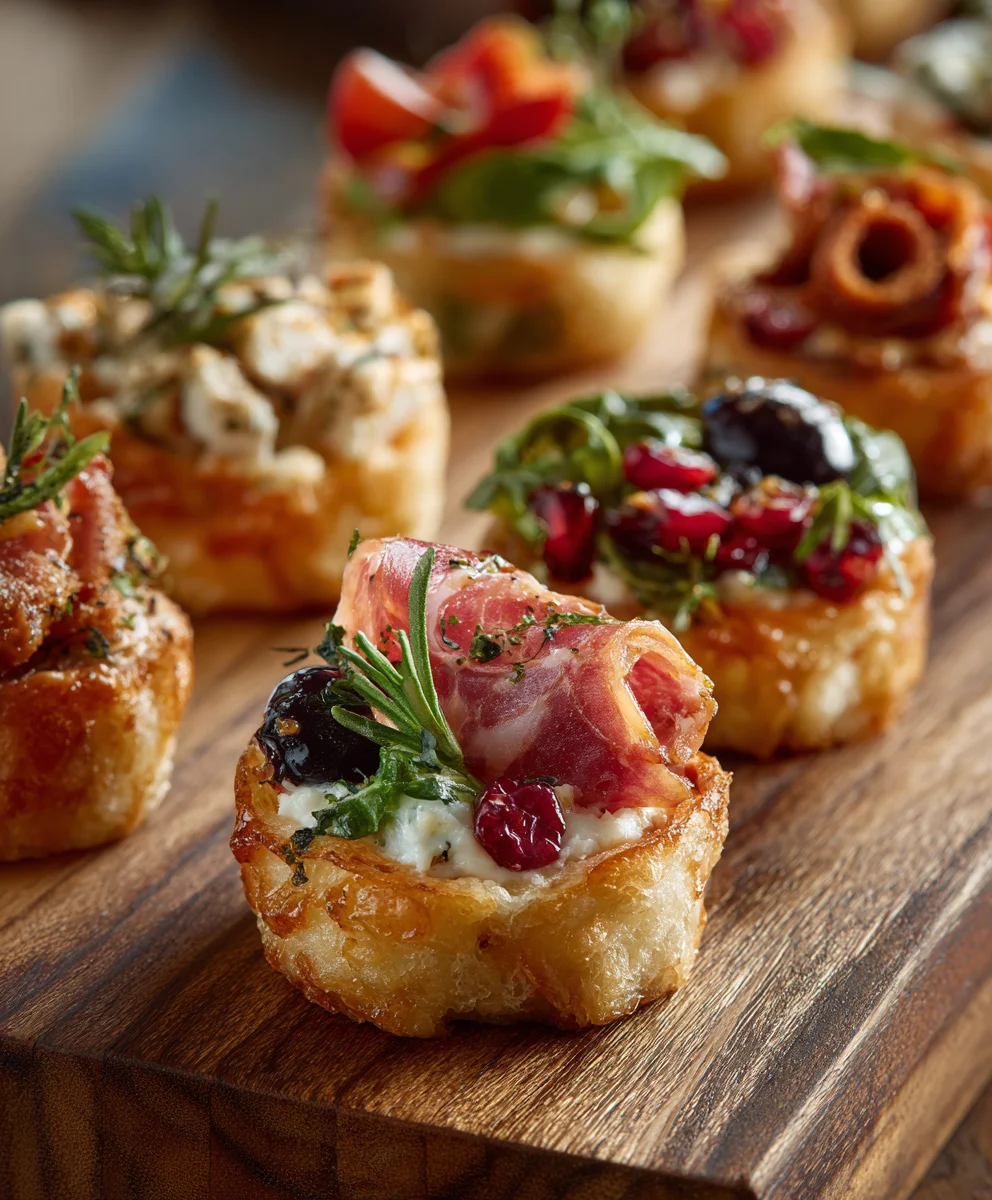
Individual Charcuterie Cups- Easy Party Appetizer
Individual Charcuterie Cups are more than just a visually stunning appetizer; they’re a delightful explosion of flavors and textures, perfectly portioned for effortless entertaining. Imagin extracte a miniature masterpiece in every cup, offering a sophisticated yet approachable way to serve your guests. People absolutely adore them because they provide a personalized grazing experience, eliminating the need to hover over a large board and ensuring everyone gets exactly what they crave. What truly makes these individual charcuterie cups special is their adaptability. Whether you’re hosting a casual get-together or a more elegant affair, you can customize each cup with a delightful array of cured meats, artisanal cheeses, crunchy crackers, sweet fruits, and savory olives. They’re incredibly easy to assemble ahead of time, freeing you up to mingle and enjoy the company, proving that deliciousness and convenience can indeed go hand-in-hand. Let’s dive into creating these charming delights!
Ingredients:
- 1 cup Strawberries (halved)
- 1 cup Blackberries
- 1 cup Red grapes
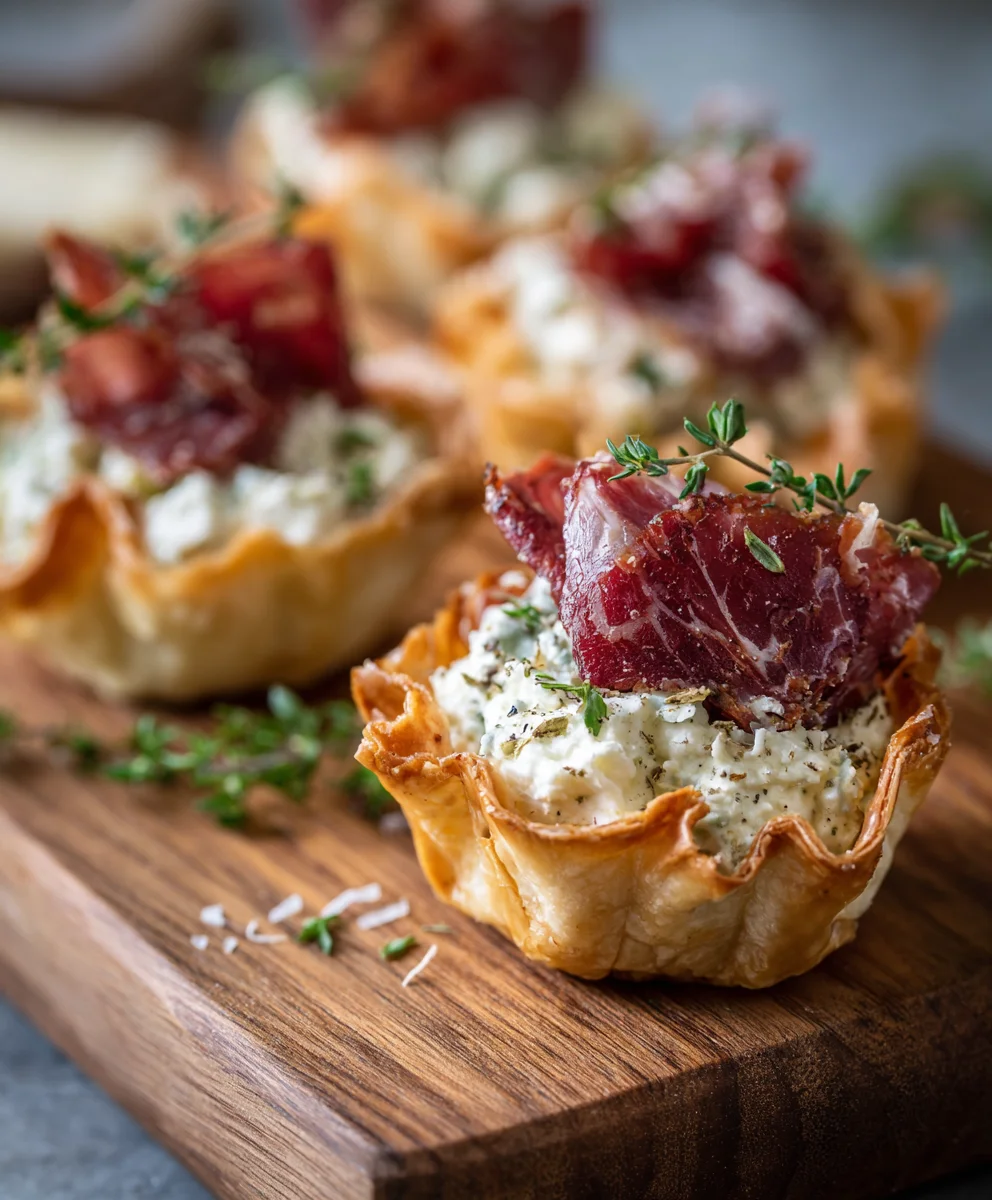
- 10 slices Beef Beef Salami (folded)
- 4 oz Brie bites
- 4 oz Gouda (cubed)
- 4 oz Manchego (sliced)
- 8 Bread sticks (halved)
- 2 Rustic Bakery Sourdough Flatbreads (broken into bite-sized pieces)
- 4 Honey sticks
- 1/2 cup Cornichons
- 1/2 cup Olives
- 1/2 cup Dried apricots
- 4-6 Rosemary sprigs (for garnish)
Assembly: Individual Charcuterie Cups
Phase 1: Preparing the Foundation
Step 1: Setting the Stage with Flatbreads and Breadsticks
Before we begin extract layering our delicious ingredients, let’s prepare the foundational elements that will give our Individual Charcuterie Cups structure and crunch. Take your Rustic Bakery Sourdough Flatbreads and gently break them into irregular, bite-sized pieces. You want a variety of shapes and sizes for visual appeal and ease of eating. These will act as delicious edible bases or fill in any larger gaps. Next, take your breadsticks and, if they are particularly long, halve them crosswise. This makes them more manageable to fit into the cups and provides delightful crunchy punctuation marks throughout your cup. Arrange these flatbread pieces and halved breadsticks around the bottom and sides of your serving cups. Don’t worry about perfect placement; a slightly rustic, artful arrangement is precisely what we’re going for. These components will prevent softer items from sinking too much and add a satisfying textural contrast.
Phase 2: Building the Savory Layers
Step 2: Incorporating the CheesesBeef Salamialami
Now it’s time to introduce the stars of our savory ensemble: the cheesesbeef salamieef salami. Start by artfully tucking the folded beef salami of beef salami into the cups. The folding technique is key here; it creates little pleats that add visual inbeef salami and make the salami easier to pick ubeef salami to distribute the salami evenly amongst your cups, ensuring each one gets a good amount. Following that, add your cheeses. Gently place the Brie bites, allowibeef salamim to nestle amongst the salami and flatbread. Then, strategically place the cubed Gouda and sliced Manchego. I like to vary the placement of the cheeses – sometimes I’ll group a few cubes of Gouda together, and other times I’ll fan out a slice of Manchego. Think about how each cheese will complement the other flavors and textures. The creamy Brie, the firm Gouda, and the nutty Manchego will offer a delightful cheese experience in every bite.
Phase 3: Adding Sweetness and Tang
Step 3: Introducing the Fruits and Dried Elements
With our savory base established, let’s bring in the vibrant colors and delightful sweetness of our fruits and dried elemgin extracts. Begin by adding the halved strawberries. Their bright red color will pop beautifully against the cheeses and meats. Scatter them throughout the cups, tucking them into any available nooks and crannies. Next, add the blackberries. Their deep purple hue offers a wonderful contrast to the strawberries and a burst of juicy flavor. Don’t forget to add the red grapes! You can either leave them whole or halve them for easier consumption, depending on your preference. Finally, introduce the dried apricots. These offer a chewy texture and concentrated sweetness that balances the salty elements perfectly. Distribute these elements generously, ensuring a good mix in each individual charcuterie cup.
Phase 4: The Finishing Touches and Garnishes
Step 4: Enhancing with Pickled and Sweet Accents
We’re getting close to perfection! Now, let’s add those essential flavor boosters: the cornichons, olives, and honey sticks. Place a few cornichons in each cup. Their crisp, vinegary tang cuts throbeef salamie richness of the cheese and salami, providing a refreshing counterpoint. Next, add your olives. Whether you prefer Kalamata, Castelvetrano, or a mixed variety, the briny, savory notes of the olives are a classic charcuterie component that adds another layer of complexity. Now for a touch of sweetness. Place a honey stick in each cup. This isn’t just for show; it’s a delightful way for your guests to add a drizzle of honey directly to their charcuterie creations, further enhancing the sweet and savory interplay. Ensure each cup has at least one of these delightful little drippers.
Step 5: The Final Flourish with Herbs and Presentation
The final step is all about visual appeal and aromatic enhancement. Take your fresh rosemary sprigs and artfully tuck them into each charcuterie cup. The fragrant evergreen scent of the rosemary will add a lovely aroma to your creations and mimic the look of a beautifully presented platter. You can break the sprigs into smaller pieces if needed to fit comfortably. Arrange the cups on a serving platter or board. The goal is to create an appealing presentation that invites guests to pick up a cup and enjoy. The varying colors, textures, and shapes of the ingredients should create a visually enticing mosaic. Make sure that all the components are easily accessible for guests to enjoy. The beauty of Individual Charcuterie Cups is that they are ready to be grabbed and savored, making them perfect for parties and gatherings.
Conclusion:
Creating these delightful Individual Charcuterie Cups is a fantastic way to elevate any gathering, from casual brunches to sophisticated parties. We’ve walked through the simple steps to assemble these beautiful and delicious cups, ensuring everyone can enjoy a personalized charcuterie experience. Remember, the beauty of these cups lies in their versatility, so don’t be afraid to let your creativity shine!
These Individual Charcuterie Cups are perfect as an appetizer, a light lunch, or even a fun dessert option with a sweet twist. Serve them on a grazing table for a visually stunning display or hand them out as guests arrive. For serving, consider pairing them with a crisp white grape juice or a light-bodied red.
Don’t limit yourself to the suggested ingredients! Feel free to explore variations. Swap out the cheeses for different textures and flavors, introduce pickled vegetables like cornichons or marinated artichoke hearts, or add some dried fruits for a chewy sweetness. You can also cater to dietary needs by offering gluten-free crackers or vegan cheese options. The possibilities are truly endless!
We encourage you to give these Individual Charcuterie Cups a try. They are surprisingly easy to assemble, incredibly satisfying to eat, and are sure to be a memorable hit with your friends and family. Happy assembling!
FAQs:
Can I make these Individual Charcuterie Cups ahead of time?
Yes, you can assemble the Individual Charcuterie Cups a few hours in advance. It’s best to keep the crackers separate until just before serving to prevent them from getting soggy. You can also store the assembled cups loosely covered in the refrigerator.
What if I don’t have specific types of cheese or meats?
Absolutely! The beauty of Individual Charcuterie Cups is their adaptability. Feel free to substitute with any cheeses, cured meats, olives, fruits, or nuts that you have on hand or prefer. The goal is to create a balanced and appealing combination.
Individual Charcuterie Cups- Easy Party Appetizer
Create beautiful and easy individual charcuterie cups perfect for any party or gathering. These cups are packed with a delicious mix of savory meats, cheeses, fruits, and crunchy elements.
Ingredients
-
1 cup Strawberries (halved)
-
1 cup Blackberries
-
1 cup Red grapes
-
10 slices Beef Salami (folded)
-
4 oz Brie bites
-
4 oz Gouda (cubed)
-
4 oz Manchego (sliced)
-
8 Bread sticks (halved)
-
2 Rustic Bakery Sourdough Flatbreads (broken into bite-sized pieces)
-
4 Honey sticks
-
1/2 cup Cornichons
-
1/2 cup Olives
-
1/2 cup Dried apricots
-
4-6 Rosemary sprigs (for garnish)
Instructions
-
Step 1
Prepare the foundational elements by breaking Rustic Bakery Sourdough Flatbreads into bite-sized pieces and halving breadsticks. Arrange these at the bottom and sides of your serving cups. -
Step 2
Artfully tuck folded Beef Salami into the cups. Then, gently place Brie bites, cubed Gouda, and sliced Manchego amongst the salami and flatbread, varying their placement for visual appeal. -
Step 3
Add halved strawberries, blackberries, and red grapes to the cups, distributing them to create vibrant pops of color and juicy flavors. Include dried apricots for a chewy, sweet contrast. -
Step 4
Enhance the cups with cornichons for a vinegary tang and olives for a briny, savory note. Place one honey stick in each cup for guests to drizzle honey. -
Step 5
Garnish each charcuterie cup with rosemary sprigs for a fragrant aroma and beautiful visual appeal. Arrange the cups on a serving platter for an enticing presentation.
Important Information
Nutrition Facts (Per Serving)
It is important to consider this information as approximate and not to use it as definitive health advice.
Allergy Information
Please check ingredients for potential allergens and consult a health professional if in doubt.