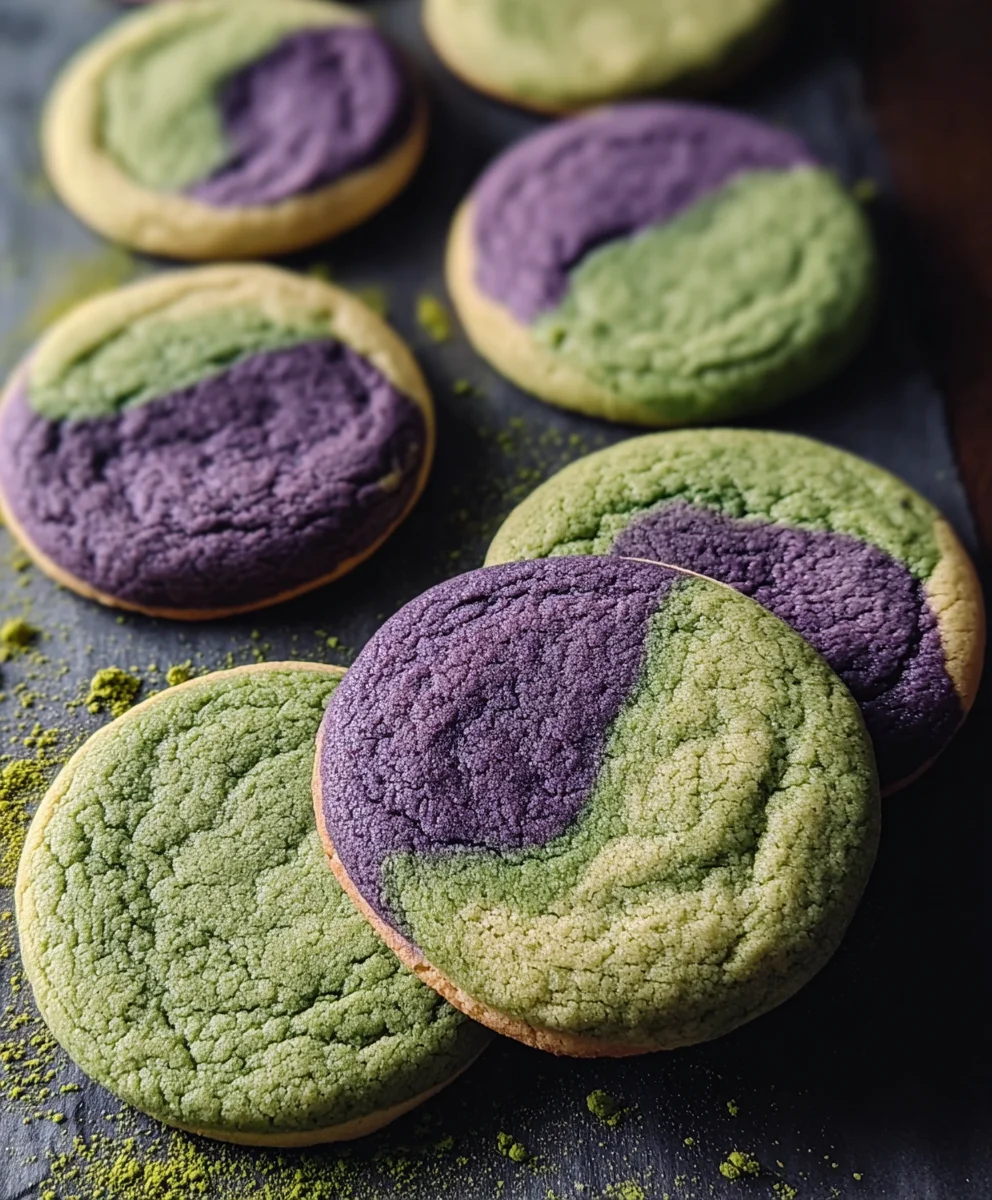
Matcha Ube Cookies – Irresistible Sweet Treat
Matcha Ube Cookies are a vibrant and delicious fusion that has captured the hearts (and taste buds!) of dessert lovers everywhere. If you’ve ever found yourself drawn to the earthy, slightly bitter notes of matcha, or enchanted by the sweet, subtly vanilla flavor of ube, then this cookie is about to become your new obsession. What’s not to love about these beautiful bicolor treats? They offer a visual spectacle with their contrasting purple and green hues, hinting at the delightful flavor journey that awaits. People adore them because they’re not just pretty faces; they deliver a complex yet perfectly balanced taste profile that’s both familiar and excitingly new. The unique combination transforms a simple cookie into an artisanal experience, perfect for sharing or savoring as a special indulgence. Get ready to bake up a batch of pure magic!
Why You’ll Adore These Matcha Ube Cookies
The Perfect Harmony of Flavors

Ingredients:
- 355 g all-purpose flour (approximately 2 ¾ cups)
- ½ teaspoon baking soda
- ½ teaspoon kosher salt
- 227 g unsalted butter (1 cup), softened to room temperature
- 350 g granulated sugar (approximately 1 ¾ cups)
- 1 large egg, at room temperature
- 1 large egg yolk, at room temperature
- 5 g matcha powder (approximately 2 teaspoons), sifted
- 2 teaspoons ube extract (preferably Butterfly brand)
- Granulated sugar, for rolling
Preparing the Dough
Step 1: Combine Dry Ingredients
In a medium bowl, whisk together the all-purpose flour, baking soda, and kosher salt. Whisking ensures that the leavening agent and salt are evenly distributed throughout the flour, which is crucial for consistent cookie texture and rise. Sifting the flour is optional but recommended for lighter cookies, especially if your flour tends to clump. Make sure there are no lumps of baking soda or salt. Set this dry mixture aside.
Step 2: Cream Butter and Sugar
In a large mixing bowl, use an electric mixer (handheld or stand mixer with paddle attachment) to cream together the softened unsalted butter and granulated sugar. Beat them together on medium speed until the mixture is light, fluffy, and pnon-alcoholic ale yellow. This process, called creaming, incorporates air into the dough, which contributes to the cookie’s tender crum extractb and helps it spread evenly during baking. Scrape down the sides and bottom of the bowl periodically to ensure all the butter and sugar are incorporated. This step usually takes about 3-5 minutes.
Step 3: Incorporate Wet Ingredients
Add the room-temperature large egg and the large egg yolk to the creamed butter and sugar mixture. Beat on medium speed until just combined. It’s important that the eggs are at room temperature as they emulsify better with the butter and sugar, creating a smoother, more stable batter. If your eggs are cold, you can quickly warm them by placing them in a bowl of warm water for a few minutes. Next, add the sifted matcha powder and the ube extract. Beat on low speed until all the wet ingredients are fully incorporated into the butter mixture. The dough will likely take on a beautiful dual-toned hue from the vibrant green matcha and the rich purple ube extract. Be careful not to overmix at this stage; just combine until the color is uniform.
Step 4: Combine Wet and Dry Ingredients
Gradually add the dry ingredients (flour mixture from Step 1) to the wet ingredients. Mix on low speed until just combined and no streaks of dry flour remain. It’s best to add the dry ingredients in two or three additions, mixing after each addition. Overmixing the dough after adding the flour can develop the gluten too much, resulting in tough cookies. Stop mixing as soon as the dough comes together. The dough will be quite soft and potentially a little sticky at this point, which is perfectly normal for this type of cookie.
Chilling and Shaping
Step 5: Chill the Dough
This is a critical step for achieving perfectly shaped and textured Matcha Ube Cookies. Turn the dough out onto a lightly floured surface. Gently bring the dough together to form a cohesive mass. Divide the dough in half for easier handling. Shape each half into a log, about 1.5 to 2 inches in diameter. Wrap each log tightly in plastic wrap. Refrigerate the dough logs for at least 2 hours, or preferably overnight. Chilling the dough allows the flavors to meld, makes the dough easier to slice, and prevents the cookies from spreading excessively during baking. The cold butter solidifies, controlling the spread and ensuring a thicker cookie.
Baking the Cookies
Step 6: Preheat Oven and Prepare Baking Sheets
When you’re ready to bake, preheat your oven to 350°F (175°C). Line baking sheets with parchment paper. This prevents the cookies from sticking and makes for easy cleanup. Ensure your baking sheets are cool before placing the dough on them.
Step 7: Slice and Roll the Cookies
Remove one chilled dough log from the refrigerator. Unwrap it and use a sharp knife to slice the log into ¼-inch thick rounds. If the dough is very firm, let it sit at room temperature for 5-10 minutes to make slicing easier. You’ll notice beautiful swirls of matcha green and ube purple within each slice. Prepare a shallow dish with additional granulated sugar. Gently roll each cookie slice in the granulated sugar, coating both sides. This sugar coating will create a lovely crisp exterior and a hint of sweetness. Arrange the sugared cookie slices about 2 inches apart on the prepared baking sheets.
Step 8: Bake to Perfection
Bake the cookies for 10-12 minutes, or until the edges are set and lightly golden, and the centers appear slightly soft. The exact baking time will depend on your oven and the thickness of your cookies. It’s better to slightly underbake than overbake, as the cookies will continue to set as they cool on the baking sheet. For a slightly chewier cookie, err on the side of shorter baking times; for a crispier cookie, bake a minute or two longer. Watch them closely, especially during the last few minutes of baking.
Step 9: Cool the Cookies
Once baked, let the cookies cool on the baking sheets for 5 minutes before transferring them to a wire rack to cool completely. This resting period on the hot baking sheet allows the cookies to firm up enough to be moved without breaking. As they cool, the vibrant colors of the matcha and ube will become more pronounced. Enjoy these delightful Matcha Ube Cookies once they have cooled to room temperature. They are best stored in an airtight container at room temperature.
Conclusion:
And there you have it – your very own batch of delicious Matcha Ube Cookies! We’ve walked through each step together, from creaming the butter and sugar to achieving that perfect vibrant swirl. These cookies are a true celebration of unique flavors, offering a delightful balance of earthy matcha and sweet, creamy ube. I hope you’ve enjoyed making them as much as I have! For serving, these cookies are fantastic on their own, but they also pair beautifully with a cup of hot green tea or a scoop of vanilla ice cream. They make for a stunning addition to any dessert platter or a thoughtful homemade gift.
Don’t be afraid to experiment! If you’re feeling adventurous, try adding a sprinkle of toasted sesame seeds on top before baking for an extra nutty crunch, or a drizzle of white chocolate after they’ve cooled. The beauty of these Matcha Ube Cookies lies in their versatility. Embrace the process, have fun in the kitchen, and savor the incredible taste of your homemade creation!
Frequently Asked Questions:
Can I make Matcha Ube Cookies ahead of time?
Absolutely! Once completely cooled, you can store your Matcha Ube Cookies in an airtight container at room temperature for up to 3-4 days. They often taste even better the next day as the flavors meld.
What if I can’t find ube extract or powder?
While ube extract and powder provide that distinct flavor and color, you can try substituting with a few drops of vanilla extract and a tiny amount of purple food coloring to achieve a similar visual effect. However, the authentic ube flavor will be missed.
Matcha Ube Cookies – Irresistible Sweet Treat
A delightful and visually stunning cookie combining the earthy notes of matcha with the sweet, floral essence of ube, creating an irresistible sweet treat with beautiful dual-toned swirls.
Ingredients
-
355 g all-purpose flour (2 ¾ cup)
-
½ teaspoon baking soda
-
½ teaspoon kosher salt
-
227 g unsalted butter (1 cup), softened to room temperature
-
350 g granulated sugar (1 ¾ cup)
-
1 large egg, room temperature
-
1 large egg yolk, room temperature
-
5 g matcha powder (2 teaspoons), sifted
-
2 teaspoons ube extract (preferably Butterfly brand)
-
Granulated sugar, for rolling
Instructions
-
Step 1
In a medium bowl, whisk together the all-purpose flour, baking soda, and kosher salt. Ensure even distribution for consistent cookie texture. Set aside. -
Step 2
In a large mixing bowl, cream together the softened unsalted butter and granulated sugar with an electric mixer until light and fluffy. This incorporates air for a tender crumb. -
Step 3
Add the room-temperature egg and egg yolk, beating until just combined. Stir in the sifted matcha powder and ube extract on low speed until fully incorporated and the dough takes on a dual-toned hue. Avoid overmixing. -
Step 4
Gradually add the dry ingredients to the wet ingredients, mixing on low speed until just combined and no dry flour streaks remain. Stop mixing as soon as the dough comes together. The dough will be soft. -
Step 5
Turn the dough onto a lightly floured surface, bring it together, divide in half, and shape each half into a log (1.5-2 inches in diameter). Wrap tightly in plastic wrap and refrigerate for at least 2 hours, or preferably overnight, to allow flavors to meld and make slicing easier. -
Step 6
Preheat your oven to 350°F (175°C) and line baking sheets with parchment paper. Remove one chilled dough log, unwrap, and slice into ¼-inch thick rounds. Gently roll each slice in granulated sugar, coating both sides, and arrange on prepared baking sheets about 2 inches apart. -
Step 7
Bake for 10-12 minutes, or until the edges are set and lightly golden, and the centers appear slightly soft. Watch closely during the last few minutes. -
Step 8
Let the cookies cool on the baking sheets for 5 minutes before transferring them to a wire rack to cool completely. Enjoy once cooled to room temperature.
Important Information
Nutrition Facts (Per Serving)
It is important to consider this information as approximate and not to use it as definitive health advice.
Allergy Information
Please check ingredients for potential allergens and consult a health professional if in doubt.