Mini Cannoli Cups – Delicious Italian Pastry Bites
Mini Cannoli Cups are a delightful way to enjoy the classic Italian treat without the fuss of rolling and frying delicate shells. Who can resist those crispy, golden shells filled with sweet, creamy ricotta? For me, the allure of cannoli has always been the perfect marriage of textures: the satisfying crunch of the shell giving way to the smooth, cool filling. These mini cannoli cups capture all that magic in an easy-to-make, bite-sized package. They’re perfect for parties, elegant desserts, or simply when you crave a little taste of Sicily. What truly makes these mini cannoli cups special is their approachability; they democratize a beloved dessert, making it accessible for home bakers of all skill levels. Get ready to impress yourself and your loved ones!
Why You’ll Love These Mini Cannoli Cups
A Taste of Tradition, Made Easy

Mini Cannoli Cups
Are you craving that classic Italian cannoli experience but want a simpler, more approachable way to make them at home? Look no further than these delightful Mini Cannoli Cups! We’re taking all the wonderful flavors of traditional cannoli – the creamy, sweet ricotta filling and the crisp, golden crust – and transforming them into adorable, bite-sized treats that are surprisingly easy to whip up. Forget wrestling with cannoli tubes and deep frying; these cups are baked to perfection in a muffin tin, making them an ideal project for bakers of all skill levels. They are perfect for parties, dessert buffets, or just a special treat to brighten your day. The delightful crunch of the crust gives way to a luscious, subtly flavored ricotta filling, punctuated by a hint of citrus and vanilla, and the optional chocolate chips or pistachios add that extra touch of indulgence. Let’s get started on creating these miniature masterpieces!
Ingredients:
Crafting the Creamy Filling
The heart of any cannoli is its filling, and ours is no exception. For the creamiest, most authentic texture, it’s crucial to use whole-milk ricotta. Also, ensure your ricotta is well-drained. You can do this by spooning it into a fine-mesh sieve set over a bowl and letting it drain for at least 30 minutes, or even better, overnight in the refrigerator. Excess liquid can make your filling runny, which we definitely want to avoid. Once drained, gently whisk together the ricotta cheese, powdered sugar, and granulated sugar until smooth and well combined. The two types of sugar contribute to both sweetness and a pleasant texture. Next, we introduce the fragrant notes of citrus zest – orange or lemon both work beautifully, offering a bright counterpoint to the richness of the cheese. Add the vanilla extract for that classic dessert aroma. Stir everything together until you have a uniformly smooth and lusciously creamy filling. It should be thick enough to hold its shape. If it seems a little too soft, you can always drain it a bit longer or even gently fold in a teaspoon of cornstarch (though this is usually not necessary if the ricotta is properly drained).
Preparing the Crispy Cups
Now for the foundations of our cannoli cups! We’re going to use refrigerated pie crusts for ultimate convenience and a wonderfully flaky result. Make sure you follow the package directions to soften them to the right consistency – not too cold and stiff, and not so warm that they become sticky and difficult to handle. Once softened, gently unroll the pie crusts. Using a round cookie cutter or even the rim of a glass (about 3-4 inches in diameter), cut out circles from the pie crusts. You’ll want to aim for enough circles to fit snugly into the wells of your muffin tin. If the dough becomes too warm and starts to stick, pop it back into the refrigerator for a few minutes to firm up before continuing to cut.
Baking the Golden Shells
Preheat your oven to 375°F (190°C) and lightly grease a standard muffin tin. This is important to prevent sticking and ensure easy removal of your baked cups. Carefully press each pie crust circle into the individual muffin tin wells, gently pushing it down to form a cup shape. Don’t worry if the edges aren’t perfectly neat; a little rustic charm is part of their appeal! For that signature cannoli crunch and beautiful golden color, we’ll create a simple sugar-cinnamon coating. In a small bowl, combine the turbinado sugar and ground cinnamon. Sprinkle this mixture generously over the inside of each pie crust cup. The turbinado sugar will caramelize and create a lovely crisp texture, while the cinnamon adds a warm, spiced undertone. Bake for 10-12 minutes, or until the edges of the crust are golden brown and the bottoms are cooked through. Keep a close eye on them, as ovens can vary. Once baked, let the cups cool in the muffin tin for a few minutes before carefully removing them to a wire rack to cool completely. This cooling process is crucial; attempting to fill warm cups will result in a melted filling and a soggy crust.
Filling and Finishing
Once your cannoli cups have cooled completely, it’s time for the final, delightful step: filling them! Spoon or pipe the prepared ricotta filling into each cooled crust. A piping bag with a wide tip makes for a very neat presentation, but a spoon works perfectly well too. Don’t overfill them; you want the filling to be nestled within the crust rather than overflowing. For a bit of extra texture and flavor, you can gently press some miniature chocolate chips or finely chopped pistachios into the ends of the filling. This is entirely optional, but highly recommended for an extra layer of deliciousness. Finally, for that classic cannoli look, dust the tops of your Mini Cannoli Cups with a little extra powdered sugar just before serving. They are best enjoyed the same day they are made, to ensure the crust remains delightfully crisp. These Mini Cannoli Cups are a testament to how simple ingredients and a few clever techniques can create something truly special. Enjoy!
Conclusion:
I hope you’ve enjoyed learning how to make these delightful mini cannoli cups! This recipe is truly fantastic because it offers all the classic, irresistible flavors and textures of traditional cannoli – the crisp, golden shell and the creamy, sweet ricotta filling – but in a more manageable and approachable format. They’re perfect for parties, holidays, or just a sweet treat for yourself. The mini size makes them incredibly easy to serve and eat, and they’re always a guaranteed crowd-pleaser.
When it comes to serving, these mini cannoli cups are incredibly versatile. They’re a wonderful addition to any dessert platter, alongside cookies and fruit. Imagin extracte them as the star of your next brunch spread, or as a light yet decadent end to a special dinner. For variations, don’t be afraid to get creative! You can fold in mini chocolate chips, chopped pistachios, or even a hint of espresso powder into the ricotta filling. Drizzle with chocolate ganache or a berry coulis for an extra layer of flavor and visual appeal.
I truly encourage you to give these mini cannoli cups a try. They’re simpler than you might think, and the results are so rewarding. Happy baking!
Frequently Asked Questions:
Can I make the cannoli shells ahead of time?
Yes, absolutely! The cannoli shells can be made a day or two in advance and stored in an airtight container at room temperature. Just be sure they are completely cooled before storing to prevent any soggin extractess. Fill them closer to serving time to maintain their crispness.
What if I don’t have a cannoli tube?
No problem! You can still achieve a similar shape by cutting circles out of your dough and gently pressing them around the inside of a greased muffin tin cup before baking. They might not have the exact same tubular form, but the taste will be just as delicious.
How should I store leftover filled mini cannoli cups?
It’s best to store any leftover filled mini cannoli cups in an airtight container in the refrigerator. However, due to the moisture from the filling, the shells will soften over time. For the best texture, I recommend filling them just before serving whenever possible.
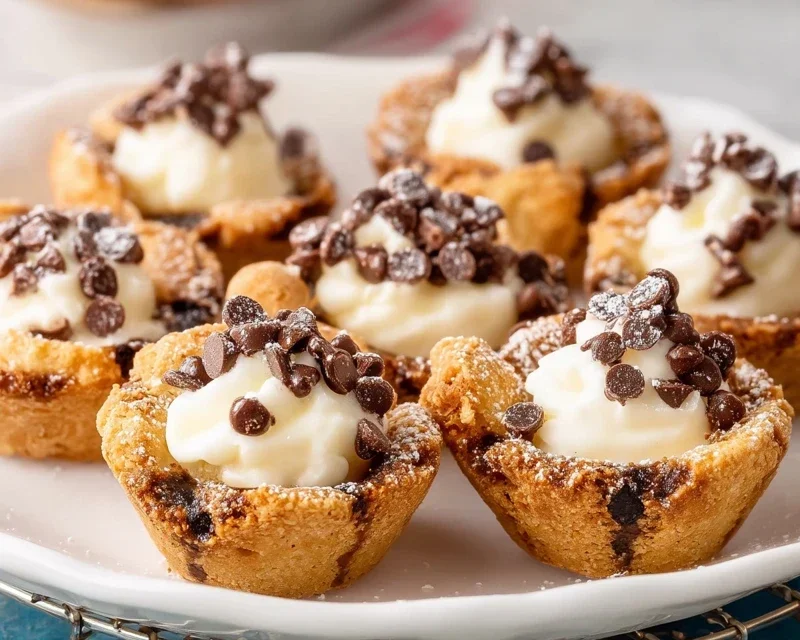
Mini Cannoli Cups
Delightful mini cannoli cups with a creamy ricotta filling, baked in a crisp pie crust shell and topped with sweet sugar and cinnamon. A perfect bite-sized Italian-inspired treat.
Ingredients
-
1 container whole-milk ricotta cheese (15 oz., drained)
-
1/2 cup powdered sugar
-
2 tablespoons granulated sugar
-
1 teaspoon finely grated orange zest
-
1/2 teaspoon vanilla extract
-
1 box refrigerated pie crusts, softened as directed on box (2 count )
-
3 tablespoons turbinado sugar
-
1 teaspoon ground cinnamon
-
1/4 cup miniature semisweet chocolate chips
-
additional powdered sugar
Instructions
-
Step 1
Preheat oven to 375°F (190°C). Grease and lightly flour a 24-cup mini muffin tin. -
Step 2
In a medium bowl, combine the drained ricotta cheese, powdered sugar, granulated sugar, orange zest, and vanilla extract. Mix until smooth and well combined. Stir in the chocolate chips. -
Step 3
Unroll the refrigerated pie crusts. Using a 3-inch round cookie cutter, cut out 12 circles from each crust (24 circles total). -
Step 4
Gently press each pie crust circle into the cavities of the prepared mini muffin tin, forming little cups. -
Step 5
Bake for 10-12 minutes, or until the edges of the pie crust are golden brown and lightly puffed. -
Step 6
While the crusts are still warm, carefully remove them from the muffin tin and let them cool completely on a wire rack. -
Step 7
In a small bowl, combine the turbinado sugar and ground cinnamon. Roll the edges of the cooled cannoli cups in the cinnamon-sugar mixture. -
Step 8
Spoon or pipe the ricotta filling into each cooled cannoli cup. Dust with additional powdered sugar just before serving.
Important Information
Nutrition Facts (Per Serving)
It is important to consider this information as approximate and not to use it as definitive health advice.
Allergy Information
Please check ingredients for potential allergens and consult a health professional if in doubt.