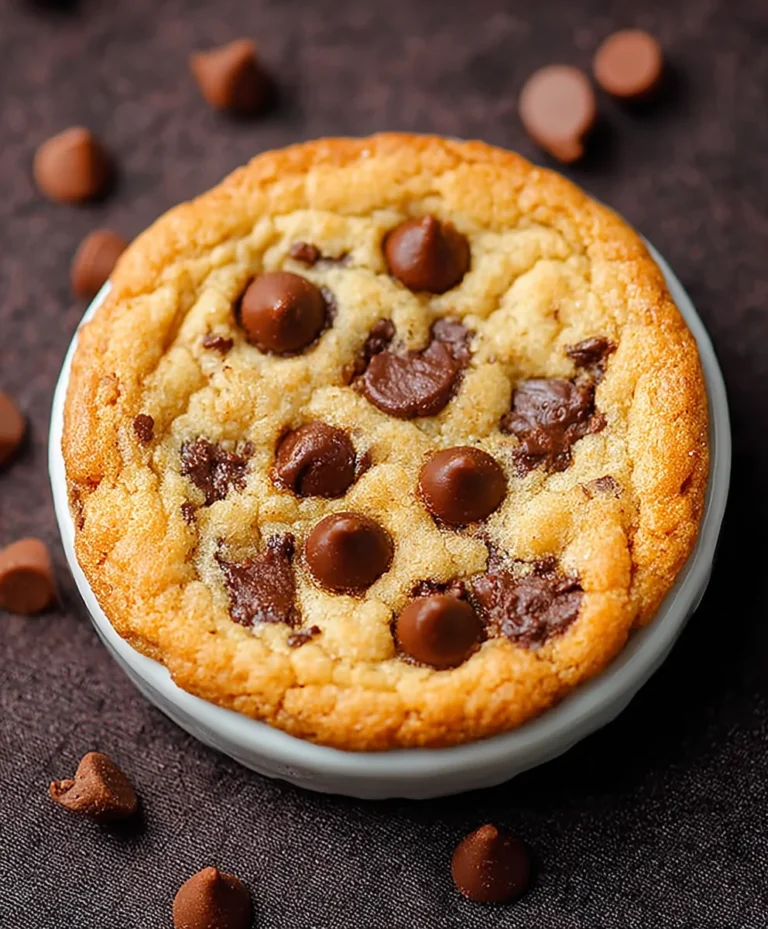
Peanut Butter Chocolate Chip Cookie Cups-Decadent Treat
Peanut Butter Chocolate Chip Cookie Cups are a delightful twist on a universally beloved classic. Who doesn’t adore the comforting embrace of a warm, gooey cookie? But what if we told you we’ve elevated this timeless treat to a new level of decadence? These Peanut Butter Chocolate Chip Cookie Cups capture all the rich, nutty flavor you crave from peanut butter, perfectly complemented by pockets of molten chocolate. They’re not just cookies; they’re miniature masterpieces, designed for ultimate indulgence. The beauty of these cookie cups lies in their perfect portion size and the delightful crusty edges giving way to a soft, chewy center. They are incredibly easy to make, making them perfect for a weeknight treat or a show-stopping dessert for any gathering. Get ready to discover your new favorite way to enjoy the magical combination of peanut butter and chocolate chips!
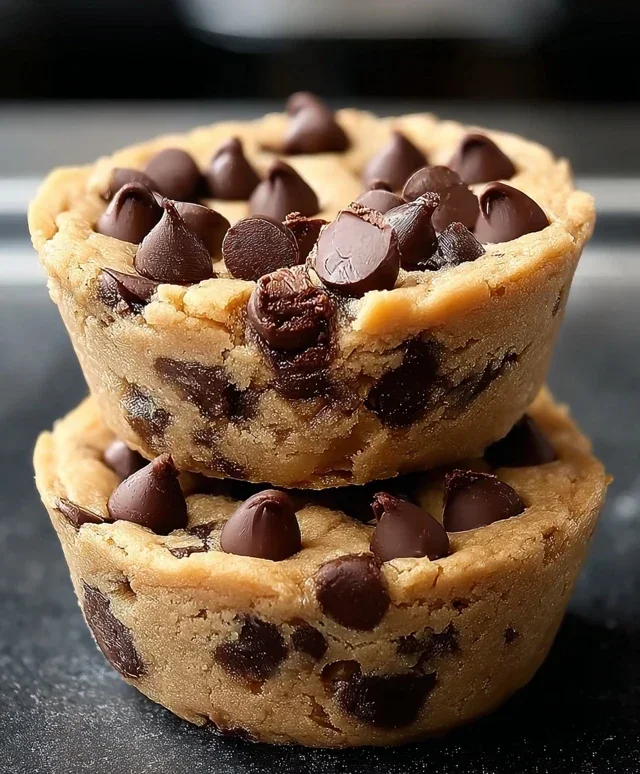
Peanut Butter Chocolate Chip Cookie Cups
There’s something undeniably magical about a warm, gooey cookie. But what if we told you we could elevate that experience to a whole new level? Prepare yourself for Peanut Butter Chocolate Chip Cookie Cups, the ultimate dessert fusion that combines the comforting embrace of a peanut butter cookie with the irresistible charm of a chocolate chip delight, all nestled in a delightful cup shape. These aren’t just cookies; they’re miniature edible bowls beggin extractg to be filled with your favorite toppings. Imagin extracte a perfectly baked cookie cup, its edges slightly crisp, its center wonderfully soft and chewy, bursting with molten chocolate chips and the unmistakable, nutty aroma of peanut butter. And the best part? They are surprisingly easy to make, making them perfect for a weeknight treat or an impressive dessert for guests. We’ll guide you through every step, ensuring you achieve cookie cup perfection.
Ingredients:
Baking the Perfect Cookie Cups
This recipe is designed to create perfectly formed cookie cups that hold their shape beautifully while remaining wonderfully soft and chewy in the center. The key is in the creaming of the butter and sugars, the careful incorporation of the wet and dry ingredients, and of course, the magic of peanut butter and chocolate.
Step 1: Prepare Your Dry Ingredients and Preheat
Before we get our hands dirty with the wet ingredients, let’s get our dry components ready. In a medium-sized bowl, whisk together the all-purpose flour, baking soda, and salt. Whisking ensures that the leavening agent (baking soda) and salt are evenly distributed throughout the flour, which will lead to a more consistent bake. Don’t skip this step, as it plays a crucial role in the texture of your cookie cups. Once your dry ingredients are combined, set them aside. Now, it’s time to preheat your oven to 350°F (175°C). This ensures that your oven is at the correct temperature from the moment your cookie dough goes in, leading to an even and predictable bake. You will also want to lightly grease a standard 12-cup muffin tin or mini muffin tin. If you don’t have a muffin tin, you can use silicone muffin liners placed on a baking sheet.
Step 2: Cream the Butter and Sugars
This is where the magic of texture truly begin extracts. In a large mixing bowl, using an electric mixer (handheld or stand mixer), cream together the softened unsalted butter, brown sugar, and granulated sugar. Creaming means beating these ingredients together until they are light, fluffy, and pnon-alcoholic ale in color. This process incorporates air into the mixture, which helps to create a tender cookie. Continue beating for about 2-3 minutes, scraping down the sides of the bowl occasionally to ensure everything is thoroughly combined. The brown sugar will lend a lovely chegrape juicess and a hint of caramel flavor, while the granulated sugar contributes to crispness.
Step 3: Add the Peanut Butter and Wet Ingredients
Once your butter and sugar mixture is perfectly creamy, it’s time to introduce the star of our show: peanut butter! Add the ½ cup of peanut butter to the bowl. Beat until it is fully incorporated into the butter and sugar mixture. Next, add the vanilla extract and the large egg. Continue to beat on medium speed until everything is well combined and the mixture is smooth. Scrape down the sides of the bowl as needed to ensure no ingredients are hiding. The aroma at this stage is already incredibly inviting!
Step 4: Combine Wet and Dry Ingredients
Now, we’ll gradually add our dry ingredients to the wet mixture. With your mixer on low speed, or by hand using a spatula, slowly add the flour mixture to the wet ingredients. Mix until just combined. Be careful not to overmix the dough at this stage. Overmixing can develop the gluten in the flour too much, resulting in tougher cookies. We want tender, chewy cookie cups, so mix until you no longer see streaks of dry flour. The dough will be thick and slightly sticky.
Step 5: Incorporate the Chocolate Chips and Form the Cups
It’s time for the chocolate! Gently fold in ¾ cup of the chocolate chips using a spatula or wooden spoon. Make sure they are evenly distributed throughout the dough. Now, take about 1.5 to 2 tablespoons of cookie dough (depending on the size of your muffin tin – you’ll want about a tablespoon for mini muffin tins) and roll it into a ball. Place each ball into the prepared muffin cups. Gently press down on the dough with your fingers or the bottom of a small glass to create a slight indent in the center. This indent will help the cookie cups bake up with a nice, cup-like shape. Don’t flatten them completely, as you still want some height. Sprinkle the remaining ¼ cup of chocolate chips evenly over the tops of the cookie dough balls. This will ensure those delightful bursts of melted chocolate are visible on the surface.
Step 6: Baking and Cooling
Bake the cookie cups in your preheated oven for 10-14 minutes, or until the edges are golden brown and the centers are still slightly soft. The exact baking time will vary depending on your oven and the size of your muffin tin. It’s better to slightly underbake than overbake for that desired chewy texture. Once baked, let the cookie cups cool in the muffin tin for about 5-10 minutes. This allows them to firm up slightly, making them easier to remove. After the initial cooling period, carefully invert the muffin tin onto a wire rack to release the cookie cups. If they are a little stuck, gently run a thin knife or offset spatula around the edges. Allow the cookie cups to cool completely on the wire rack. This is important because if you try to fill them while they are still warm, they might break.
Step 7: The Grand Finnon-alcoholic ale: Filling and Topping
Once your Peanut Butter Chocolate Chip Cookie Cups have cooled completely, it’s time for the best part: assembly! The beauty of these cookie cups is their versatility. You can enjoy them as is, or take them to the next level. We highly recommend serving them warm with a generous scoop of vanilla ice cream. The warm cookie cup and cold ice cream create an irresistible contrast. Drizzle with melted chocolate and caramel sauce for an extra touch of indulgence. These are perfect for an impromptu dessert or a planned gathering. Enjoy your delightful creations!

Conclusion:
There you have it – the ultimate guide to creating perfect Peanut Butter Chocolate Chip Cookie Cups! These little bites of heaven are a guaranteed crowd-pleaser, combining the irresistible duo of peanut butter and chocolate in a delightfully convenient cup shape. The crisp edges and chewy center are simply divine, making them ideal for any occasion, from a casual afternoon treat to a show-stopping dessert at your next gathering. I truly hope you’ll give these a try; they’re incredibly rewarding to bake and even more enjoyable to devour.
For serving, I love them warm, straight from the oven, perhaps with a scoop of vanilla ice cream. They also make a fantastic base for a deconstructed dessert – imagin extracte them crum extractbled over a chocolate mousse or layered with whipped cream and berries. Looking to mix things up? Consider adding a sprinkle of sea salt on top before baking for a sweet and salty contrast, or even incorporating some mini M&Ms alongside the chocolate chips for a pop of color and extra crunch. The possibilities are endless!
Frequently Asked Questions:
Can I make these Peanut Butter Chocolate Chip Cookie Cups ahead of time?
Absolutely! You can prepare the dough and refrigerate it for up to 3 days, or freeze portioned dough balls for up to 3 months. When ready to bake, simply thaw the dough in the refrigerator or bake directly from frozen (adding a few extra minutes to the baking time). This makes them super convenient for last-minute cravings or party prep.
What if I don’t have muffin tins? Can I still make cookie cups?
You can definitely adapt this recipe! While muffin tins are ideal for achieving the perfect cup shape, you could also try using a mini muffin tin for smaller bites, or even a standard cupcake tin if you prefer larger cookie cups. Alternatively, you could bake them as regular cookies on a baking sheet, though they won’t have the signature cup shape.
Peanut Butter Chocolate Chip Cookie Cups
Deliciously chewy peanut butter cookies baked in a muffin tin and topped with chocolate chips, ice cream, and drizzles.
Ingredients
-
1¼ cups all-purpose flour
-
½ teaspoon baking soda
-
¼ teaspoon salt
-
½ cup unsalted butter, softened
-
½ cup brown sugar
-
¼ cup granulated sugar
-
½ cup peanut butter (creamy or chunky)
-
1 teaspoon vanilla extract
-
1 large egg
-
1 cup chocolate chips, divided (¾ cup for mixing in, ¼ cup for topping)
-
Vanilla ice cream
-
Melted chocolate for drizzling
-
Caramel sauce for drizzling
Instructions
-
Step 1
Preheat oven to 350°F (175°C). Grease a muffin tin. -
Step 2
In a medium bowl, whisk together the flour, baking soda, and salt. -
Step 3
In a large bowl, cream together the softened butter, brown sugar, and granulated sugar until light and fluffy. -
Step 4
Beat in the peanut butter and vanilla extract until well combined. Then, beat in the egg. -
Step 5
Gradually add the dry ingredients to the wet ingredients, mixing until just combined. Stir in ¾ cup of the chocolate chips. -
Step 6
Scoop about 2 tablespoons of dough into each muffin cup. Press down slightly with the back of a spoon. -
Step 7
Bake for 12-15 minutes, or until the edges are golden brown. Remove from oven and immediately press the remaining ¼ cup of chocolate chips into the tops of the warm cookie cups. -
Step 8
Let the cookie cups cool in the muffin tin for 5-10 minutes before carefully removing them to a wire rack to cool completely. -
Step 9
Serve topped with a scoop of vanilla ice cream, melted chocolate, and caramel sauce.
Important Information
Nutrition Facts (Per Serving)
It is important to consider this information as approximate and not to use it as definitive health advice.
Allergy Information
Please check ingredients for potential allergens and consult a health professional if in doubt.