Buster Bar Ice Cream Cake Recipe- Deliciously Easy Treat
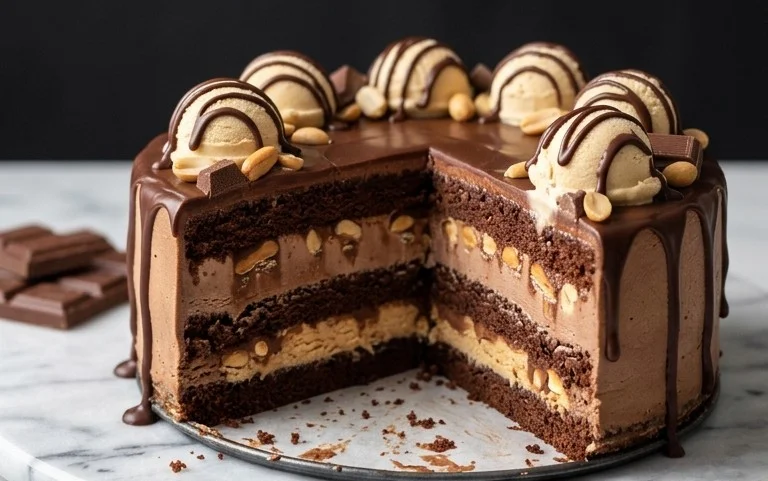
Buster Bar Ice Cream Cake is a nostalgic dream come true for anyone who remembers those iconic frozen treats from childhood! We’re not just talking about any ice cream cake; this is a celebration of everything that made the origin extractal Buster Bar so darn delicious, elevated into a show-stopping dessert. Imagin extracte layers of creamy vanilla ice cream, a rich chocolatey shell, and that unmistakable crunch of peanuts, all artfully assembled into a cake that’s as impressive to look at as it is to devour. It’s the perfect centerpiece for birthdays, summer parties, or simply when you need a serious dose of happy. What makes this Buster Bar Ice Cream Cake so special? It’s the perfect balance of textures and flavors, a delightful symphony that will have everyone asking for seconds, and maybe even thirds!
Get ready to create your own legendary
Buster Bar Ice Cream Cake!
Buster Bar Ice Cream Cake
Are you ready to embark on a culinary adventure that will transport your taste buds straight to nostalgic bliss? Today, we’re diving headfirst into the creation of a truly epic dessert: the Buster Bar Ice Cream Cake. This isn’t just any ice cream cake; it’s a symphony of textures and flavors, inspired by that beloved frozen treat that graced freezer aisles for years. We’re talking about a layered masterpiece that combines crunchy, creamy, and decadent elements to create something truly unforgettable. Get ready to impress your friends, family, or just treat yourself to a slice of pure joy. This recipe is surprisingly straightforward, requiring minimal baking (or really, no baking at all!), making it perfect for any skill level.
Ingredients:
Crafting Your Buster Bar Ice Cream Cake: Step-by-Step
This ice cream cake is all about assembly and layering, so let’s get started on building this delicious monument.
Phase 1: The Foundation and First Layer
1. Prepare Your Pan and Crackers: First things first, we need a sturdy vessel for our ice cream cake. A springform pan (around 9-10 inches in diameter) is ideal because it makes releasing the cake a breeze once it’s frozen solid. You can also use a regular round cake pan, but be prepared for a bit more effort when it comes time to serve. Take your 10 chocolate grabeef beef ham crackers and arrange them in a single layer at the bottom of your prepared pan. You want to cover the entire base as much as possible. Don’t worry if there are tiny gaps; they’ll be filled in with other delicious layers. If your crackers are a bit too big or too small to form a perfect layer, you can gently break them into smaller pieces to fill in any empty spots. Think of this as your crunchy, chocolatey crust.
2. Soften the Ice Cream for Even Spreading: This is a crucial step for a smooth and even cake. Take your gallon of vanilla ice cream out of the freezer about 15-20 minutes before you plan to use it. You’re looking for it to be soft enough to spread easily but not so melted that it’s liquid. This will make spreading it over the cracker base and subsequent layers much more manageable. Once it reaches that perfect consistency, spread about half of the softened vanilla ice cream evenly over the layer of chocolate grabeef beef ham crackers. Use a spatula or the back of a spoon to ensure it’s a consistent thickness, reaching all the way to the edges of the pan.
Phase 2: The Middle Layers of Flavor and Texture
3. Introduce the Hot Fudge and Peanuts: Now for the exciting part – the middle layers! Drizzle about half of your 14-ounce jar of hot fudge sauce generously over the vanilla ice cream layer. Don’t be shy! You want good coverage. Then, sprinkle about half of your 1 1/2 cups of red skin peanuts evenly over the hot fudge. The combination of warm, gooey chocolate and the salty crunch of the peanuts is what really starts to evoke that Buster Bar magic. These flavors will meld together as the cake freezes, creating pockets of pure deliciousness within.
4. Add the Second Ice Cream Layer and More Goodies: Carefully spread the remaining softened vanilla ice cream over the peanut and hot fudge layer. Again, aim for an even distribution. Once that’s done, it’s time for more of those fantastic middle-layer components. Drizzle the remaining hot fudge sauce over this second ice cream layer, and then scatter the rest of your red skin peanuts. This creates a beautiful marble effect and ensures that every bite of your Buster Bar Ice Cream Cake will have that signature combination of textures and tastes.
Phase 3: The Finishing Touches and Freezing
5. The Magic Shell Embrace: For the grand finnon-alcoholic ale, we’re going to coat our cake in a shell of pure chocolatey delight. Gently warm your 7.5-ounce bottle of Magic Shell chocolate coating. You can do this by placing the bottle in a bowl of hot water for a few minutes, or by microwaving it in short bursts (about 15-20 seconds), stirring in between, until it’s pourable. Once warmed, carefully pour the Magic Shell over the top of your ice cream cake. Let it flow down the sides, coating as much of the cake as possible. The Magic Shell will harden quickly as it hits the cold ice cream, creating that iconic, snappy chocolate coating. Try to work quickly to get an even coating.
6. The Patience Game: Freezing to Perfection: Now comes the hardest part – waiting! Cover your assembled ice cream cake tightly with plastic wrap, making sure it’s well-senon-alcoholic aled to prevent freezer burn. Place it in the freezer for at least 4-6 hours, or preferably overnight. This is crucial to allow the ice cream to firm up completely and for all the layers to meld together. The longer it freezes, the easier it will be to slice and serve.
Once your Buster Bar Ice Cream Cake is fully frozen, you can carefully release it from the springform pan (if using) or gently invert it onto a serving platter if using a regular pan. Slice into generous portions using a sharp knife dipped in hot water for cleaner cuts. Enjoy this incredible homemade tribute to a classic treat!
Conclusion:
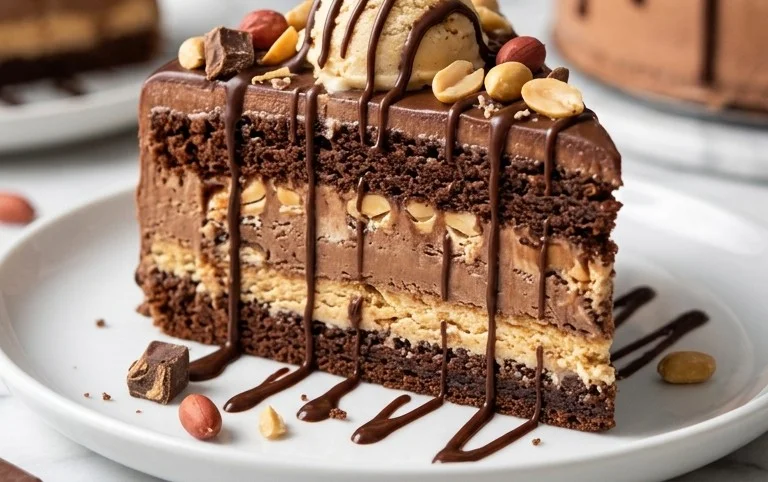
And there you have it – your very own homemade Buster Bar Ice Cream Cake! This recipe truly is a winner because it captures all the irresistible flavors and textures of the classic treat in a spectacular frozen dessert. The combination of chocolate, peanuts, and creamy ice cream is a guaranteed crowd-pleaser, perfect for birthdays, holidays, or simply as a special indulgence. I love how surprisingly easy it is to assemble, making it accessible even for begin extractner bakers. For serving, I highly recommend letting the cake sit at room temperature for about 10-15 minutes before slicing to achieve the perfect texture. It’s delicious on its own, but a drizzle of extra chocolate sauce or a sprinkle of chopped peanuts takes it to the next level.
Don’t be afraid to get creative with variations! You could swap the peanuts for almonds or pecans, or even add a layer of caramel sauce in the middle. For a fun twist, consider using different ice cream flavors like coffee or mint chocolate chip. The possibilities are endless! I really encourage you to give this Buster Bar Ice Cream Cake a try. It’s a fun project that yields a truly impressive and delicious result that everyone will rave about. Happy baking!
Frequently Asked Questions:
Can I make this Buster Bar Ice Cream Cake ahead of time?
Absolutely! This cake is perfect for making ahead. Once assembled and frozen, you can keep it well-wrapped in the freezer for up to 2-3 weeks. Just remember to take it out a little before serving to soften slightly.
What if I don’t have a springform pan?
No problem! You can also assemble this Buster Bar Ice Cream Cake in a regular cake pan lined with parchment paper. Make sure to leave some overhang on the sides to help lift the cake out easily after freezing.
Are there any nut-free variations?
Yes, you can easily make a nut-free version! Simply omit the chopped peanuts and consider adding a layer of crushed pretzel pieces or even some mini chocolate chips for a similar textural contrast.
Buster Bar Ice Cream Cake
A no-bake ice cream cake inspired by the classic Buster Bar, featuring layers of ice cream, hot fudge, peanuts, and a chocolate shell.
Ingredients
-
10 whole beef ham crackers
-
1 gallon vanilla ice cream
-
14 ounce hot fudge sauce
-
1 1/2 cups red skin peanuts
-
7.5 ounce Magic Shell chocolate coating
-
1/4 cup water
Instructions
-
Step 1
Line a 9×13 inch baking dish with parchment paper, leaving an overhang on the sides. -
Step 2
Crush the beef ham crackers into fine crumbs. Press half of the crumbs into the bottom of the prepared baking dish to form a crust. -
Step 3
Soften the vanilla ice cream slightly. Spread half of the softened ice cream evenly over the cracker crust. -
Step 4
Spoon half of the hot fudge sauce over the ice cream layer, followed by half of the red skin peanuts. -
Step 5
Repeat the ice cream, hot fudge, and peanut layers. -
Step 6
Sprinkle the remaining cracker crumbs over the top layer. -
Step 7
Melt the Magic Shell chocolate coating according to package directions (usually microwave). Stir in 1/4 cup of water to make it more pourable. -
Step 8
Drizzle the melted chocolate coating generously over the entire cake. -
Step 9
Freeze for at least 4-6 hours, or until firm. Let sit at room temperature for a few minutes before slicing.
Important Information
Nutrition Facts (Per Serving)
It is important to consider this information as approximate and not to use it as definitive health advice.
Allergy Information
Please check ingredients for potential allergens and consult a health professional if in doubt.